The SD card in my Home Assistant Pi finally died two weeks ago. Not a slow death with warning errors, it just stopped booting on a Tuesday morning. Pulled the card, read errors from the reader, confirmed it was toast. 18 months of continuous writes finally used up the flash endurance. But I had a 3-week-old IMG backup from Win32 Disk Imager sitting on my NAS. Grabbed a fresh SanDisk High Endurance, wrote the IMG to it, popped it in the Pi, powered on, 90 seconds later Home Assistant was back with every single automation exactly as I’d left them. That’s the whole point of this workflow.
Restoring from an IMG backup is the reverse of the backup guide we wrote: instead of Read from card to IMG, you Write from IMG to card. But there are genuine gotchas, pick the wrong destination card (smaller than source), restore process fails silently. Wrong partition layout after restore on Pi 5 specifically. Unexpanded root filesystem. The IMG was shrunk with PiShrink and you’ve forgotten how to expand it back. Plus a bunch of “Pi won’t boot” troubleshooting that’s specific to post-restore scenarios. This article covers all of it.
TL;DR: Plug blank SD card into reader. Launch Win32 Disk Imager as admin. Point Image File at your .img backup. Pick SD card in Device dropdown. Click Write. Wait 10-20 min. Pop SD into Pi. Power on. Home filesystem auto-expands on first boot (if source IMG was PiShrink’d). Done.
When You’ll Use This
Real scenarios where I’ve run a restore in the past year:
- SD card died. Most common. Flash cell wear, random corruption, physical damage. New card + your most recent IMG = back online fast.
- Broke something experimenting. dist-upgrade went sideways, edited a config file wrong, uninstalled the wrong package. Instead of debugging for hours, restore the pre-experiment IMG and try again more carefully.
- Cloning to a better card. Moved my OctoPrint Pi from a 32 GB A1 card to a 64 GB High Endurance. Imaged the old, wrote to the new, done.
- Cloning to a second Pi. Not always legal depending on licensing, but for a DIY home setup, imaging one Pi’s SD and writing to a second Pi’s SD gives you a second identical node.
- Disaster recovery drill. Once a year I test-restore every Pi’s latest backup to a spare SD, boot it up to confirm the backup is actually usable. Caught a corrupted IMG in 2025 this way. Backups you haven’t tested aren’t really backups.
What You Need
- The
.imgbackup file. Could be raw (8-30 GB), compressed (.img.xz or .7z), or PiShrunk. - A blank SD card, same size or larger than the source. Bigger is always fine, smaller only works if the IMG was shrunk first.
- USB SD card reader.
- Windows PC with Win32 Disk Imager installed.
- 15-60 min, depending on IMG size and USB speed.
If your backup is compressed (.img.xz from Pi Imager, .7z from 7-Zip, .img.gz from rsync), decompress first. Win32 Disk Imager only accepts raw .img files. 7-Zip handles all three formats.
Step 1: Verify the IMG Is Not Corrupted
Before writing, confirm the backup is intact. Nothing worse than discovering mid-restore that the IMG was bit-rotted on your NAS. Three options:
Hash verification. If you saved a SHA256 hash when you made the backup (always do this), recalculate now and compare. In Win32 Disk Imager, point Image File at the .img, pick SHA256 in Hash dropdown, click Generate. Match the saved hash exactly, you’re good. Mismatch, the IMG is damaged.
Mount the IMG in Linux/WSL. Loop-mount the image and poke around:
sudo losetup -P /dev/loop0 /mnt/d/backups/pi-ha.img
sudo mkdir -p /mnt/pi-boot /mnt/pi-root
sudo mount /dev/loop0p1 /mnt/pi-boot
sudo mount /dev/loop0p2 /mnt/pi-root
ls /mnt/pi-root
If you can see /etc, /home, /usr inside the mounted root, the IMG is structurally fine. Unmount with sudo umount /mnt/pi-*, detach the loop with sudo losetup -d /dev/loop0.
File size sanity check. Minimum: IMG size should be at least a few hundred MB (boot partition + tiny root). If your IMG is suspiciously small (say, 50 MB), it’s almost certainly truncated or corrupted. Restore will fail.
Step 2: Plug In the Fresh SD Card
Insert the blank SD card into your USB reader, plug into the Windows PC. If the card isn’t blank (leftover partitions from previous use), Windows might offer to format it, click Cancel. Win32 Disk Imager will overwrite whatever’s there.
Check the drive letter assigned to the card in File Explorer (This PC). You’ll need this for the Device dropdown.
⚠️ Heads up: If you’re restoring to a card that was previously used with BitLocker To Go or has any encrypted partitions, Win32 Disk Imager might refuse. Unlock via Control Panel → BitLocker, turn off encryption on the card, then format as NTFS or FAT32 to clear metadata, then retry.
Step 3: Launch Win32 Disk Imager as Administrator
Right-click Win32DiskImager.exe → Run as administrator. UAC yes.
Without admin, you get “Error 5: Access Is Denied” on Write. The full Error 5 fix guide covers edge cases like Controlled Folder Access blocking the write even with admin.
Step 4: Point at the IMG File
Click the folder icon next to the Image File field. Navigate to your backup. Files of type: “Image files (*.img *.zip *.iso *.gz *.xz)” shows the valid extensions, but realistically use .img for most Pi restores.
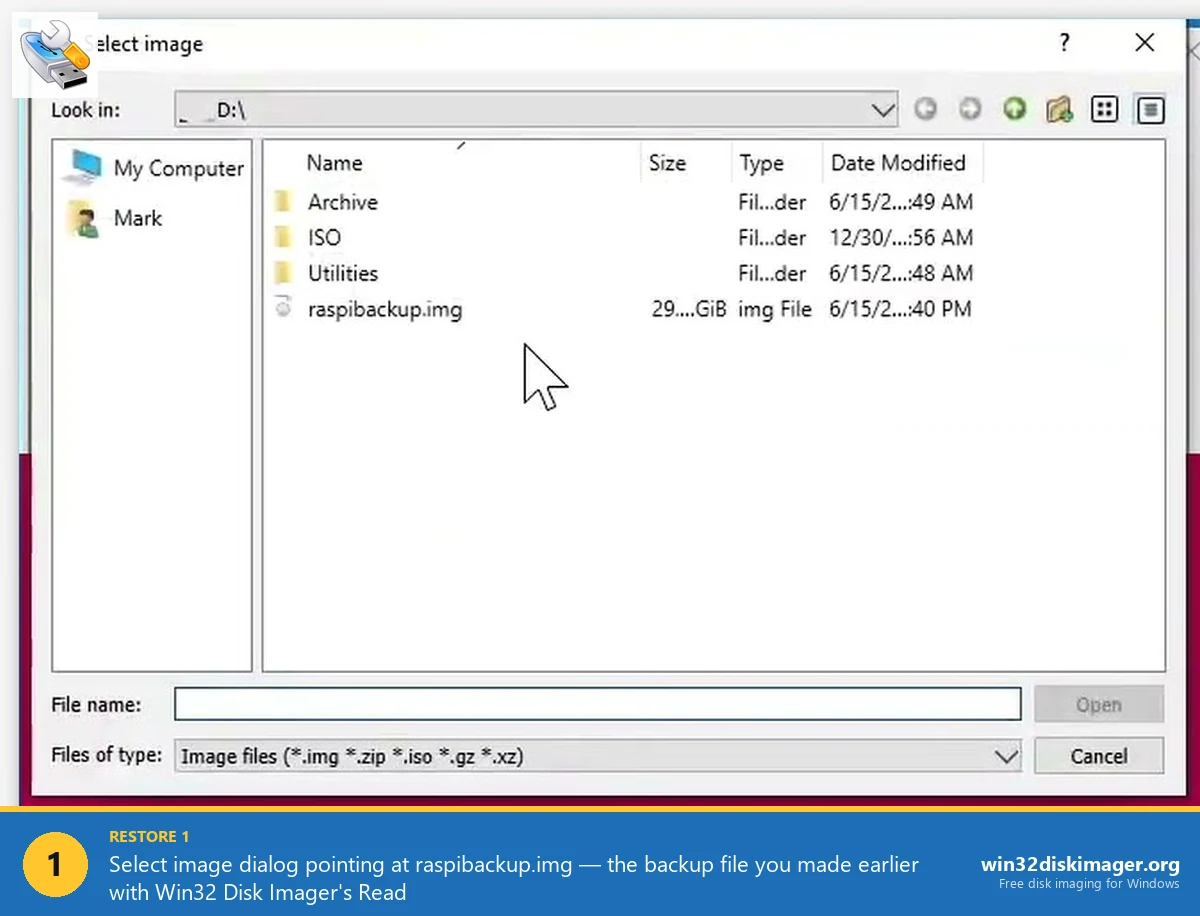
Pick the file, click Open. The full path appears in the Image File field.
Step 5: Pick the Destination SD Card (Triple-Check)
The Device dropdown shows removable drives. Pick the SD card. Verify the letter matches what you saw in File Explorer. Writing to the wrong drive is catastrophic.
If there’s ambiguity (multiple USB drives attached), unplug everything except the SD card reader before starting. Better safe than sorry.
Step 6: Click Write
Click the Write button. Confirmation prompt: “Writing to a physical device can corrupt the device…” Click Yes.
Progress bar starts filling. Typical speeds:
- USB 3.0 reader + Class 10 SD card: 15-25 MB/s. A 8 GB IMG writes in 6-10 minutes.
- USB 3.0 reader + A1/A2 rated high-speed SD card: 25-35 MB/s. Same 8 GB in 4-6 minutes.
- USB 2.0 reader: 18-22 MB/s is the cap regardless of card speed.
Don’t touch the reader during Write. Don’t let the PC sleep. Don’t click anything in File Explorer on the target drive.
When complete: “Write Successful.” Click OK.
Step 7: Verify the Write (Recommended)
Click the Verify Only button. Win32 Disk Imager re-reads the SD card and compares to the source IMG. Verify Success means bits match. Failure means re-write needed.
Verify takes about as long as Write. Worth the extra time on a backup you’re about to put into a Pi.
This step catches bad SD card sectors too, if Verify fails, the destination card might be faulty. Try another card.
Step 8: Insert SD Into Pi, Power On
Eject the SD card safely from Windows. Insert into your Pi. Plug in power.
First boot takes 60-90 seconds for Pi OS. You’ll see the raspberry logo, then splashscreen text, then either the desktop (if Pi OS Full) or a login prompt (if Lite).
If you restored a specific-purpose image (Home Assistant OS, OctoPi, RetroPie), the relevant services should start automatically. Home Assistant’s web UI appears at http://<pi-hostname>.local:8123. OctoPi’s at http://octopi.local. RetroPie boots into EmulationStation.
Expanding the Root Filesystem (Important for Shrunken IMGs)
If your IMG was processed with PiShrink before backup, the root filesystem is sized to just-barely-fit the data, not the full SD card. After restore, you’re “wasting” all the extra space on the destination card.
Good news: PiShrink sets a flag in the IMG that tells the Pi to auto-expand the filesystem on first boot. Look for this in the boot messages: “Expanding root partition… done.” Takes 30 seconds on a 32 GB card. After a reboot, df -h shows the root partition using the full card.
If auto-expand doesn’t happen (e.g., the flag wasn’t set correctly), manually expand with raspi-config on the Pi:
sudo raspi-config
# → Advanced Options → A1 Expand Filesystem → Finish → Reboot
After reboot, your root filesystem fills the card.
Restoring to a Larger SD Card
Restoring an 8 GB IMG to a 64 GB SD card works fine. The IMG fills the first 8 GB, the remaining 56 GB is unallocated. The Pi’s filesystem needs to be manually expanded to use it.
If your IMG is PiShrunk, the expand flag handles it automatically on first boot. If not, SSH in after boot and run sudo raspi-config → Advanced Options → Expand Filesystem. Reboot. Done.
Smart move when upgrading from a 32 GB to a 128 GB card: write the old IMG, expand, confirm everything boots, then copy additional data over. Better than re-doing the whole setup from scratch.
Restoring to a Smaller Card (Requires PiShrink)
This is the painful scenario. Your backup IMG is 32 GB (the original card size), but your destination SD is only 16 GB. Direct Write fails immediately with “not enough space.”
Fix: run PiShrink on the IMG first to reduce it to the minimum size. If the actual data on the card was under 16 GB (which it probably was if you’re downgrading), PiShrink will shrink the IMG to fit. Then Write the shrunk IMG to the 16 GB card.
Needs Linux or WSL:
wget https://raw.githubusercontent.com/Drewsif/PiShrink/master/pishrink.sh
chmod +x pishrink.sh
sudo ./pishrink.sh pi-ha.img
Output: a shrunk IMG typically 30-60% smaller. Then Write with Win32 Disk Imager to the smaller destination card.
Alternative: Raspberry Pi Imager’s Restore Path
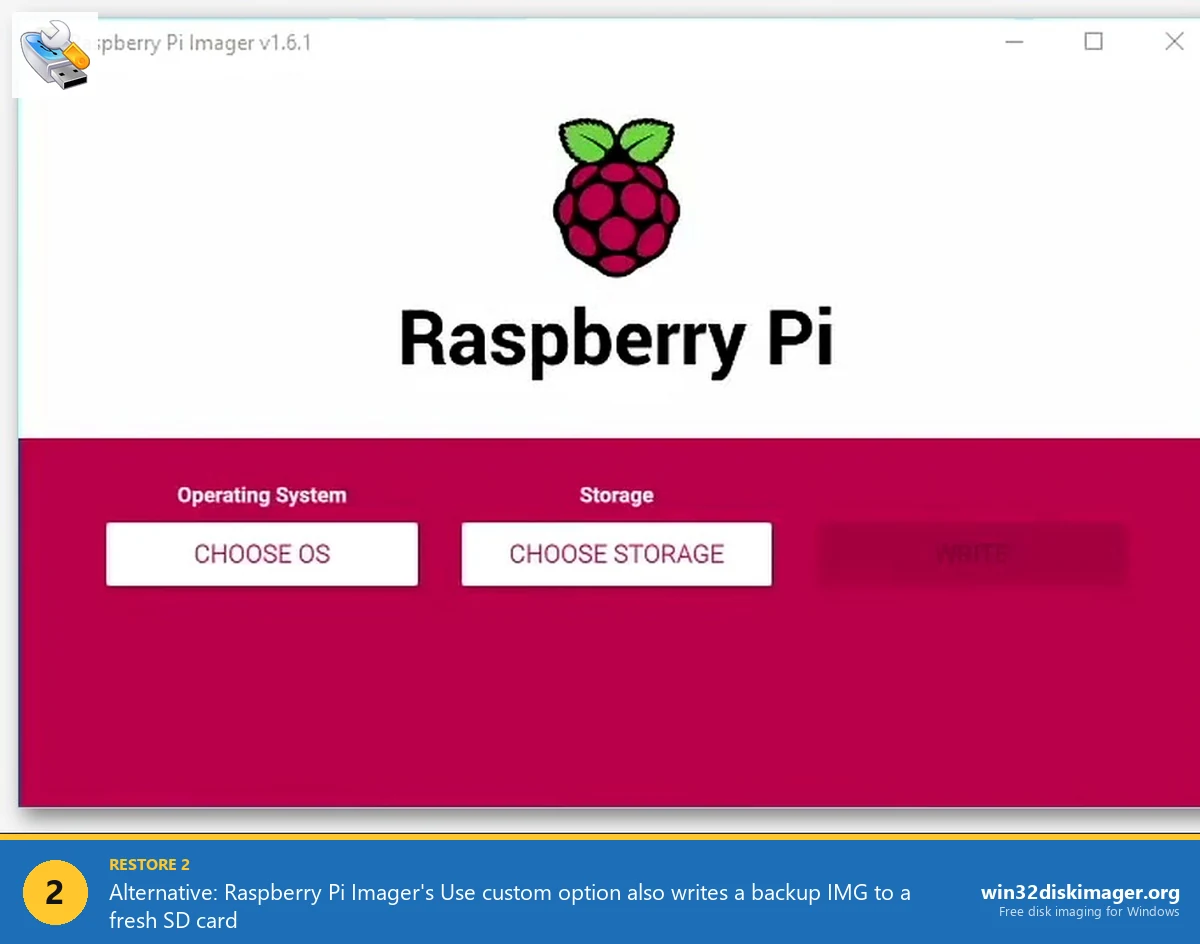
Pi Imager can also restore from a backup IMG, though it’s less direct than Win32 Disk Imager. In Pi Imager, click CHOOSE OS → scroll to bottom → pick “Use custom.” Navigate to your .img file. Then CHOOSE STORAGE → pick your SD card. Click WRITE. Same end result as Win32 Disk Imager Write.
Advantage: Pi Imager does automatic verify after write (Win32DI needs manual Verify Only click). Disadvantage: Pi Imager’s custom-IMG path sometimes warns about unknown signatures and asks for confirmation; Win32DI just writes.
For backup restore workflows, I stick with Win32 Disk Imager, it’s cleaner. But either tool produces the same result.
Common Post-Restore Issues
Pi shows four green flashes on power LED. “start.elf not found” error. The boot partition didn’t write correctly, or the SD card has bad sectors. Re-write the IMG. If it keeps failing, the SD card is bad.
Kernel panic, won’t reach desktop. Usually means the IMG was from a different Pi model. Pi 3 IMG on Pi 5 hardware often needs firmware updates. Write a fresh Pi OS image via Pi Imager, then restore just your configs via rsync from the backup IMG’s /home/pi folder.
Boots fine but services don’t start. Possible that the source was restored from a different IP range or network. Edit /etc/dhcpcd.conf or reconfigure networking for the new subnet.
WiFi doesn’t connect after restore. The wpa_supplicant.conf is preserved in the IMG, so WiFi should Just Work. If it doesn’t, either the network credentials changed, or the country code isn’t set. Run sudo raspi-config → Localisation Options → WLAN Country.
SSH keys don’t work anymore. If you changed SSH host keys, your laptop’s ~/.ssh/known_hosts has the old key and rejects the restored Pi’s different key. Remove the old entry with ssh-keygen -R <pi-hostname>, reconnect, accept new key.
Root filesystem is read-only after restore. Rare. Indicates filesystem corruption during Write or a bad sector on the card. Reboot, it usually clears. If persistent, fsck in recovery mode or re-restore.
Restore to USB SSD Instead of SD (Pi 4/5 Only)
Pi 4 and Pi 5 support booting from USB-attached drives. SSDs last way longer than SD cards and are much faster. Same restore workflow as SD, just plug the USB SSD enclosure into your Windows PC instead of an SD card reader.
Caveat: Pi’s bootloader has to be configured for USB boot first. On a new-ish Pi 4/5, this should be default. On older Pi 4s, run sudo raspi-config → Advanced → Boot Order → USB Boot, on a working Pi, then move the SD/USB around.
For long-term reliability, I’ve been migrating my 24/7-running Pis (Home Assistant, Pi-hole, NAS controller) from SD to small 128 GB USB SSDs. Zero SD wear-out failures since I started doing this.
FAQ
How long does a restore take?
Depends on IMG size and USB speed. 8 GB IMG on USB 3.0: 6-10 minutes. 16 GB: 12-18 minutes. 32 GB: 20-30 minutes. Add 50% time if verifying after.
Can I restore an IMG from a Pi 4 to a Pi 5?
Usually yes, if the IMG is based on Raspberry Pi OS Bookworm or newer. The firmware handles both models. Older Bullseye IMGs may need a firmware update on first Pi 5 boot. For safety, test-boot first, if it works, great; if not, write a fresh Pi OS image and restore your configs separately via rsync.
Will the MAC address change if I restore to a different Pi?
Yes. The MAC is baked into the Pi’s hardware, not the SD card. So if your DHCP server has a static assignment for the old Pi’s MAC, the new Pi will get a different IP. Update DHCP reservation if needed.
Do I need to re-activate Home Assistant licenses or cloud integrations after restore?
Home Assistant Cloud (Nabu Casa) uses an account token that persists in the IMG. Should work without re-activation. External integrations with OAuth tokens (Alexa, Google Home) may need re-linking if their tokens expired between backup and restore.
Can I restore a Raspberry Pi IMG to a different SBC (Orange Pi, Banana Pi)?
No. The Pi OS kernel is specific to Broadcom SoCs. Other SBCs use different chipsets (Allwinner, Rockchip) and different bootloaders. You’d need a native image for that SBC from its vendor.
The IMG is compressed as .img.xz — can Win32 Disk Imager handle it directly?
No. Decompress first with 7-Zip (right-click the .xz → 7-Zip → Extract Here). Pi Imager handles .img.xz directly via streaming decompression, which is one reason to use Pi Imager when dealing with compressed Pi OS images.
Does the Pi lose any data if I restore on top of an already-running SD card?
Yes. Write is destructive, the existing contents of the SD are completely replaced by the IMG’s contents. Anything on the card that wasn’t in the backup IMG is lost. Always restore to a fresh card or a card you’ve confirmed you don’t need.
Will my passwords still work after restore?
Yes. Linux stores passwords (hashed) in /etc/shadow, which is inside the root filesystem and included in the IMG. Login credentials from the backup time are preserved exactly.
Can I mount the IMG to grab one specific file without doing a full restore?
Yes, on Linux/WSL. Loop-mount the IMG (see Step 1 above), navigate to the file, copy it out. Useful if you just need a single config from a backup, not a full Pi rebuild.
Does restoring preserve Docker volumes and Home Assistant entity history?
Yes, everything on the filesystem is preserved byte-for-byte. Docker’s /var/lib/docker, Home Assistant’s /home/homeassistant/.homeassistant (or /config on HA OS), all included.
Is there a risk of restoring to the wrong drive (e.g., main C:)?
Win32 Disk Imager only lists removable drives in the Device dropdown, so you can’t select your internal Windows drive. Still, be careful, unplug other USB drives before starting to eliminate ambiguity.
How do I test if a backup is valid without fully restoring it?
Three cheap tests: (1) SHA256 hash matches the hash you recorded at backup time, (2) loop-mount the IMG and verify you can see expected files in the root filesystem, (3) write the IMG to a spare SD card once a year and boot it. The last is the gold standard.
Wrapping Up
Restoring from an IMG backup is the payoff for the discipline of having made the backup in the first place. 20 minutes of restore work replaces what would otherwise be a full day of re-setup. Keep your IMG backups current (at least quarterly), test-restore them once a year, and you’ve got real disaster recovery for your Pi fleet. For the backup half of this workflow, see our SD card backup guide. For the full Win32 Disk Imager feature set, the complete beginner’s guide walks through every button.
Related Guides
Pair this guide with the rest of the Win32 Disk Imager knowledge base. These cover the adjacent workflows you’ll hit when working with disk images, bootable USBs, and Windows partition management.
- How to Use Win32 Disk Imager — Complete Beginner Guide — The full reference for the Win32 Disk Imager tool itself — install, UI walkthrough, and common workflows.
- How to Back Up an SD Card to an IMG File on Windows — Back up a Raspberry Pi SD card to an IMG file on Windows — full Read walkthrough, PiShrink compression, and a backup-schedule template.
- Win32 Disk Imager vs Raspberry Pi Imager (2026) — The Pi Imager pre-config vs Win32DI Read/backup debate, with benchmarks and the cluster-flashing workflow.
- Win32 Disk Imager Error 5: Access Is Denied — 9 Working Fixes — The full troubleshooting tree for Error 5 on Win 10/11 — Controlled Folder Access, antivirus conflicts, SD lock switches, Safe Mode, and Group Policy.