My Home Assistant Pi 4 has been running for 18 months. Zigbee2MQTT with 47 devices paired. Frigate NVR with four cameras. Node-RED flows I’ve tweaked at 2am in three different time zones. The SD card is a SanDisk Ultra 32 GB that’s probably done 400 GB of writes by now and is starting to throw the occasional I/O error in journalctl. I need to image this card to a .img file before it dies, because recreating this setup from scratch would take me a full weekend.
Backing up an SD card on Windows is what Win32 Disk Imager was built for. You pop the card into a USB reader, point the tool at a destination file, click Read, and 15 minutes later you’ve got a byte-for-byte copy of everything on that card, boot sector, partition table, filesystem, all the configs, all the data. Restore to any blank same-size or larger SD and your Pi boots up as if nothing happened. This is the guide for doing that properly, including the bit where you shrink the resulting IMG so it’ll fit on a smaller card next time.
TL;DR: Shutdown the Pi. Pop SD card into USB reader on Windows PC. Launch Win32 Disk Imager as admin. Type backup path in Image File (e.g. E:\backups\pi-ha-2026-04-20.img). Pick SD card from Device dropdown. Tick Read Only Allocated Partitions. Click Read. Wait 10-30 min. Done, that .img is your complete SD card snapshot.
Why Back Up an SD Card?
Three realistic reasons:
- SD cards wear out. Flash memory has a finite write-cycle count. Budget cards (A1, Class 10, no endurance rating) typically survive 1-2 years of continuous use in a Pi. Industrial/endurance cards (SanDisk High Endurance, Samsung PRO Endurance) last 3-5 years. Every SD card will eventually fail. When it does, you want a backup.
- Before a risky update. dist-upgrade on Pi OS can occasionally brick a setup, especially when Debian base version changes (Bookworm → Trixie coming soon). Image your card before running it.
- Cloning to a new card. You bought a bigger card, or a faster one, or an industrial endurance one. You want your working config on the new card. Imaging + restoring is the fastest path.
There’s also a fourth, “you broke something and need to revert.” Rolled back to a known-good image after a failed OS upgrade: saved my ass twice on the Home Assistant Pi alone.
What You Need Before You Start
- A Windows 10 or 11 PC with at least the SD card’s capacity in free disk space (32 GB SD = 32 GB free space minimum, though we’ll cover compression below).
- A USB SD card reader, or a laptop with a built-in SD slot. Budget reader like a $10 UGREEN USB 3.0 reader works fine. Avoid cheap 5-in-1 combo readers, they’re slow.
- Win32 Disk Imager installed.
- The SD card you want to back up (obvious, but people forget to shut the Pi down cleanly first).
- 15-60 minutes of patient waiting, depending on SD card size and USB speed.
⚠️ Heads up: USB 2.0 readers cap out at about 30 MB/s. USB 3.0 readers hit 80-120 MB/s. If you’re doing this regularly, the $10 upgrade to a USB 3.0 reader saves minutes per backup and is absolutely worth it.
Step 1: Shut Down the Pi Cleanly
You cannot image a live SD card. The filesystem has to be unmounted and consistent. Pulling the card while the Pi is running gives you a corrupted backup that may or may not boot.
SSH into the Pi, run:
sudo shutdown -h nowWait for the Pi’s activity LED to go solid or off (usually 10-15 seconds). Then pull the power. Now pop the SD card out.
If the Pi is unreachable (kernel panic, network dead), just pull power and hope for filesystem consistency. Most modern Pi OS setups use ext4 with journaling, which survives abrupt shutdown gracefully ~95% of the time. Worth imaging even if it’s “dirty”, you can fsck the image after.
Step 2: Insert the SD Card Into Your Windows PC
Plug the USB reader in first, then insert the SD card. Wait for Windows to detect it.
You’ll get a familiar surprise: Windows pops up “You need to format the disk in drive X: before you can use it.” That’s because Windows can’t natively read ext4 filesystems (which is what your Pi’s root partition uses). Click Cancel. Do not format. The card is fine, Windows just can’t see into the main partition. Win32 Disk Imager reads raw bytes and doesn’t care that Windows can’t understand the filesystem.
You’ll also see the boot partition (usually the first ~256 MB of the card) mount with a drive letter, because that partition is FAT32 which Windows handles fine. Ignore it.
Step 3: Launch Win32 Disk Imager as Administrator
Right-click the Win32 Disk Imager icon → Run as administrator. UAC prompt, Yes.
If you skip admin, you’ll hit “Error 5: Access Is Denied” on Read (we have a full Error 5 fix guide for that). Admin is required for raw disk reads.
The main window appears with six controls. This is where you’re about to do the work.
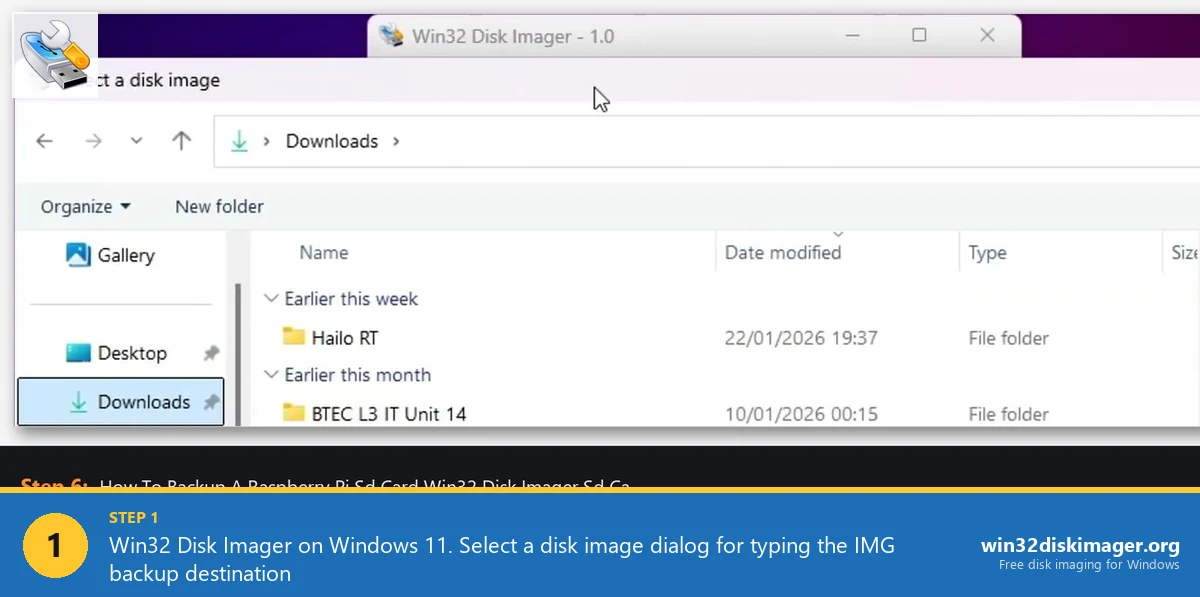
Step 4: Specify the Image File Destination
Click the small folder icon next to the Image File text field. A Save dialog opens.
Navigate to where you want the backup saved. Recommended: a dedicated D:\backups\ folder, not Desktop (faster, avoids OneDrive sync issues), not the C: drive if you’re tight on space.
File name convention I use: [device-name]-[date].img. Examples:
pi-ha-2026-04-20.img(Home Assistant Pi, April 20 2026)pi-octopi-2026-03-15.img(3D printer control Pi)pi-retropie-initial.img(fresh RetroPie install, no date, it’s the baseline)
The extension must be .img. Type it explicitly in the filename, Windows doesn’t always add it. Click Save.
Step 5: Pick the Correct Device
This is the step where people destroy data. Triple-check.
The Device dropdown in Win32 Disk Imager shows every removable drive by letter. Your SD card will be something like [E:\], [F:\], [G:\] depending on what else is plugged in. It’ll be the drive that just popped up when you inserted the card.
To verify: open File Explorer, look at This PC. Your SD card’s boot partition will have a drive letter and usually “boot” as its label. That letter is what you want in the Device dropdown. If there’s ambiguity, unplug every other USB drive before starting.
⚠️ Heads up: Never pick a Device that’s your internal C: or D: drive, that’s your Windows install. In practice Win32 Disk Imager refuses to show those (shows only removable drives), but mental model: only pick a letter corresponding to your SD card’s boot partition.
Step 6: The “Read Only Allocated Partitions” Checkbox (Important!)
This is the checkbox most tutorials skip over, and it’s huge. Tick it.
By default, Win32 Disk Imager reads every sector of the card, including the empty space. So a 32 GB SD card with 5 GB of data used produces a 32 GB .img file, the unused 27 GB is zeroes (or random leftover data).
With “Read Only Allocated Partitions” ticked, Win32DI reads only the allocated partitions (up to the end of the last allocated partition). So that same card produces maybe a 6-8 GB .img instead of 32 GB. Faster Read, smaller file, easier to store and transfer.
Caveat: the resulting image won’t be writable back to a card smaller than the original allocated-partitions size. That’s fine 99% of the time, you’re restoring to the same card or bigger.
This feature was added in Win32DI 0.9.5 and has been default behavior many users don’t know exists. Always use it unless you have a specific reason to image empty space too (forensics, say).
Step 7: Click Read and Wait
Click the Read button. Confirmation prompt: “This action is being performed on a physical device…” Yes.
The progress bar starts filling. The transfer rate in the bottom-left shows throughput (typically 15-30 MB/s on USB 3.0 SD readers). The ETA in the bottom-right estimates time remaining.
For a typical 32 GB SD card with ~8 GB allocated: expect 8-15 minutes on USB 3.0, 20-30 minutes on USB 2.0.
During Read, don’t do anything else with the SD card. Don’t open File Explorer windows pointing at it, don’t try to eject it, don’t unplug the USB reader. Just wait.
When it’s done you get “Read Successful” with a file-size summary. Click OK. You now have an IMG backup.
Step 8: Verify the Backup (Recommended)
Optional but I always do this: click the Verify Only button. It re-reads from the SD card and compares to the IMG file. If they match, Verify Success. If not, something went wrong during Read (unlikely but possible on flaky SD cards).
Verify takes roughly the same time as the original Read. Worth the 10 minutes for peace of mind on a backup you might rely on in a year.
Alternatively, in the Hash dropdown pick SHA256, click Generate. Win32DI calculates the hash of the IMG. Save that hash (copy it to a text file next to the .img). Later, you can recalculate the hash to check the .img hasn’t been corrupted on disk.
Shrinking the IMG File (Save Disk Space)
Even with “Read Only Allocated Partitions” ticked, your IMG includes empty space inside the allocated filesystem (unused clusters in the ext4 root partition, for instance). For a 32 GB SD card with maybe 6 GB actually in use, you’ll get an 8-10 GB IMG.
You can compress this further using:
7-Zip compression. Right-click the .img → 7-Zip → Add to archive → Archive format: 7z, Compression level: Ultra. This compresses an 8 GB IMG down to maybe 1.5-2.5 GB. Takes 5-10 minutes. Resulting .7z is portable, backups stack well on NAS/cloud.
PiShrink (Linux-side). The gold-standard tool. Resizes the IMG’s partition to the smallest size that fits the data, not just compressing but actually shrinking the filesystem. You need a Linux machine or WSL2 to run it. From the PiShrink GitHub:
wget https://raw.githubusercontent.com/Drewsif/PiShrink/master/pishrink.sh
chmod +x pishrink.sh
sudo ./pishrink.sh pi-ha-2026-04-20.img
Result: a shrunken .img that’s maybe 2-3 GB, directly writable to any SD card. On first boot, the partition auto-expands to fill the card. Best of both worlds.
The Alternative: SD Card Copier (On-Pi)
Quick note for completeness. Raspberry Pi OS ships a GUI tool called SD Card Copier (in the Accessories menu). It copies the running SD card to a USB-connected SD card in a reader, all from within the running Pi. Good for when you don’t want to shut the Pi down, or when you want a live clone to a backup card you can swap in immediately.
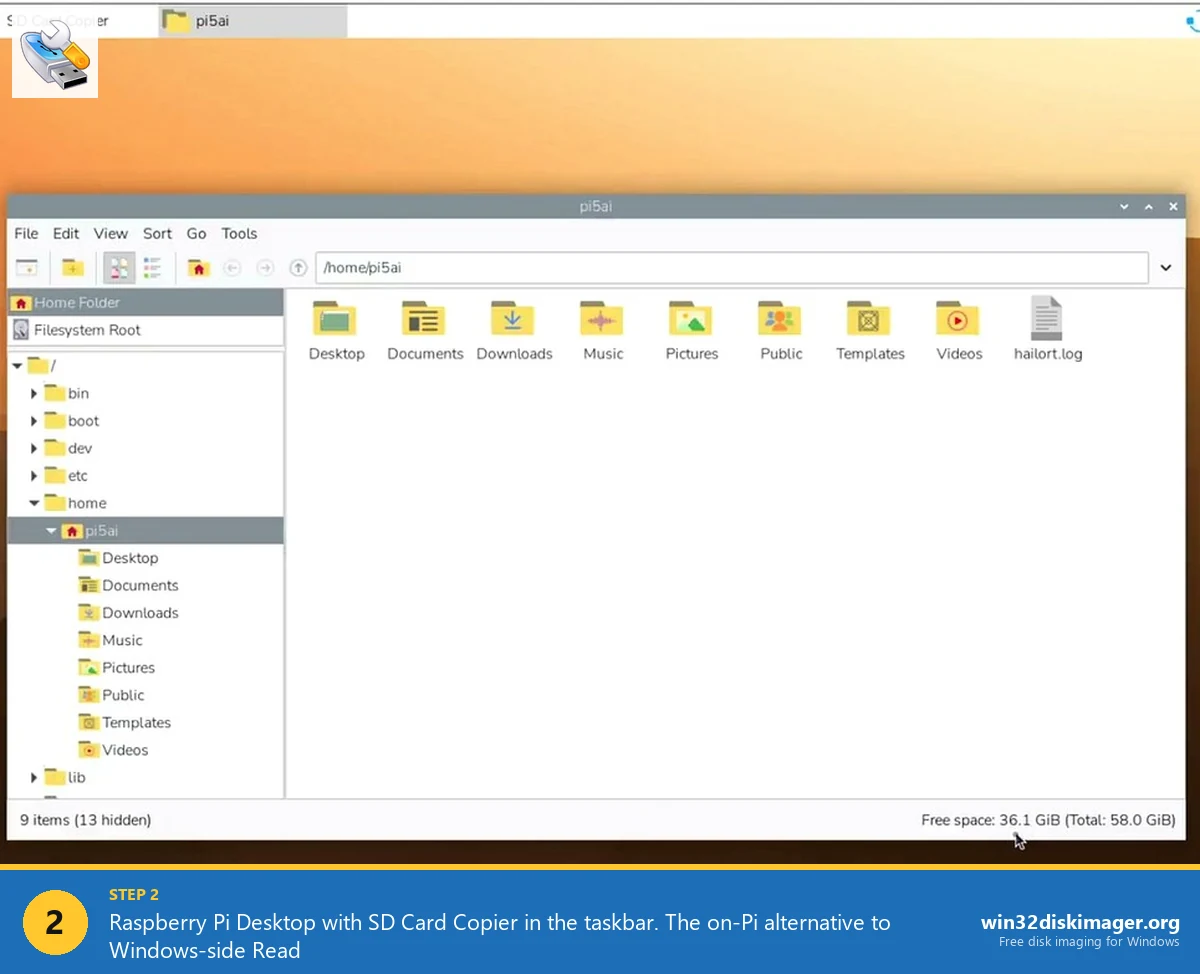
Drawback: it produces a cloned SD card, not an IMG file. You need a second physical SD card and reader. Good complement to Win32 Disk Imager’s IMG backup: use SD Card Copier for in-place clones, use Win32DI for archived IMG snapshots you stash on NAS or cloud.
Backup Schedule I Actually Use
For my home Pi fleet (5 active Pis as of 2026):
- Full IMG backup: once every 3 months. Before any dist-upgrade, definitely. Takes 15 minutes per Pi, stored on TrueNAS pool in a
pi-backups/dataset. - Config-only backup: weekly. Rsync
/etcand/home/pito NAS via SSH cron job. Tiny, fast, covers 80% of what I’d lose. - Golden image: once when each Pi is first fully configured. Preserved forever, labeled “initial”. This is my “start over from zero” fallback.
Three-tier approach: weekly configs, quarterly full IMGs, one-time golden baselines. If any Pi dies, I can be back online in 20 minutes from the most recent quarterly, or hours from the golden.
Common Issues and Fixes
“Access Is Denied” when clicking Read. Classic Error 5. Run as administrator (Step 3). See full Error 5 guide.
Read stalls at the same percentage every time. Bad sector on the SD card. Try a different reader first (hardware issue?). If stalls persist, the card is dying. Image with dd in Linux using conv=sync,noerror to skip bad sectors, Win32DI doesn’t have that mode.
IMG file is smaller than the SD card capacity. That’s expected when “Read Only Allocated Partitions” is ticked. Not a bug.
Resulting IMG won’t write to a new SD card (error “not enough space”). Happens when the destination card is smaller than the source. PiShrink the IMG first, or buy a bigger card.
Read says Success but the backup IMG won’t boot. Rare, but possible if the source SD was already corrupted before imaging. Mount the IMG as a loop device in Linux/WSL and fsck the partitions: sudo losetup -P /dev/loop0 pi.img, then fsck -y /dev/loop0p2.
Storing Backups Safely
A backup you can’t find in 6 months is useless. My convention:
- Local:
D:\backups\pi-{name}\{name}-{YYYY-MM-DD}.img. Keep most recent 3 per Pi. Delete older ones. - NAS: Same structure on the NAS, rsync to it after each quarterly backup. Keep all historical.
- Off-site: Once a year, copy the golden images to Backblaze B2 or Wasabi. Cheap cold storage, disaster recovery.
Storage cost: a 10 GB IMG on Backblaze B2 costs about $0.05/month. Twenty of them for a fleet = $1/month. Effective insurance.
FAQ
How long does imaging a 32 GB SD card take?
Depends on USB reader speed and how full the card is. USB 3.0 reader, full card: 12-15 minutes. USB 2.0 reader, full card: 20-30 minutes. USB 3.0 with “Read Only Allocated Partitions” on a lightly-used card: 3-6 minutes.
Can I back up an SD card while the Pi is running?
Not from Windows, the card has to be unmounted. You can from the Pi itself using SD Card Copier (to a USB-attached backup SD) or dd on the live filesystem, but live dd produces an inconsistent image that may not boot. Always shut down first for reliability.
Will the IMG backup capture everything, including hidden files?
Yes. IMG is a byte-for-byte copy of every sector, there’s no concept of “hidden” at the imaging level. Hidden files, orphaned inodes, filesystem journal entries, all preserved exactly.
How do I restore from an IMG file?
Exactly the reverse: plug in a blank SD card of the same size or larger, launch Win32 Disk Imager, point Image File at the backup .img, pick the SD card in Device, click Write. We have a dedicated Pi restore guide covering the full workflow.
Does an IMG backup include SSH keys and configs?
Yes, everything. SSH keys, fstab, crontab, WiFi credentials in wpa_supplicant, Home Assistant configs, Docker images, the lot. Literally the entire filesystem.
Can I back up an eMMC chip on a CM4 Compute Module the same way?
Yes, but trickier. Use rpiboot to expose the eMMC as USB mass storage, then back up with Win32 Disk Imager like any other removable drive. Raspberry Pi Foundation has a guide at raspberrypi.com/documentation on eMMC boot mode.
Is it safe to copy the IMG file to a NAS or cloud while the Pi is still off?
Absolutely. The IMG is a plain file at that point, treat it like any other large file. Copy, compress, encrypt, upload, whatever. The Pi can be powered back on and the SD reinserted while you’re still uploading.
Does the “Read Only Allocated Partitions” feature work with all Pi OS versions?
Yes. It works with any image that has a valid partition table, which is every Pi OS from Raspbian Jessie through current Bookworm. Only fails on raw-formatted cards without partition tables (extremely rare).
Should I verify the backup with hash before storing long-term?
Yes. Generate SHA256 via Win32DI’s Hash dropdown, save the hash alongside the IMG. A year from now when you need this backup, recalculate and confirm the IMG hasn’t bitrot-ed on storage. Cheap insurance.
Can I encrypt the IMG file for privacy?
Yes. 7-Zip’s “Encrypt file names” option with AES-256 password works great, produces an encrypted .7z. VeraCrypt for a more serious container. For cloud upload, both work, just don’t forget the password.
How often should I back up?
Depends on how much you change on the Pi. For a static setup (OctoPi not currently in use): once at setup, then never. For an active Home Assistant or NAS setup: monthly full IMG, plus weekly rsync of configs. For a Pi that’s actively under development: daily config rsync, weekly full IMG.
Does this work on a Windows PC that’s on an ARM CPU (Snapdragon, M-series via Parallels)?
Win32 Disk Imager is x64/x86 only, runs under Windows’ emulation on ARM. Works fine for SD imaging, just slower than on a native x64 machine. For ARM Windows laptops, balenaEtcher runs natively and does the same job.
Wrapping Up
Imaging an SD card to an IMG file is the single most important Pi maintenance habit you can develop. The card will eventually fail, it’s just a question of whether you’ve got a backup when it does. Fifteen minutes once a quarter saves you hours of setup work when the worst happens. Once you’ve got the IMG saved, the next step is knowing how to restore from it, which we cover in the Pi restore guide. And if you want to understand the full Win32 Disk Imager feature set beyond just Read, the complete beginner’s guide walks through Read, Write, Verify, and Hash together.
Related Guides
Pair this guide with the rest of the Win32 Disk Imager knowledge base. These cover the adjacent workflows you’ll hit when working with disk images, bootable USBs, and Windows partition management.
- How to Use Win32 Disk Imager — Complete Beginner Guide — The full reference for the Win32 Disk Imager tool itself — install, UI walkthrough, and common workflows.
- Write an IMG File to USB with Win32 Disk Imager — Step-by-step for writing a .img or .iso to USB on Windows 10/11 with real benchmarks and error fixes.
- Win32 Disk Imager vs Raspberry Pi Imager (2026) — The Pi Imager pre-config vs Win32DI Read/backup debate, with benchmarks and the cluster-flashing workflow.
- Win32 Disk Imager Error 5: Access Is Denied — 9 Working Fixes — The full troubleshooting tree for Error 5 on Win 10/11 — Controlled Folder Access, antivirus conflicts, SD lock switches, Safe Mode, and Group Policy.
See also: Once you’ve made the backup, the next step is the restore workflow: How to Restore a Raspberry Pi SD Card from IMG.