I installed Raspberry Pi OS on my first Pi (a Pi 2 Model B, 2015) using Win32 Disk Imager. That flash took about 10 minutes over USB 2.0, and I spent another 20 minutes trying to figure out why it wasn’t booting (I’d flashed the wrong .img, a laptop restore image instead of Raspbian). I’ve done 200+ Pi flashes since, and the Win32 Disk Imager workflow hasn’t really changed, it’s still four clicks and a progress bar. But the Pi OS ecosystem around it has evolved significantly: new releases every 6 months, new Pi hardware (Pi 5, Pi Zero 2 W, CM4/CM5), new OS flavors (64-bit Bookworm, Lite for headless, Legacy for Pi Zero W compatibility).
This is the complete 2026 guide for using Win32 Disk Imager specifically to install Raspberry Pi OS on any Pi model, including the choice of which .img variant you want (it matters more than you’d think), the full flash workflow, the post-flash headless boot config (SSH, WiFi, hostname), and the troubleshooting you’ll hit if first boot fails. We’ll also compare to the Raspberry Pi Imager path at the end, because for most users in 2026 Pi Imager is actually the better choice. But for anyone stuck with an older Win 7 machine, offline/air-gapped environments, or flashing custom OS images, Win32 Disk Imager remains the right tool.
TL;DR: Download Raspberry Pi OS .img.xz from raspberrypi.com/software/operating-systems, decompress with 7-Zip, launch Win32 Disk Imager as admin, point Image File at the .img, pick SD card in Device, tick Read Only Allocated Partitions (not relevant on Write but good habit), click Write. 5 minutes later, insert SD into Pi, power on. For headless use, pre-create ssh and wpa_supplicant.conf on the boot partition first.
Which Raspberry Pi OS Version Should You Pick?
More important than the Win32 Disk Imager part. There are multiple Pi OS flavors and picking the wrong one means starting over. As of April 2026, the options are:
- Raspberry Pi OS (64-bit) with desktop and recommended software. The full-fat option. ~2.8 GB download. Has LibreOffice, Chromium, Thonny Python IDE, Minecraft Pi, everything. Pick this for general-purpose Pi use or if you want a graphical desktop.
- Raspberry Pi OS (64-bit) with desktop. Same but without the pre-installed office/education apps. ~1.4 GB. Leaner but still GUI. Good middle ground.
- Raspberry Pi OS Lite (64-bit). Headless-only, no desktop environment. ~800 MB. My default for anything running as a server: Home Assistant, OctoPi base, Pi-hole, NAS controller.
- Raspberry Pi OS (32-bit). For older Pi hardware (Pi 1, Pi 2, Pi Zero W non-2). The 64-bit variants require Pi 3 or newer. Use 32-bit only if your hardware is old.
- Raspberry Pi OS Legacy (Bullseye-based). For apps that broke with the Bookworm upgrade (rare but real). Don’t pick Legacy unless you specifically know your software needs it.
My recommendation: Pi OS Lite 64-bit for 80% of projects. Add desktop later via sudo apt install raspberrypi-ui-mods if you change your mind.
What You Need
- A Windows PC (Win 7 through 11, all work).
- Win32 Disk Imager 1.0.0 installed (~12 MB). Download from the official site.
- A microSD card, 8 GB minimum for Lite, 16 GB minimum for full desktop. Recommended: 32 GB A1 or A2 rated from a reputable brand (SanDisk, Samsung, Kingston). Avoid bargain-bin no-name cards, corruption is common.
- A USB SD card reader (or laptop with built-in SD slot).
- 7-Zip (or similar) to decompress the .img.xz download. 7-zip.org.
- Your Pi model handy so you pick the right OS version.
- About 30 minutes from download to first boot.
Step 1: Download Raspberry Pi OS
Go to raspberrypi.com/software/operating-systems. Scroll to the variant you picked. Click the Download link for “.img.xz” (the compressed image).
Why .img.xz and not the raw .img? The .xz compression shrinks a 2.8 GB image to about 900 MB. Saves bandwidth and download time. You’ll decompress it locally before Win32 Disk Imager can use it.
Current .img.xz checksums are listed on the download page. Worth saving these to verify your download, there are mirror sites that serve modified ISOs and you want to catch those.
⚠️ Heads up: Downloads from raspberrypi.com can be slow from certain regions. If you’re in Australia, India, or South America, expect 10-30 minute downloads. Use a torrent if available, or a regional mirror (raspberrypi.com lists approved mirrors).
Step 2: Decompress the .img.xz
Right-click the downloaded file → 7-Zip → Extract Here. Takes 30-90 seconds depending on CPU.
Result: a plain .img file next to the .xz (something like 2026-03-04-raspios-bookworm-arm64-lite.img). Win32 Disk Imager needs this plain .img, not the .xz.
Delete the .xz afterward if you want to save space, or keep it as a compressed backup of the download.
Step 3: Insert the SD Card
Plug the USB card reader into your PC, insert the SD card. Windows detects it within a few seconds.
If this is a used SD card with existing Pi OS on it, Windows will pop up the “Format disk?” dialog because it sees the ext4 partition. Click Cancel. Win32 Disk Imager will overwrite anyway.
Note the drive letter assigned to the card in File Explorer. You’ll need it for the Device dropdown.
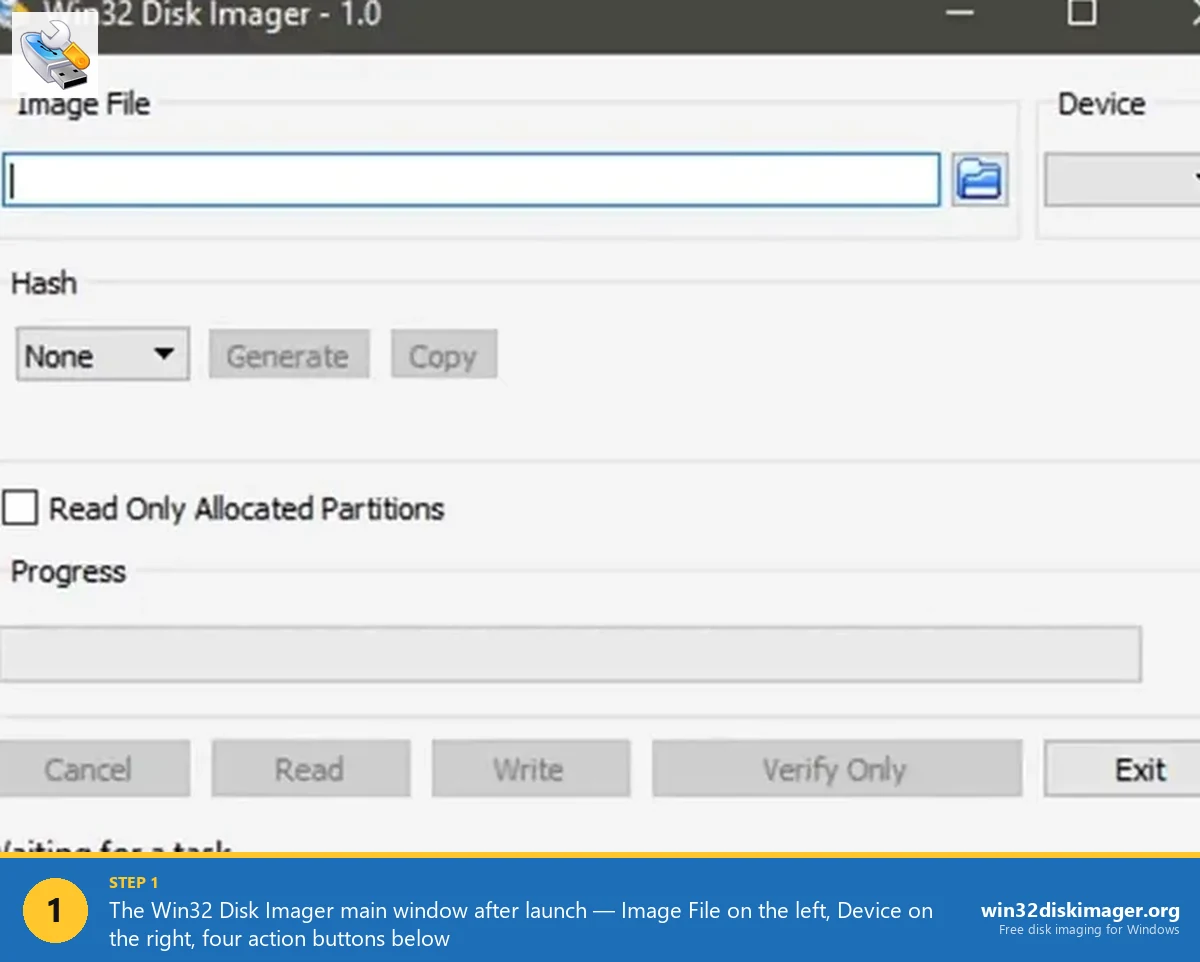
Step 4: Launch Win32 Disk Imager as Administrator
Right-click the Win32 Disk Imager shortcut → Run as administrator. UAC prompt, Yes.
If it fails to open, see our Won’t Open troubleshooting guide. Most common cause on 2026 Windows 11: Google Drive background process.
Step 5: Pick the IMG File and Target Device
Click the folder icon next to Image File. Navigate to your decompressed .img file, click Open.
Device dropdown: pick the drive letter that matches your SD card. Triple-check this. Selecting the wrong letter here wipes something you didn’t want wiped.
Leave Hash on “None” (unless you want to verify the download’s integrity, in which case pick SHA256 and Generate, then compare to the published hash on raspberrypi.com).
Leave “Read Only Allocated Partitions” unchecked for Write operations (it only affects Read).
Step 6: Click Write
Click the Write button. Confirmation prompt: “Writing to a physical device can corrupt the device…” Yes.
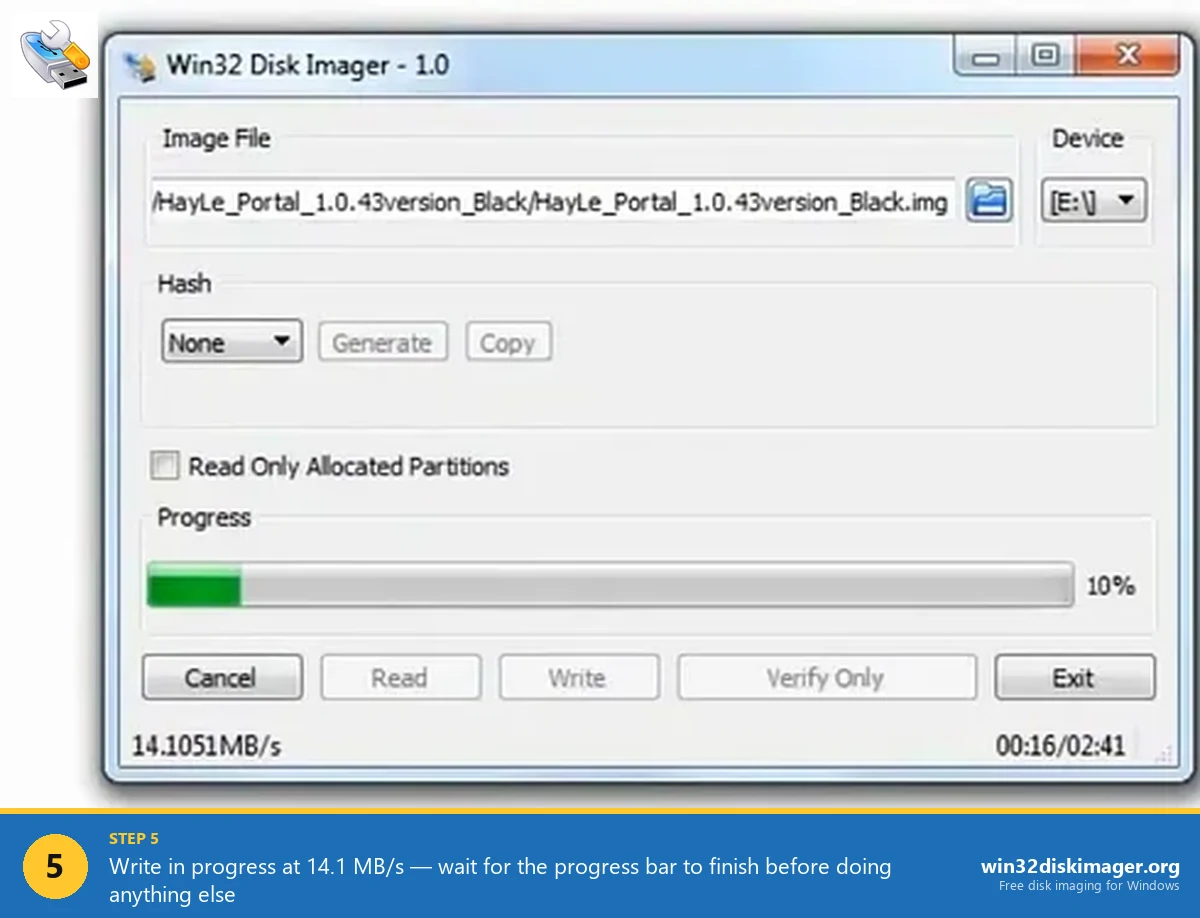
Progress bar starts. Typical speeds:
- USB 3.0 reader + A1 SD card: 20-30 MB/s. 2.8 GB Pi OS image writes in ~2-3 minutes.
- USB 2.0 reader: 15-22 MB/s. Same image: ~3-4 minutes.
- Ultra-cheap reader or old USB port: 10-15 MB/s, 5-8 minutes.
When finished: “Write Successful” dialog. Click OK.
Step 7: Verify (Recommended)
Click the Verify Only button. Takes about the same time as Write. Compares the SD card contents back to the source .img.
Verify Success = you’re good. Verify failure = SD card has bad sectors or the write was interrupted. Either re-write or use a different card.
Skipping verify is fine for most users; it’s an extra 3 minutes of safety. For a Pi you’re going to rely on 24/7, worth the time.
Headless Setup: Configure SSH and WiFi Before First Boot
If you don’t have a monitor/keyboard for the Pi (or don’t want to plug them in), you need to pre-configure SSH access and WiFi before first boot. After Win32 Disk Imager finishes, the SD card has two partitions: boot (FAT32, ~256 MB, Windows can read it) and the root filesystem (ext4, Windows can’t).
Open File Explorer, navigate to the boot drive letter.
Enable SSH: create an empty file called ssh (no extension) in the boot partition root. Windows’ File Explorer tries to add .txt automatically, force no extension by wrapping the name in quotes when you save from Notepad, or create via Command Prompt: echo. > E:\ssh (replace E: with your boot drive letter).
Configure WiFi: create a file called wpa_supplicant.conf in the boot partition root with this content:
country=US
ctrl_interface=DIR=/var/run/wpa_supplicant GROUP=netdev
update_config=1

network={
 ssid="YourWiFiName"
 psk="YourWiFiPassword"
 key_mgmt=WPA-PSK
}
Replace country=US with your ISO country code (GB, DE, IN, etc.). Replace SSID and psk with your actual WiFi credentials.
Pre-configure user: on Bookworm and later, there’s no default “pi” user for security. Create a userconf.txt file with:
yourusername:$6$encryptedpasswordhashGenerate the encrypted hash with openssl passwd -6 on any Linux box, or use Pi Imager’s pre-config (which handles this for you). Without this file, first boot will drop you into an interactive user-creation wizard that requires keyboard/monitor.
Step 8: First Boot
Safely eject the SD from Windows. Insert into the Pi. Plug in power.
Boot process takes 60-120 seconds depending on Pi model:
- Pi 5: ~45 seconds to SSH-ready.
- Pi 4: ~60 seconds.
- Pi 3: ~90 seconds.
- Pi Zero 2 W: ~120 seconds.
- Pi 1 / Zero: 2-3 minutes (slower CPU).
First boot also auto-expands the root filesystem to fill the SD card (adds 30 seconds). Then reboots. Then it’s ready.
SSH in from your main PC: ssh [email protected] (or the Pi’s IP from your router). Default password is whatever you configured in userconf.txt.
Post-Install Essentials
Once you’re in, these are the first things I run on every new Pi:
sudo apt update && sudo apt upgrade -y
sudo raspi-config
# → System Options → Hostname (change it)
# → Localisation → Change Timezone
# → Interface Options → Enable SSH (if not already)
sudo apt install htop neofetch git curl -y
Takes about 10 minutes total for the update + install. Now the Pi is current and has the tools you need to start your actual project.
Also recommend: change the default password if you haven’t already. passwd command. Especially important if the Pi is internet-exposed.
Troubleshooting: Pi Doesn’t Boot
Common first-boot failures and fixes:
Red power LED only, no green activity LED. Either bad SD card, bad power supply, or bad SD reader during flash. Try a different card first. If problem persists, test the power supply (needs 5V 3A for Pi 4, 5V 5A USB-C for Pi 5).
Green activity LED flashes in a 4-flash pattern. “start.elf not found” in the boot partition. The flash didn’t complete properly. Re-write with Win32 Disk Imager, this time Verify afterward.
Green flashes repeatedly but no HDMI output. Boot is happening but no video. Either HDMI cable is bad, or you’re using the wrong HDMI port (Pi 4/5 have two micro-HDMI ports, HDMI 0 is the one closest to USB-C power input).
Boots to desktop but WiFi doesn’t connect. wpa_supplicant.conf syntax error, wrong country code, or wrong credentials. SSH via ethernet first if possible, then debug WiFi.
Can SSH in as pi/raspberry but wanted a different user. Bookworm removed the default pi user. If you got “pi/raspberry” working, you’re actually on an older Bullseye image. Upgrade or re-download Bookworm.
Win32 Disk Imager vs Raspberry Pi Imager for Pi OS Install
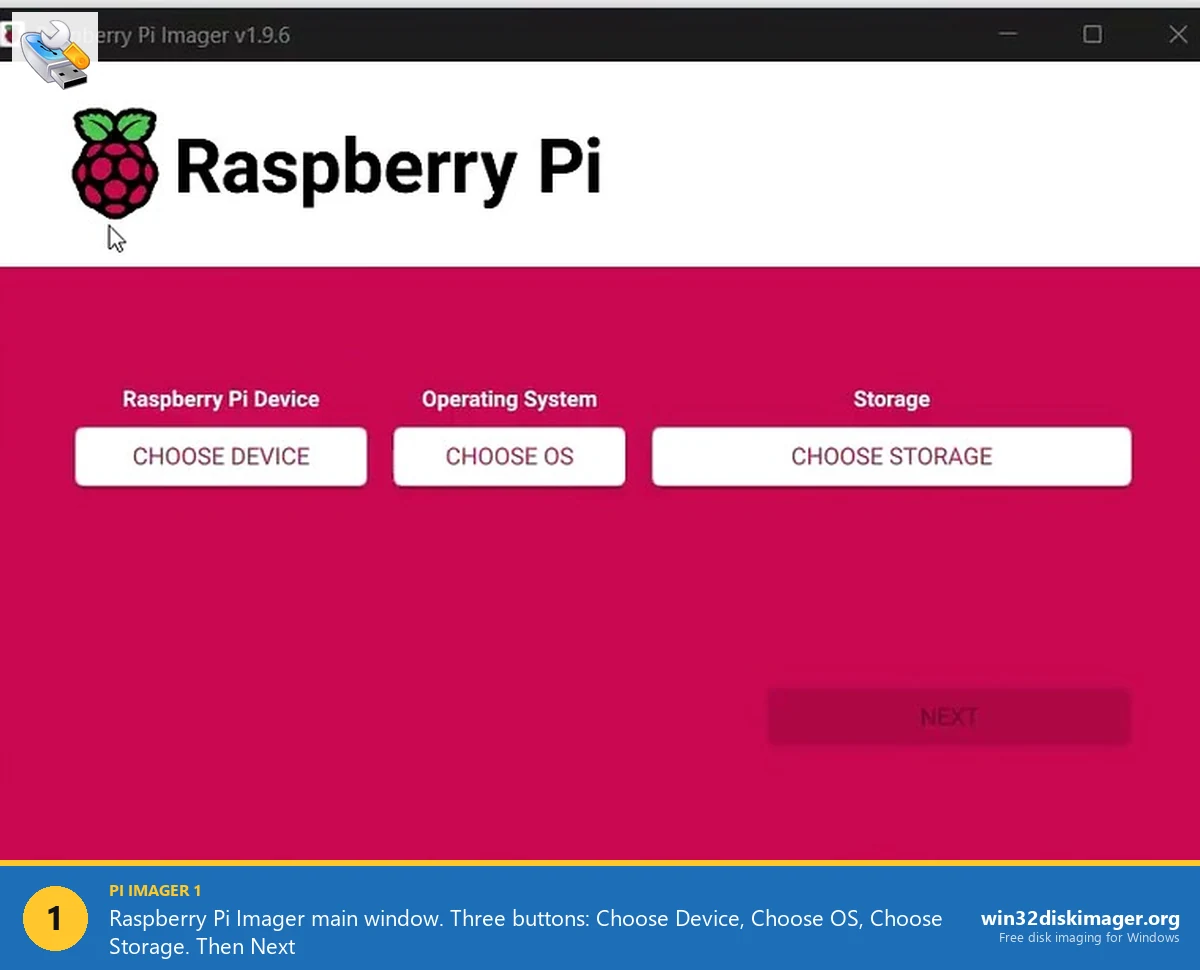
Honest comparison: for first-time Pi OS installs in 2026, Raspberry Pi Imager is the better tool for most users. It handles the .img.xz download and decompression automatically, it has a pre-config screen for SSH/WiFi/hostname (no manual wpa_supplicant.conf file creation), and it auto-verifies.
Win32 Disk Imager is still the right choice when:
- You’re on Windows 7 or 8 (Pi Imager requires Win 10+).
- You’re on a corporate locked-down Win PC that blocks Pi Imager’s install.
- You already have the .img downloaded and don’t want to re-download.
- You’re flashing a custom image not in Pi Imager’s OS list.
- You’re doing backup (Read to IMG), which Pi Imager can’t do.
See our full vs comparison for the detailed breakdown.
Flashing Other Pi-Compatible Images
Win32 Disk Imager works identically for any Pi-based OS image, not just the official Raspberry Pi OS:
- Home Assistant OS: .img.xz from home-assistant.io/installation/raspberrypi. Write with Win32DI, first boot auto-configures.
- OctoPi: Official OctoPrint distribution. Download from octoprint.org/download, decompress, write.
- RetroPie: Emulation setup. retropie.org.uk. Flash, then configure controllers on first boot.
- LibreELEC / Kodi: Media center OS. Download the Pi-specific build from libreelec.tv.
- DietPi: Lightweight alternative to Pi OS. dietpi.com. Very small download, very fast boot.
- Ubuntu Server for Pi: Official Ubuntu. ubuntu.com/download/raspberry-pi. Flash, SSH in, run
ubuntu-server-install. - Manjaro ARM: Arch-based alternative for Pi 4/5. Full desktop build available.
All of these flash with identical Win32 Disk Imager workflow: decompress if needed, Image File → Device → Write. The first-boot config varies per distro (Home Assistant has its own web setup, OctoPi uses octopi-wpa-supplicant.txt, etc.).
FAQ
What SD card size should I buy for Pi OS?
32 GB is the sweet spot for general use. 16 GB is minimum for Pi OS with desktop. 8 GB only works with Lite. 64 GB or 128 GB for media servers or anything storing lots of data. Speed rating: A1 minimum, A2 preferred. Brand: SanDisk Ultra or High Endurance, Samsung EVO/PRO.
Can I use a USB SSD instead of an SD card?
Yes, on Pi 4 and Pi 5. Same flash workflow, just connect the SSD via USB enclosure to your Windows PC, write the Pi OS image to it, then plug the SSD into the Pi’s USB 3 port. Pi needs to have USB boot enabled first, which is default on new Pi 4/5 firmware. USB SSD lasts much longer than SD and is ~10x faster.
How often should I re-flash my Pi OS?
Rarely. Pi OS handles in-place updates via apt for 99% of changes. Re-flashing is only needed for major version upgrades (e.g., Bullseye → Bookworm) or when the card is corrupted. For Pi OS releases every 6 months, you can either re-flash or run sudo apt full-upgrade, I prefer re-flash for clean-slate upgrades, apt for incremental.
Does Win32 Disk Imager support .img.xz files directly?
No, you need to decompress first with 7-Zip. Pi Imager does support .img.xz natively. This is a minor usability advantage for Pi Imager.
Can I flash Pi OS to an SD card on a Mac instead?
Yes, but not with Win32 Disk Imager (Windows-only). On Mac, use balenaEtcher or dd from Terminal. See our Etcher comparison for the Mac workflow.
Will old Pi 1 / Pi Zero images boot on a Pi 5?
Probably not. Pi 5 requires firmware in the boot partition that older images don’t have. Flash a current Pi OS (2024 or later release) and it’ll work on Pi 1 through Pi 5.
Why does my flash keep failing with “Error 5: Access Is Denied”?
Standard Error 5 causes on Windows 11: not running as admin, Controlled Folder Access blocking, antivirus interference, SD card lock switch. See our full Error 5 fix guide for all 9 fixes.
How do I change the Pi’s hostname after boot?
SSH in, run sudo raspi-config, System Options → Hostname. Or directly: sudo hostnamectl set-hostname newname and edit /etc/hosts. Reboot. Pi is now accessible as newname.local.
Can I make a backup of my working Pi install?
Yes, that’s the Read function in Win32 Disk Imager. See our SD card backup guide for the full Read-to-IMG workflow.
What if my Pi won’t finish boot and just sits at the rainbow splash?
Usually incompatible OS version (32-bit image on Pi 4 with Pi 5 firmware, or Bullseye image on Pi 5 which needs Bookworm). Re-download the latest Pi OS for your Pi model, re-flash.
Does Win32 Disk Imager work with Raspberry Pi Compute Module (CM4/CM5)?
For eMMC-based CM4/CM5, you need to use the Pi’s rpiboot tool to expose the eMMC as a USB drive first, then Win32 Disk Imager writes to it like any other removable drive. Documented at raspberrypi.com/documentation.
Can I install Pi OS on multiple SD cards at once?
Not with Win32 Disk Imager, it does one card at a time. balenaEtcher supports multi-drive flash if you need to batch-flash 3-5 cards simultaneously.
Wrapping Up
Win32 Disk Imager is still a perfectly valid way to get Raspberry Pi OS onto an SD card in 2026, especially if you’re comfortable with the headless-setup file-creation workflow (ssh, wpa_supplicant.conf, userconf.txt). For first-time Pi users, Pi Imager’s pre-config screen is the friction-free path. Both produce working SD cards. Pick based on your comfort level, and if you’re going to be running a Pi long-term, don’t forget to grab Win32 Disk Imager backups of the working install before the SD card wears out.
Related Guides
Pair this guide with the rest of the Win32 Disk Imager knowledge base. These cover the adjacent workflows you’ll hit when working with disk images, bootable USBs, and Windows partition management.
- How to Use Win32 Disk Imager — Complete Beginner Guide — The full reference for the Win32 Disk Imager tool itself — install, UI walkthrough, and common workflows.
- How to Back Up an SD Card to an IMG File on Windows — Back up a Raspberry Pi SD card to an IMG file on Windows — full Read walkthrough, PiShrink compression, and a backup-schedule template.
- How to Restore a Raspberry Pi SD Card from a Backup IMG — Restore your Pi SD card from an IMG backup with Win32 Disk Imager. Auto-expand filesystem, larger-card upgrades, post-restore troubleshooting.
- Win32 Disk Imager vs Raspberry Pi Imager (2026) — The Pi Imager pre-config vs Win32DI Read/backup debate, with benchmarks and the cluster-flashing workflow.
- Win32 Disk Imager Error 5: Access Is Denied — 9 Working Fixes — The full troubleshooting tree for Error 5 on Win 10/11 — Controlled Folder Access, antivirus conflicts, SD lock switches, Safe Mode, and Group Policy.