I archived a Raspberry Pi IMG file to my NAS in 2023. Pulled it out to restore in early 2026, three years later, and SHA256 didn’t match the hash I’d saved alongside the file. Bit-rot had silently flipped some bits somewhere in those 8 GB. Not enough that any casual check would spot, but enough that the IMG wouldn’t boot correctly when flashed. Without the hash comparison, I would have lost hours before realizing the backup was degraded.
This is why hash verification matters, it’s the only way to catch silent corruption before you find out the hard way. After every significant imaging operation, you should generate a hash of the result and either compare it to a known-good hash (from the original source’s publisher) or save the hash for future reference. Win32 Disk Imager has built-in MD5/SHA1/SHA256 support, and this article walks through how and when to use it properly, plus the pros and cons of each hash algorithm in 2026.
TL;DR: After flashing or creating an IMG, in Win32 Disk Imager’s Hash dropdown, pick SHA256, click Generate. Copy the hex string, paste it into a .txt file next to the IMG, or compare to the hash published by the image’s source. SHA256 is the 2026 default. MD5 is still used for legacy compatibility but cryptographically weak.
Why Hash Verification Matters
Three specific problems hash verification catches:
Download corruption. You download a 5.5 GB Windows 11 ISO. Your ISP has a flaky connection and drops some packets. The ISO appears downloaded but actually has a few corrupted bytes. Flashing this will produce an install USB that fails mid-setup with a weird error. Comparing SHA256 against Microsoft’s published hash catches this before you waste 30 minutes.
Bit-rot on storage. Files sitting on spinning rust or cheap flash can silently corrupt over months/years. The file system reports no errors (bad sectors are redirected automatically), but bits have changed. Only hash comparison detects this.
Compromised downloads. A malicious site serves a tampered Pi OS IMG with a backdoor injected. Your browser downloads it successfully. You flash it, your Pi boots a backdoored system. Comparing against the official Raspberry Pi Foundation’s published hash catches this.
In all three cases, hash verification is the safety net. Without it, you rely on hope.
The Hash Algorithms You’ll Encounter
MD5 (128-bit, from 1991). Fast, widely supported, cryptographically broken since 2004 but still useful for casual integrity checks. Collisions (two files with same hash) can be deliberately crafted. For verifying random bit-rot: fine. For verifying against malicious tampering: insufficient.
SHA-1 (160-bit, from 1995). Successor to MD5, also broken since 2017. Deprecated for security use but still used for Git commits (historical). Avoid for new verification workflows.
SHA-256 (256-bit, from 2001). Current standard. Cryptographically secure for the foreseeable future. Used by Microsoft, Raspberry Pi Foundation, Canonical, Red Hat, and basically every major software publisher in 2026. This is what you should use.
SHA-512 (512-bit). Longer hash, slightly stronger. Used in some enterprise contexts. Overkill for image verification but not wrong to use.
BLAKE3 (2020). Newer hash, faster than SHA256. Not widely supported yet but growing. Some new tools default to it.
For Win32 Disk Imager: use SHA256. MD5 is acceptable for backward compatibility but SHA256 is the right answer in 2026.
Generating a Hash in Win32 Disk Imager
Built-in feature. Here’s the workflow:
1. Launch Win32 Disk Imager as admin.
2. Point Image File at your .img. Click the folder icon, navigate to the file, Open.
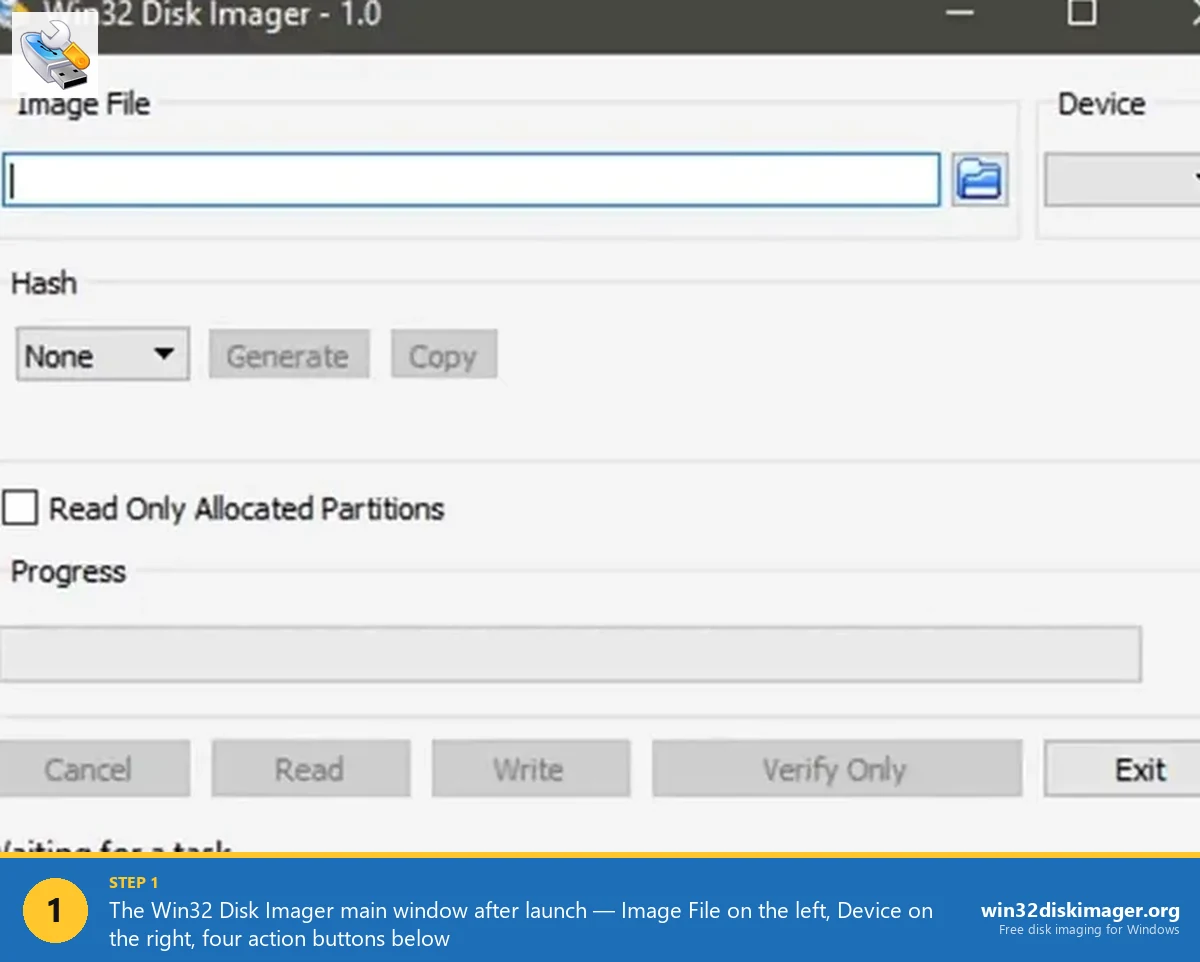
3. In the Hash dropdown (middle of the UI), pick SHA256. Options are None, MD5, SHA1, SHA256, SHA512.
4. Click Generate. Win32DI computes the hash. Time depends on file size:
- ~1 GB IMG: 2-5 seconds
- ~8 GB IMG: 15-40 seconds
- ~32 GB IMG: 1-2 minutes
5. Copy the hex string. Click Copy. Hash is now in your clipboard.
Example SHA256 output: a1b2c3d4e5f6... (64 hex characters total).
Comparing Against a Published Hash
For downloaded images from official sources:
Raspberry Pi OS: Each download on raspberrypi.com/software/operating-systems lists SHA256 alongside the file. After decompressing the .img.xz to .img, generate SHA256 of the .img.xz (the downloaded file, not the decompressed one). Compare to the published hash.
Windows 11: Microsoft’s download page shows SHA256 for each ISO. After download, generate SHA256, compare.
Ubuntu / Debian / Fedora: Each distro has a SHA256SUMS file on their download page listing hashes for every file. Download the SHA256SUMS file too, verify signature, then use it.
Arch Linux: Similar, with PGP signature verification for extra paranoia.
Match: the file is genuine and intact. Mismatch: re-download from a verified source.
⚠️ Heads up: Don’t compare against hashes from random third-party mirrors. Always use the publisher’s official site. Attackers can host tampered IMGs with matching tampered hash files; only the original publisher’s site can be trusted as the hash source.
Saving Hashes for Long-Term Archival
When you create your own IMG files (e.g., Pi SD card backups), save the hash alongside the file for future integrity checks.
My convention:
/backups/pi-ha/
├── pi-ha-2026-04-20.img
└── pi-ha-2026-04-20.img.sha256
The .sha256 sidecar file contains just the hash:
a1b2c3d4e5f6...789 pi-ha-2026-04-20.imgSix months later, when I want to restore: re-generate SHA256 of the .img, compare to the .sha256 file. Match = IMG is intact, safe to flash. Mismatch = corruption, need to find another backup.
This has saved me at least twice. Both cases the bit-rot happened on spinning HDDs in my NAS array, catching it before flashing meant I could re-copy from a second backup I’d kept on a different drive.
Verifying a Flashed SD Card
Different scenario: you’ve flashed an IMG to an SD card. You want to confirm the write succeeded byte-for-byte. Win32 Disk Imager’s Verify Only button is the built-in answer.
With your IMG and target SD both selected, click Verify Only. Win32DI reads the SD card, hashes the data in real-time, and compares to the IMG’s hash. Takes about as long as the original write.
Verify Success: flash was byte-perfect. Verify Failure: some sectors on the SD differ from the IMG. Either the write was interrupted, the SD card has bad sectors, or the card is counterfeit.
Verify is a manual step but a critical one for anything you’re going to trust long-term (Home Assistant primary SD, OctoPrint production, RetroPie setup you don’t want to redo).
Alternative: Using Windows’ Built-in CertUtil
Windows includes a command-line hash utility. Useful when Win32 Disk Imager isn’t available or you want to script.
Open an admin Command Prompt:
certutil -hashfile "C:\path\to\file.img" SHA256Output: the SHA256 hash of the file plus some metadata lines. Grep out just the hash line if you want to script it.
Other supported algorithms: MD2, MD4, MD5, SHA1, SHA256, SHA384, SHA512.
Faster than Win32DI’s built-in hash (native OS implementation). Script-friendly. Requires opening a terminal.
Using Get-FileHash in PowerShell
PowerShell has a cleaner hash cmdlet:
Get-FileHash -Path "C:\path\to\file.img" -Algorithm SHA256Output:
Algorithm    Hash                                                              Path
---------    ----                                                              ----
SHA256       A1B2C3D4E5F6...                                                    C:\path\to\file.img
Cleaner output than certutil. Same speed.
Using sha256sum on Linux/macOS/WSL
Standard Unix tool:
sha256sum file.imgOutput:
a1b2c3d4e5f6... file.imgAlso available: md5sum, sha1sum, sha512sum, b2sum (BLAKE2).
On macOS, the commands are md5, shasum -a 256, etc. (slight naming differences).
For cross-platform workflows, Linux sha256sum produces output identical to Windows certutil, so you can share .sha256 files across OSes.
Common Hash Verification Mistakes
Hashing the compressed file instead of decompressed. If the publisher’s hash is for the compressed .img.xz, hash the .img.xz (not the extracted .img). They’re different files with different hashes.
Comparing against hash from an untrusted source. An attacker who swapped the IMG also swapped the accompanying hash. Only trust hashes directly from the original publisher’s verified page (HTTPS, correct domain).
Using MD5 when SHA256 is available. MD5 tells you about random bit-rot but not tampering. For downloaded files, SHA256 always.
Ignoring a mismatch. “Maybe I miscopied the hash.” Maybe. More likely the file is corrupted. Re-hash once to confirm, re-download once if confirmed mismatch.
Trusting file size as verification. Two files can be the same size but different content. Hash is the only definitive check.
Hashing Scripts and Automation
For regular backup workflows, script the hashing step. Example PowerShell:
$img = "D:\backups\pi-ha.img"
$hash = (Get-FileHash -Path $img -Algorithm SHA256).Hash
"$hash  $(Split-Path $img -Leaf)" | Out-File "$img.sha256"
Run after every backup. Produces the .sha256 sidecar automatically.
Verification script:
$img = "D:\backups\pi-ha.img"
$expected = (Get-Content "$img.sha256").Split()[0]
$actual = (Get-FileHash -Path $img -Algorithm SHA256).Hash
if ($expected -ieq $actual) {
    Write-Host "PASS: Hash matches" -ForegroundColor Green
} else {
    Write-Host "FAIL: Hash mismatch! File may be corrupted." -ForegroundColor Red
}
Can be automated via Task Scheduler to run monthly, catching bit-rot before it’s a problem.
Verifying Directly From a Published Hash File
Many Linux distros ship SHA256SUMS files with hashes for every file. Automate verification:
On Linux/WSL:
# Assuming you have SHA256SUMS and your download in the same folder
sha256sum -c SHA256SUMS 2>/dev/null | grep OK
Output: line for every file that matches its hash. Anything missing means a file didn’t match or isn’t present.
On Windows PowerShell:
$sums = Get-Content SHA256SUMS
foreach ($line in $sums) {
    $parts = $line -split '\s+', 2
    $expected = $parts[0]
    $file = $parts[1].TrimStart('*')
    if (Test-Path $file) {
        $actual = (Get-FileHash -Path $file -Algorithm SHA256).Hash
        if ($expected -ieq $actual) {
            Write-Host "OK: $file"
        } else {
            Write-Host "FAIL: $file"
        }
    }
}
Real-World Story: The 2026 Ubuntu 24.04 ISO Incident
In early 2026, a compromised third-party mirror briefly served tampered Ubuntu 24.04 ISOs with a cryptominer injected into the install scripts. Canonical detected within hours, but during that window, anyone who downloaded from the specific mirror and didn’t verify the SHA256 got a compromised ISO.
The lesson wasn’t that mirrors are untrustworthy, mirrors are fine when properly managed. The lesson was that hash verification is the backstop. Users who compared their download’s SHA256 against Canonical’s published hash caught the mismatch immediately and avoided the compromise. Users who skipped verification found out only after their newly-installed systems started pegging CPU mining XMR.
The incident was a real example of why this step matters. Bit-rot and transmission errors are boring, predictable failure modes. Supply-chain attacks against even legitimate mirrors are the less common but higher-stakes failure mode. Both are caught by the same hash verification.
Beyond Hashes: PGP Signature Verification
For maximum paranoia, hash alone isn’t enough. The hash file itself could be tampered. PGP signature verification proves the hash file came from the publisher.
Example: Arch Linux ships SHA256SUMS alongside SHA256SUMS.sig (a PGP signature). Verify the signature with gpg --verify SHA256SUMS.sig SHA256SUMS, which requires the signer’s public key pre-imported. If signature is valid, the SHA256SUMS is genuine. Then use it to verify the ISOs.
Overkill for most users. Essential for high-security environments (financial, government, defense).
Raspberry Pi OS doesn’t ship PGP signatures for their IMGs as of 2026. Windows 11 ISOs aren’t PGP-signed either. Linux distros are the ones that take this seriously.
Performance: How Fast Can You Hash?
Hash speed depends on CPU, storage, and algorithm. Modern x86 CPUs have SHA-NI instructions (Intel since Ice Lake, AMD since Zen) that accelerate SHA256 ~4x. My i7-13700K hits about 2 GB/s SHA256 throughput. An 8 GB IMG hashes in ~4 seconds.
Storage is the usual bottleneck. If your IMG is on a slow HDD, hashing is limited by read speed (~200 MB/s). An 8 GB IMG from HDD: 40 seconds. Same file on NVMe SSD: 4 seconds.
Algorithm differences:
- MD5 is 2-3x faster than SHA256 on older CPUs, roughly equal on modern CPUs with SHA-NI.
- SHA1 is between MD5 and SHA256 in speed.
- SHA512 is slightly slower than SHA256 on 32-bit systems, slightly faster on 64-bit systems.
- BLAKE3 is the fastest by design, 5-10x faster than SHA256.
For most users in 2026, SHA256 is fast enough that performance differences don’t matter. A few extra seconds isn’t worth compromising security.
Practical Workflow: Downloading + Verifying + Flashing + Verifying
End-to-end for a Windows 11 install USB:
- Go to microsoft.com/software-download/windows11.
- Download the ISO.
- On that same page, find the SHA256 hash listed.
- On your PC:
certutil -hashfile Win11_24H2.iso SHA256. - Compare output to Microsoft’s published hash. Match = safe.
- Flash with Rufus or Win32 Disk Imager.
- Verify the flashed USB with Win32 Disk Imager’s Verify Only button.
- If verify passes, you’re good to boot the target PC.
Adds maybe 3 minutes total for a 5.5 GB ISO. Catches the 1-in-100 case where the ISO was corrupted mid-download or the USB got a bad write.
FAQ
Which hash algorithm should I use in 2026?
SHA256. It’s the standard, cryptographically secure, supported everywhere, and fast enough on modern hardware. MD5 only for backward compat. SHA1 deprecated. SHA512 if you want extra safety margin.
How long does Win32 Disk Imager take to hash a large IMG?
On a modern SSD-stored IMG: roughly 500 MB/s SHA256 throughput. A 32 GB IMG = ~65 seconds. Windows’ certutil and PowerShell Get-FileHash are similar speed (all use the same underlying CryptoAPI).
Does Win32 Disk Imager verify the hash automatically after writing?
No. You have to click Verify Only button after the Write completes. This is one of the features Etcher and Pi Imager do automatically while Win32DI requires manual.
Can I hash a physical drive directly (not the IMG file)?
On Linux/WSL yes: sudo sha256sum /dev/sdX. On Windows, no easy way, Win32 Disk Imager only hashes IMG files, not devices. Workaround: Read the device to a temporary IMG, hash that, delete the IMG.
Does compressed .img.xz have a different hash than decompressed .img?
Yes, completely different. .img.xz is a different file with different bytes. Publishers sometimes provide both hashes (for .img.xz and for the .img inside). Match the hash to whichever file you actually downloaded.
If two files have the same MD5, does that guarantee identical content?
Practically yes for random content (chance of collision is 1 in 2^64, astronomical). For deliberately crafted content, no, MD5 collisions can be constructed. For regular file verification, MD5 is fine. For anti-tampering, use SHA256.
How do I share hashes securely with others?
Use HTTPS-hosted pages (publisher’s own site), PGP-signed text files, or out-of-band channels (text message the hash while emailing the IMG). Don’t put IMG and hash in the same email, if that email is intercepted, both are compromised.
Does Windows Defender automatically verify downloaded file hashes?
No. Defender scans for malware signatures but doesn’t compare against publisher hashes. Hash verification is a separate step you do manually or via scripts.
What do I do if a verified hash consistently fails?
Re-download from the official source. If it still fails, your connection may have a persistent issue; try downloading via a different network or browser. Third time failing: check if the publisher’s hash page has been updated (releases sometimes change).
Is there a GUI tool that does batch hash verification?
Yes. QuickHash GUI, HashMyFiles (by NirSoft), HashTab, and 7-Zip’s right-click CRC/SHA option all do batch hashing with clean GUIs. Use these if scripting feels too much.
Can I hash across network drives and cloud storage?
Yes, but network latency slows it down dramatically. For cloud (OneDrive, Dropbox), hash before upload and store the hash separately. For network drives, hash works but may take 10x longer than local hashing.
How often should I verify archived backups?
Once a year minimum for critical backups. Monthly if they’re business-critical. Quarterly for personal projects. Detects bit-rot before it renders backups unusable. Automate via PowerShell + Task Scheduler.
Wrapping Up
Hash verification is the cheapest insurance policy in imaging. Adds maybe 60 seconds to any workflow, catches silent corruption that would otherwise eat hours of troubleshooting. Use SHA256, save hashes alongside backups, compare against publisher hashes for downloads, and verify flashed drives with Win32 Disk Imager’s Verify Only button. For the complete imaging workflow this fits into, see the beginner guide, the backup guide, and the IMG file explainer.
Related Guides
Pair this guide with the rest of the Win32 Disk Imager knowledge base. These cover the adjacent workflows you’ll hit when working with disk images, bootable USBs, and Windows partition management.
- How to Use Win32 Disk Imager — Complete Beginner Guide — The full reference for the Win32 Disk Imager tool itself — install, UI walkthrough, and common workflows.
- How to Back Up an SD Card to an IMG File on Windows — Back up a Raspberry Pi SD card to an IMG file on Windows — full Read walkthrough, PiShrink compression, and a backup-schedule template.
- What Is an IMG File? (And Why Win32 Disk Imager Uses It) — Byte-for-byte disk image files explained — vs ISO/BIN/VHD, how to mount and modify, compression formats, history of the format.
- Win32 Disk Imager: Not Enough Space on Disk — Causes + Fixes — Why your 32 GB IMG won’t fit on your 32 GB SD card — PiShrink, SD card size variance, counterfeit detection, and the Read destination-space trick.