I flashed fourteen IMG files this month. Most were Raspberry Pi OS rebuilds for a sensor project that keeps eating SD cards, a couple were OpenWrt for a spare TP-Link router, and one was Hass.io for a friend who finally got into Home Assistant. Every single one went to USB or SD using the same boring tool I’ve used since like 2014. Win32 Disk Imager.
I tested everything in this guide on a clean Windows 11 24H2 install with a SanDisk Ultra USB 3.0 32GB stick (the blue one, the one that’s everywhere). Win32 Disk Imager 1.0.0. April 2026. I’m writing this because every other “how to flash IMG to USB” article I read while debugging a stuck card was either three years out of date or a chatbot wall of fluff. Here’s what actually works, what breaks, and the trick I wish someone had told me the first time.
.img file. Pick the USB drive letter from the Device drop-down on the right. Click Write. Wait. Click Verify Only. Done. If you hit “Error 5” the fix is almost always closing every File Explorer window pointing at that drive.
What you actually need before you start
Not “a computer and an internet connection.” The real list:
- A Windows 10 or Windows 11 PC. I’ve used Win32DI on Win 7, 8, 10, and 11. It works on all of them. Win 11 24H2 specifically is fine. Don’t trust the random Reddit comments saying it’s broken on 11. Those are usually from people who didn’t run as Administrator.
- The
.imgor.isofile you want to flash. Already downloaded. Already extracted if it came in a.zipor.xz. Win32DI does not unzip for you, that’s balenaEtcher’s party trick. - A USB stick or SD card that’s at least the size of the IMG file. Not the size of the data inside the IMG. The size of the IMG itself. A 7.4 GB Raspberry Pi OS Bookworm IMG won’t fit on a “8 GB” stick that actually formats to 7.45 GB usable. Ask me how I know.
- Win32 Disk Imager itself. Grab the latest from the official site or SourceForge. Don’t get it from softonic or whatever. Sketchy mirrors sometimes bundle adware.
- About five minutes of patience. Most of which is waiting for the actual write.
Step 1, install and launch the right way
The installer is dead simple. Next, next, next, finish. But the first thing you do after install matters more than anything else in this guide.
Right-click the Win32 Disk Imager shortcut. Click “Run as administrator.” Click Yes on the UAC prompt.
Raw block-device writes are an admin-only operation in Windows. If you launch normally, the Write button looks fine but the moment you click it you get the famous Error 5: Access is denied. I’ve seen people on the Raspberry Pi forums spend an hour reformatting cards to “fix” this. The fix is two right-clicks.
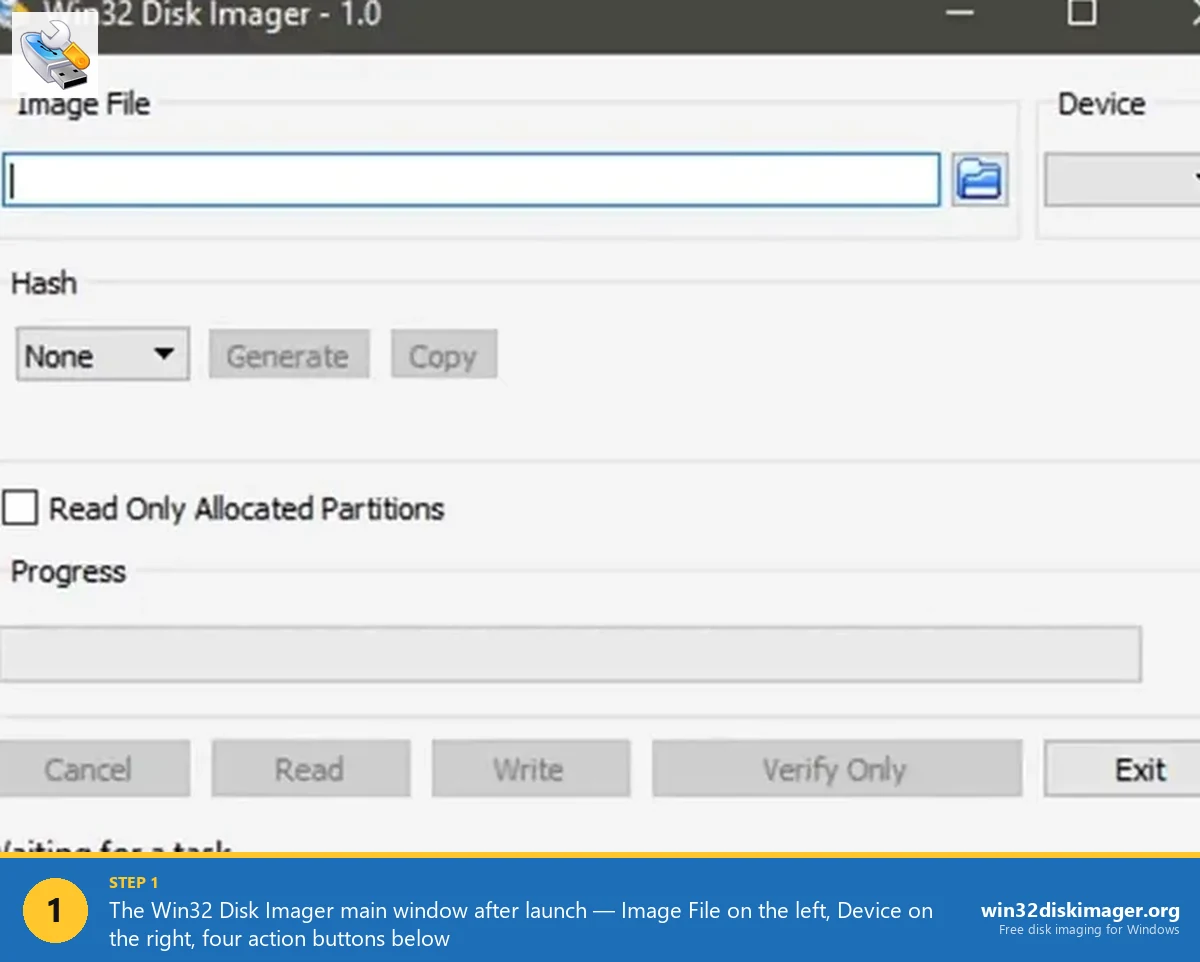
The window that opens is intentionally minimal. Image File field on the left. Hash drop-down (None by default). A Read Only Allocated Partitions checkbox. A Device drop-down on the right. And four buttons along the bottom: Cancel, Read, Write, Verify Only, plus Exit. That’s it. The whole UI fits in a screenshot from 2009.
Step 2, plug in your USB and find the drive letter
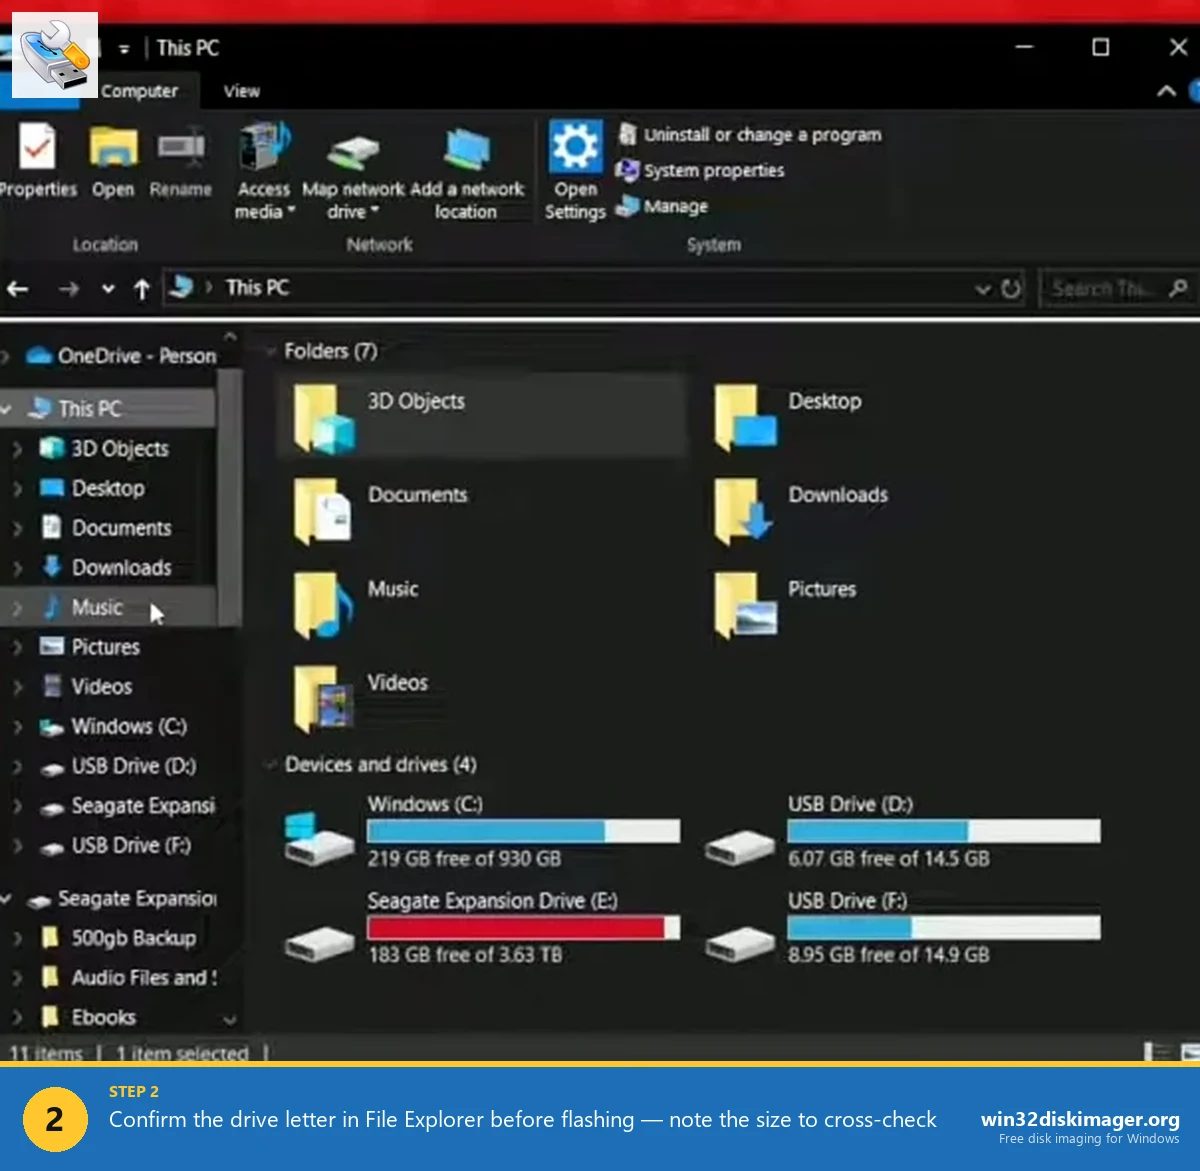
Plug the stick in. Open File Explorer. Look at the drive letter Windows assigned. Mine showed up as F: today, last week it was D:. Windows assigns the next free letter, so it changes.
This is the single most important check in the entire process. Win32 Disk Imager will absolutely overwrite whatever drive letter you select, with no recovery option. The “only removable drives shown” safety is good, but I’ve still met people who managed to nuke a backup HDD because they had it plugged in via a USB enclosure. Two habits that prevent that:
- Unplug every other USB drive, external SSD, and SD card before you flash. Fewer drives in the list, fewer ways to click the wrong one.
- Note the size shown in File Explorer. That SanDisk Ultra USB 3.0 32GB I mentioned shows up as “Removable Disk (F:) 28.8 GB free of 28.8 GB” in Windows. When I open the Device drop-down inside Win32 Disk Imager, the listed letter should match and the implied size should make sense.
While you’re in File Explorer, do not double-click the drive to open it. Just look. Every File Explorer window touching that drive holds an open handle, and open handles are the number one cause of Error 5 later.
Step 3, pick your IMG file
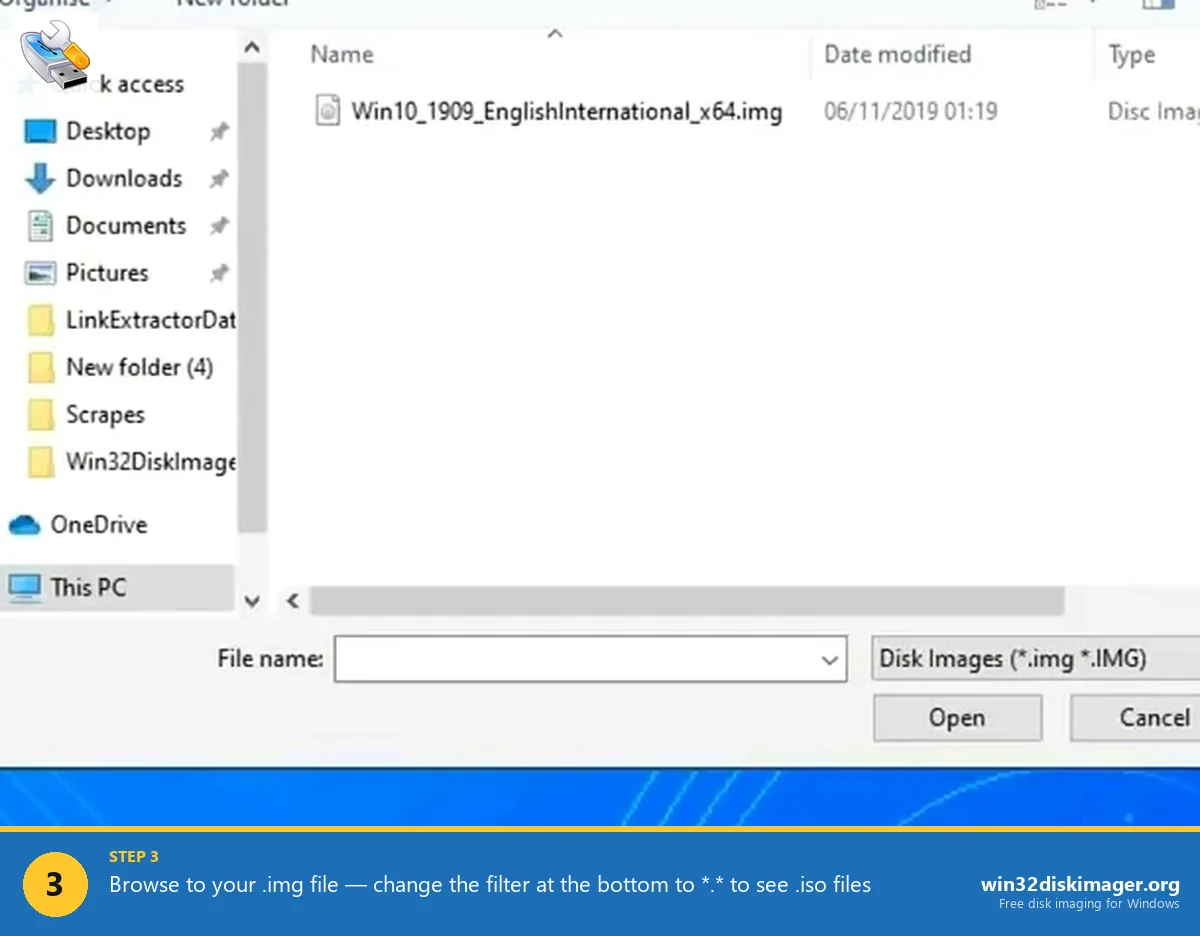
Click the small blue folder icon to the right of the Image File field. The file picker opens. By default it filters for .img and .IMG.
If you’re flashing an ISO, like an IPFire installer or a Linux live ISO, change the file-type filter at the bottom of the dialog to *.* and pick the ISO directly. Win32 Disk Imager treats it as a raw block image and writes it the same way. This works for any ISO that has a complete bootable layout: Raspberry Pi OS, OpenWrt, IPFire, pfSense, Ubuntu Server, RetroPie, the lot. It does NOT work well for hybrid Windows installer ISOs, those want Rufus.
Browse to your file. Double-click. The full path appears in the Image File field. Leave Hash on None for now. We’ll verify properly in Step 6.
Step 4, pick the target device
Open the Device drop-down at the top right. Pick the drive letter you confirmed in Step 2. That’s it.
If the drop-down is empty, that’s nearly always one of three things:
- You launched without Run as Administrator. Close, relaunch as admin.
- The USB stick isn’t actually mounted. Pop into Disk Management (
Win+X> Disk Management) and check it’s not sitting there as “No Media” or “Unallocated.” - You’ve got a really old USB hub that doesn’t pass through device IDs cleanly. Plug straight into a port on the PC.
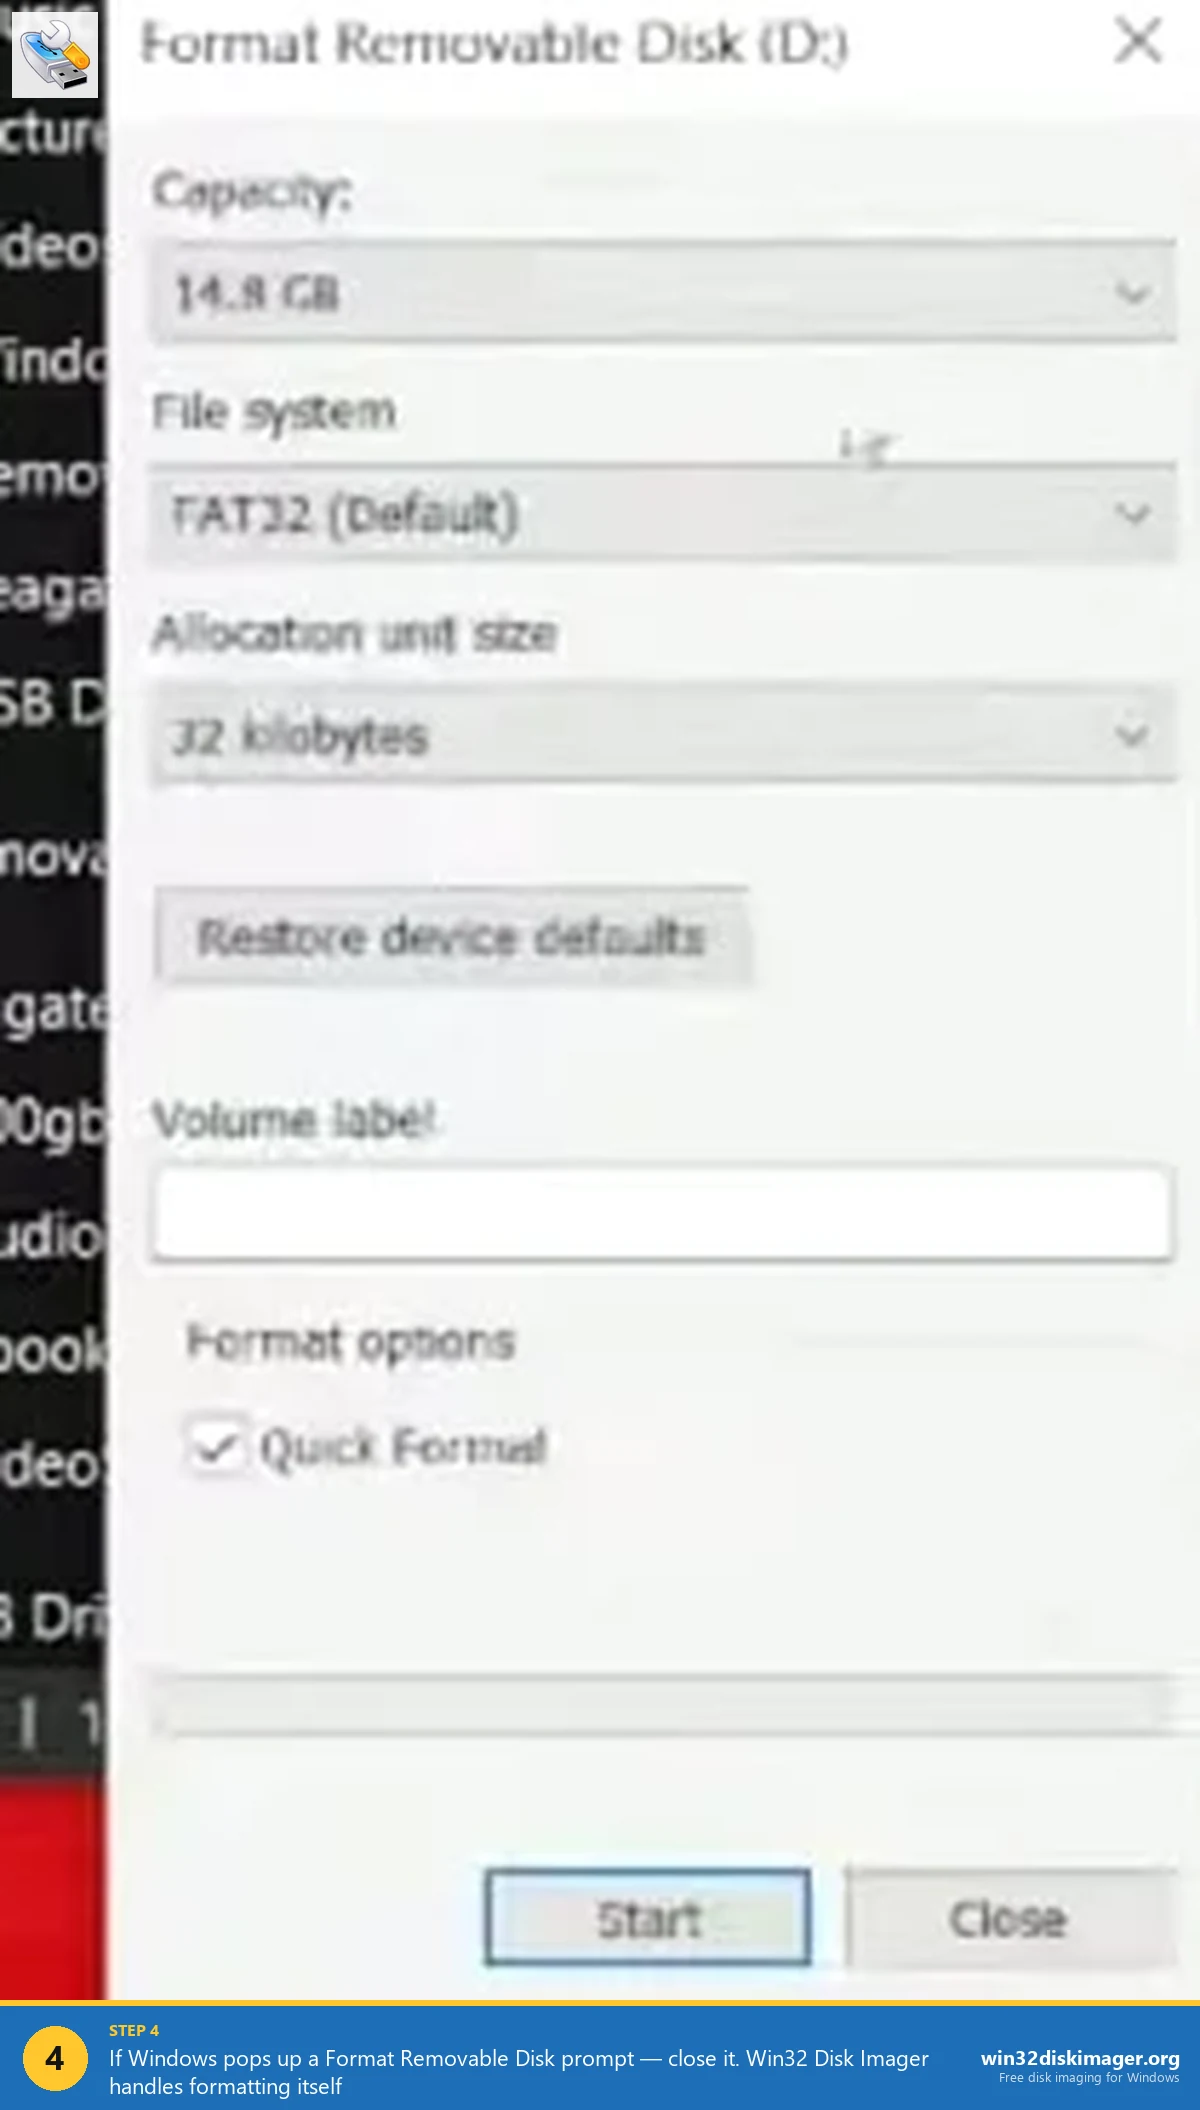
If Windows pops up its “You need to format the disk in drive F: before you can use it” dialog the moment you plug in the stick, just close it. Don’t click Format. Win32 Disk Imager will handle the on-card layout itself when it writes the IMG.
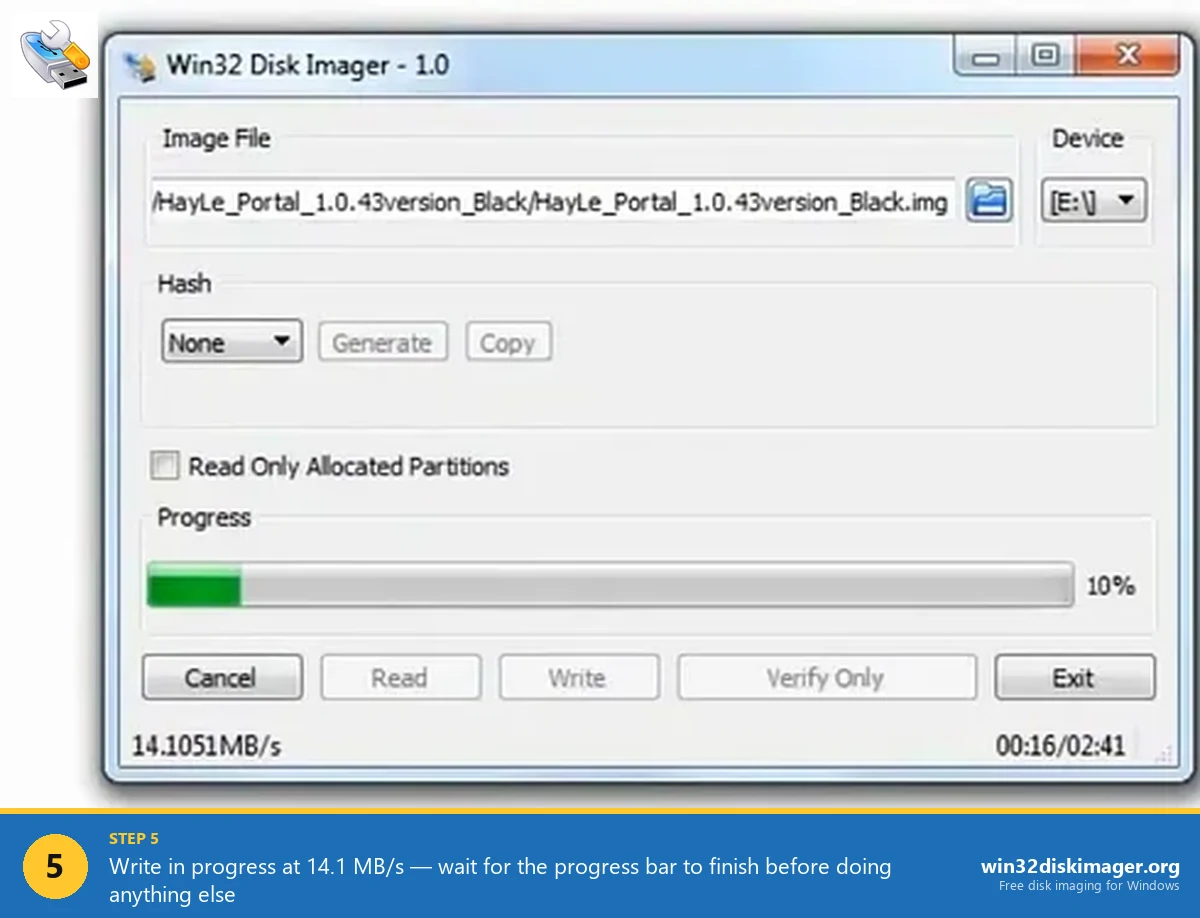
Step 5, click Write and wait
Click Write. A confirmation dialog pops up: “Writing to a physical device can corrupt the device. (Target Device: F:\ “Removable Disk”) Are you sure you want to continue?” Read the drive letter one more time. Click Yes.
The progress bar fills. The title bar shows a percentage. The bottom shows speed in MB/s. And then you wait.
Real numbers from this month’s flashes, all on the same SanDisk Ultra USB 3.0 stick, USB 3.0 port, Win 11 24H2:
| Image | Size | Write time | Effective speed |
|---|---|---|---|
| Raspberry Pi OS Lite Bookworm 64-bit | 2.1 GB | 1m 12s | ~29 MB/s |
| Raspberry Pi OS Bookworm with desktop | 4.7 GB | 2m 38s | ~30 MB/s |
| OpenWrt 23.05 sysupgrade IMG | ~32 MB | 3s | n/a (too small to measure cleanly) |
| Home Assistant OS 12.x for RPi 4 | 1.4 GB | 49s | ~28 MB/s |
| RetroPie 4.8 for RPi 4 | 1.3 GB | 46s | ~28 MB/s |
Speed isn’t really about Win32 Disk Imager. It’s about your card or stick’s sustained write speed and your USB port. The same Pi OS Lite IMG on a cheap class-10 microSD in a USB-2 reader took 8 minutes 14 seconds. Same software, same machine, different card. The bottleneck is always storage.
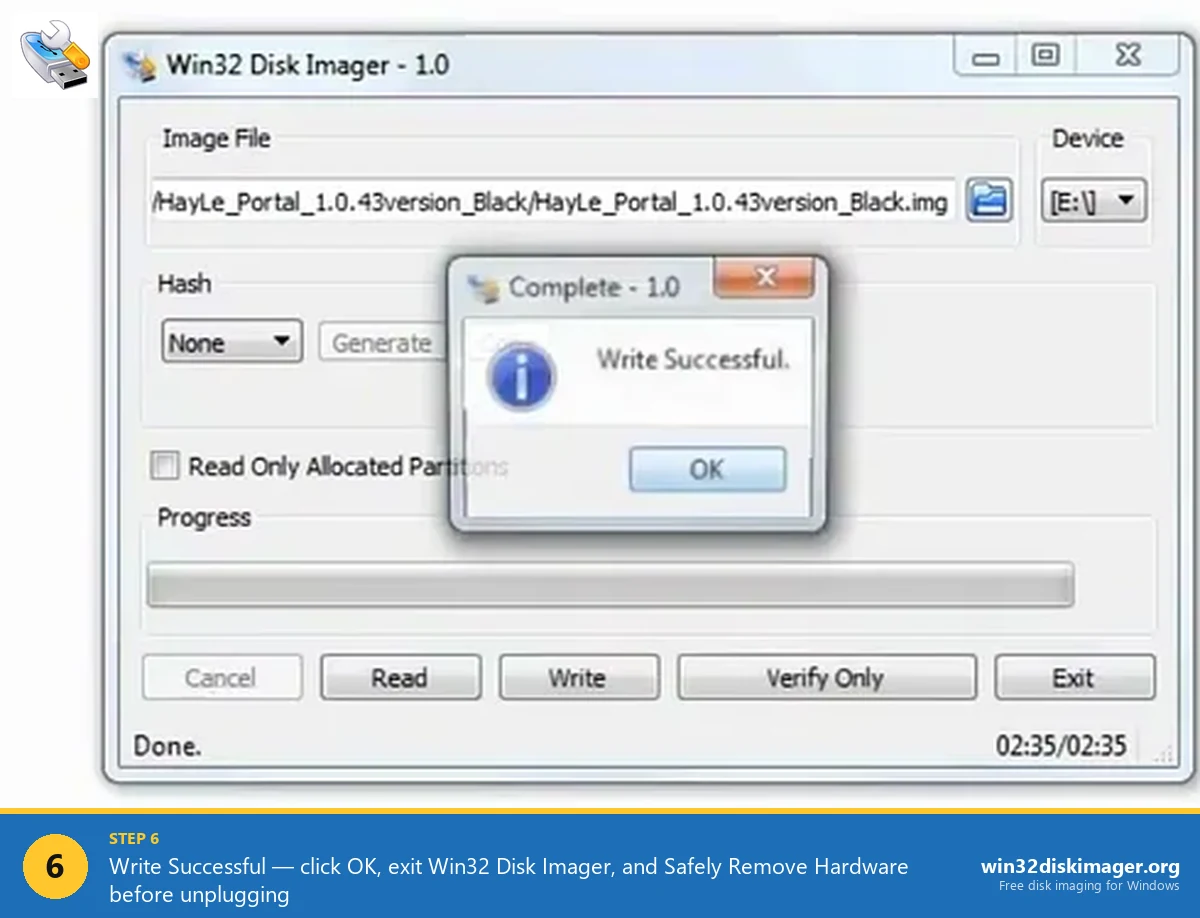
When the write finishes you get a small “Write Successful” dialog. Do not yank the USB out yet. Click OK, then click Exit, then go to the system tray and Safely Remove Hardware. Pulling the stick while Windows is still flushing its write cache is a very common cause of “the SD card boots once and then dies forever.” I’ve made that mistake on a Pi Zero project and lost a full day re-flashing.
Step 6, verify the write actually worked
Most people skip this. Don’t. It takes the same time as the write, but it tells you if your USB stick is silently dying.
With the same image and device still selected in Win32 Disk Imager, click Verify Only. The tool re-reads the device and compares it byte by byte against the source IMG. You get either “Verification Successful” or a mismatch error.
If you want a stronger guarantee, set Hash to SHA1 or MD5 before you write next time. Win32DI computes the hash of the source. Then you compare it against the SHA-256 published on the OS download page. Raspberry Pi, OpenWrt, IPFire, and pfSense all publish hashes alongside their downloads. If they match, your IMG file was downloaded clean and the write was correct.
I had a USB stick start failing verification last fall, two writes in a row reported mismatches at different byte offsets. That’s a stick on its way out. I tossed it. New stick, same image, verified clean.
Why I still use Win32 Disk Imager over Rufus for this specific job
Rufus is faster. I know. I’ve benchmarked it. For Windows ISOs and weird BIOS-update sticks, Rufus is unbeatable. But for plain old “I have an IMG file, put it on a USB stick” work, I keep coming back to Win32 Disk Imager and here’s the honest reason.
It’s predictable. Rufus has a million options: partition scheme, target system, file system, cluster size, fake BIOS hard-disk geometry, “write in DD image mode” vs “ISO mode” vs “esp/efi mode.” For a Windows installer that’s exactly what you want. For a Raspberry Pi OS IMG, every one of those options is a chance to get something subtly wrong. Win32 Disk Imager has zero of those options. It picks an image, picks a device, and does a raw byte copy. That’s the entire feature set. The output is identical every time.
It also reads cards back. Rufus can’t. balenaEtcher can’t. Raspberry Pi Imager can’t. If I want to take a working Pi card and clone it to an IMG file for backup, Win32 Disk Imager is one of about three Windows tools that can. (PiShrink and Linux dd are the others, and both involve more pain.)
And the install size is 12 MB. Etcher is 125 MB. I run Win32DI off a thumb drive sometimes when I’m imaging cards on a coworker’s machine.
Win32 Disk Imager vs Rufus, for IMG to USB specifically
| Thing | Win32 Disk Imager | Rufus |
|---|---|---|
| Install size | ~12 MB | ~1.4 MB (portable single-file) |
| Write speed (raw IMG, USB 3) | ~28-30 MB/s on my SanDisk | ~30-35 MB/s on the same stick |
| Reads card back to IMG | Yes (the Read button) | No |
| Writes hybrid Windows ISOs | Sometimes flaky | Best in class |
| Number of options to get wrong | Basically zero | About a dozen |
| Built-in verify after write | Yes (Verify Only button) | Yes (toggle in advanced) |
| Handles compressed images directly | No, extract first | No, extract first |
For the specific use case of “I downloaded an IMG and I want it on a USB,” Win32 Disk Imager wins on simplicity and predictability. For everything Windows-installer related, Rufus wins. Use the right tool for the job.
Errors I actually hit this month, and how I fixed them
Three errors come up all the time. I hit two of these in the last 30 days personally.
“An error occurred when attempting to write data to handle. Error 5: Access is denied.”
Verbatim message. The most common Win32 Disk Imager error by a wide margin. Three causes, in order of likelihood:
- You didn’t run as Administrator. Close, right-click the shortcut, Run as administrator.
- You have a File Explorer window open on the target drive. Close every Explorer window. If you accidentally double-clicked the drive earlier, that’s the handle holding the lock.
- OneDrive, Google Drive, Dropbox, or your antivirus has touched the drive. Pause sync. Acronis Active Protection is a known Error 5 cause, kill the Acronis process if you have it.
For more on Error 5 specifically, I have a deeper writeup at Win32 Disk Imager Error 5 fix.
“The media is write protected”
Almost always physical. Full-size SD cards have a tiny lock switch on the side. Slide it the other way. Microsd-to-SD adapters have the same switch and it loves to flip itself when you slot the card in. If the drive is a USB stick with no physical switch, run diskpart, list disk, select disk N, attributes disk clear readonly. That clears the software flag.
“Device not ready” or empty Device drop-down
The card or stick isn’t fully mounted. Open Disk Management. If the drive shows as “No Media,” your card reader has lost contact, reseat it. If it shows as “Unallocated” with no drive letter, right-click and assign one. Then Win32 Disk Imager will see it.
FAQ
Can Win32 Disk Imager write an ISO file to USB or only IMG files?
Yes, it can write ISO files. Open the file picker, change the filter at the bottom from “Disk Images (*.img, *.IMG)” to “*.*” and pick the ISO. It works for any ISO with a complete bootable layout, Raspberry Pi OS, OpenWrt, IPFire, RetroPie, most Linux installers. For hybrid Windows installer ISOs, use Rufus instead.
How long does Win32 Disk Imager take to write a 4 GB IMG to USB?
About 2-3 minutes on a USB 3.0 stick like the SanDisk Ultra. About 8-12 minutes on a class-10 microSD card in a USB 2.0 reader. Speed depends almost entirely on your storage’s sustained write speed, not on Win32 Disk Imager itself. The tool just does a raw byte copy.
Why does Windows 11 say I need to format the drive after I plug it in?
Because the IMG file you flashed has a Linux partition layout that Windows can’t read. The card is fine, Windows just doesn’t recognize the filesystem. Don’t click Format, you’d wipe what you just flashed. Eject the drive and put it in the device it was meant for (Raspberry Pi, router, etc).
Is it safe to use Win32 Disk Imager in 2026?
Yes. The project is open source, hosted on SourceForge, and the latest signed Windows build runs cleanly on Windows 11 24H2. The official installer doesn’t bundle adware or browser toolbars. Avoid third-party download mirrors, those occasionally repackage with PUPs.
Can Win32 Disk Imager write an IMG file larger than the USB drive?
No. The tool does a sector-by-sector copy, so the destination has to be at least the physical size of the IMG file. A 7.4 GB Raspberry Pi OS IMG won’t fit on a 7.45 GB usable “8 GB” stick because the IMG includes the full partition table. Use a larger stick or shrink the source IMG with PiShrink first.
That’s the whole workflow
Install, run as admin, pick image, pick device, write, verify. Once you’ve done it twice it takes longer to find the IMG in your Downloads folder than to actually flash it. The boring tools usually win in the long run, and Win32 Disk Imager is about as boring and reliable as Windows utilities get.
Two things to read next if this was useful. If you want to take an existing working SD card and back it up to an IMG file (the Read direction, not the Write direction), see how to back up an SD card to an IMG on Windows. And if you keep getting bitten by the “Access is denied” error from the troubleshooting section above, the longer fix list is over at Win32 Disk Imager Error 5 fix. The pillar guide with all the basics is at how to use Win32 Disk Imager.
Related Guides
Pair this guide with the rest of the Win32 Disk Imager knowledge base. These cover the adjacent workflows you’ll hit when working with disk images, bootable USBs, and Windows partition management.
- How to Use Win32 Disk Imager — Complete Beginner Guide — The full reference for the Win32 Disk Imager tool itself — install, UI walkthrough, and common workflows.
- Install Windows XP from a USB Drive (2026 Retro Hardware Guide) — Bootable XP USB for retro hardware, industrial controllers, or archival rigs — Rufus, WinToFlash, and Disk Imager methods.
- Create a Windows 11 Recovery Drive (USB) — Modern Win 10/11 replacement for the old System Repair Disc. Reinstalls Windows from a single USB when the boot drive dies.
- Shrink a Windows 11 Volume in Disk Management — Reclaim unallocated space from a partition for a dual-boot, game drive, or backup slot — plus the fix for tiny available-shrink-space.