I needed to dual-boot Ubuntu on my work laptop last month without losing the Windows 11 partition or the 1.2TB of project files already on it. The answer, as it has been since Windows Vista, is just Disk Management’s built-in Shrink Volume command. No third-party tools, no data loss, no reformatting.
The operation is boring when it works and infuriating when it doesn’t. I’ve hit both cases enough times to know the tricks. Here’s the clean 2026 walkthrough for Windows 11 (identical on Windows 10), plus the “Why does it only let me shrink 300MB out of 500GB?” fix that’s actually the reason most people land on articles like this one.
TL;DR: Win+X → Disk Management → right-click the partition → Shrink Volume → enter the MB to shrink → Shrink. Done. If the “available shrink space” is way smaller than expected, skip to the Why It Won’t Shrink More section.
When You’d Shrink a Volume
Common situations I’ve personally hit:
- Making unallocated space for a Linux dual-boot install (Ubuntu, Mint, Pop!_OS)
- Splitting a huge C: drive into C: + D: so game saves, downloads, and Steam library live separately from Windows
- Creating a scratch partition for video editing cache (Premiere, DaVinci) that I can nuke without touching the OS
- Reclaiming space from an OEM recovery partition on a small SSD (trickier, more on that later)
- Preparing a partition for BitLocker-To-Go or a separate encrypted VeraCrypt container
If your goal is instead to image that partition to a USB, that’s when Win32 Disk Imager comes in, but you still need to shrink first to get the drive small enough to fit on a target USB in many cases.
Before You Start
Three things, ten minutes, saves hours.
Back up. Shrink Volume is safe in normal use but I have seen it fail mid-operation during a sudden power loss on a laptop with a bad battery. Result: unmountable partition. If the data matters, image the whole thing first with Win32 Disk Imager or File History.
Run a disk check. chkdsk C: /f /r from an admin cmd, reboot. Bad sectors inside the area you’re trying to shrink will make the operation fail silently.
Defrag (on HDDs only). defrag C: /O. Spread-out immovable files are the #1 reason Shrink Volume gives you a tiny available-shrink number. Optimization consolidates them at the front of the disk. Skip this step on SSDs, it does nothing helpful and wears the drive.
Step 1: Open Disk Management
Three ways that all work:
- Win+X → Disk Management (fastest)
- Win+R →
diskmgmt.msc→ Enter - Start → type Create and format hard disk partitions → Enter
On Windows 11 you’ll also find a prettier version at Settings → System → Storage → Advanced storage settings → Disks & volumes. It works for basic shrinks but lacks some of the visuals and right-click shortcuts, so I still prefer the classic Disk Management MMC.
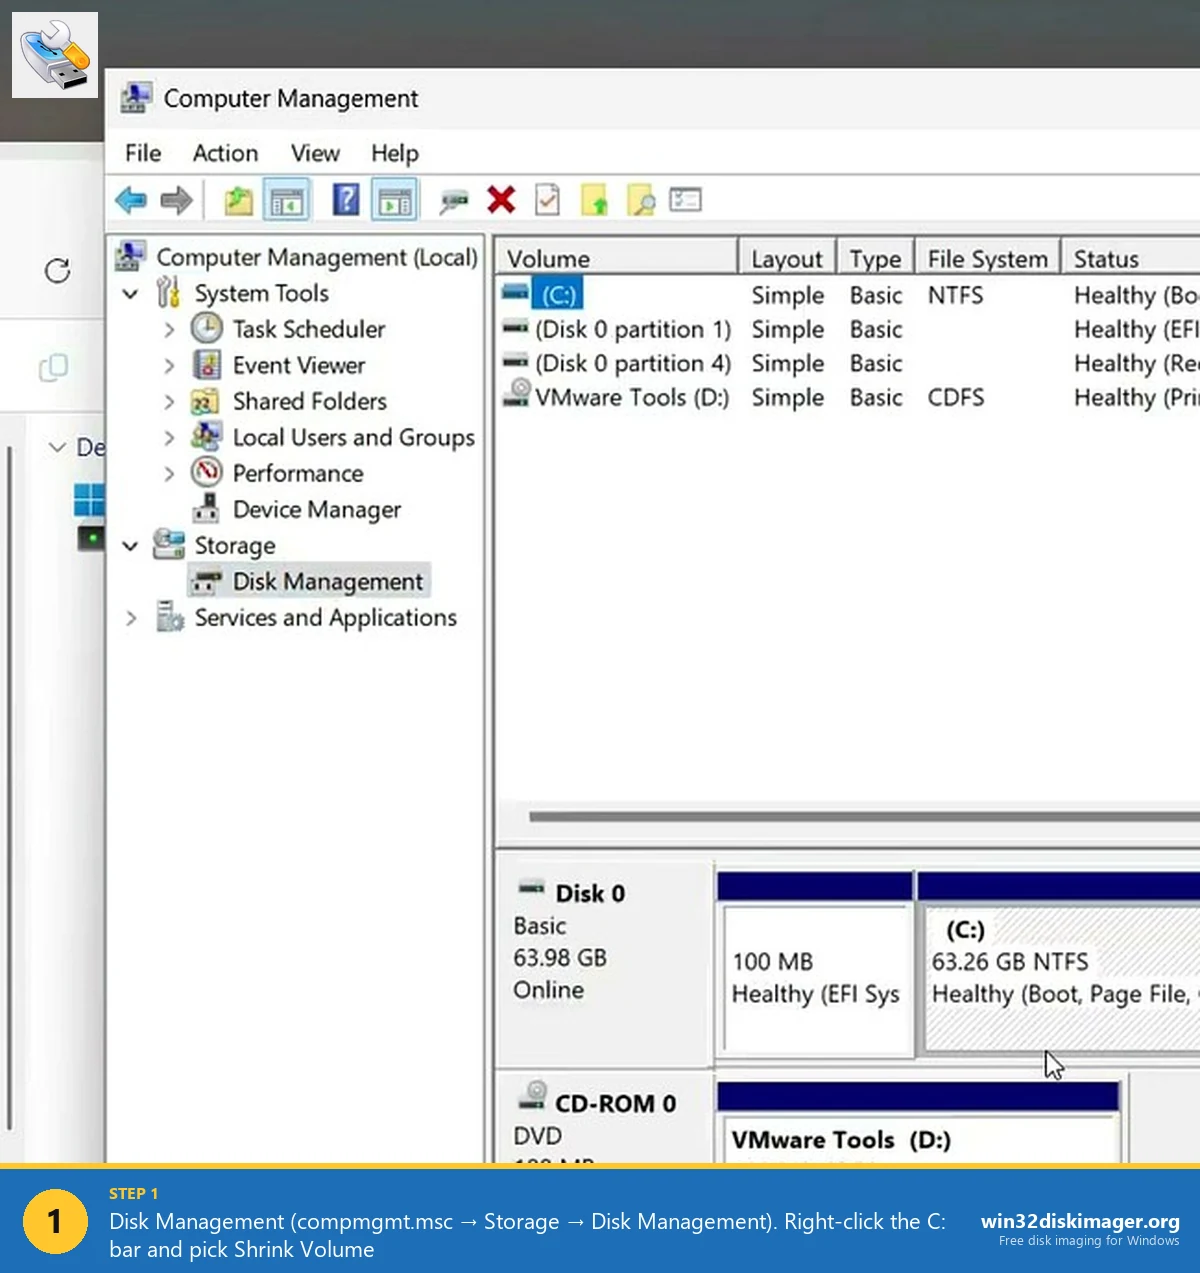
You’ll see a table of volumes at the top and a visual block-map of each physical disk at the bottom. Find the partition you want to shrink. Right-click it, either in the table or in the visual map, and pick Shrink Volume…
Step 2: Pick How Much to Shrink
Windows takes a few seconds to query available space (longer on a big HDD) and then shows a dialog with four fields:
- Total size before shrink in MB – informational
- Size of available shrink space in MB – the max you can take, based on where the last immovable file lives
- Enter the amount of space to shrink in MB – editable, defaults to the max
- Total size after shrink in MB – informational, updates as you type
Pick how much to shrink. If you’re making room for Ubuntu, 60-100 GB (61440-102400 MB) is a sane starting point. For a game drive, 500GB+ is fine. Click Shrink.
Speed depends on how much data has to be relocated. On my NVMe laptop, shrinking C: by 120 GB took about 15 seconds. On a 2TB HDD I once shrunk by 500 GB it was closer to 40 minutes.
After it finishes you’ll see a new Unallocated block right after the shrunk partition. That’s your free space, ready to be formatted as a new volume or handed to a Linux installer.
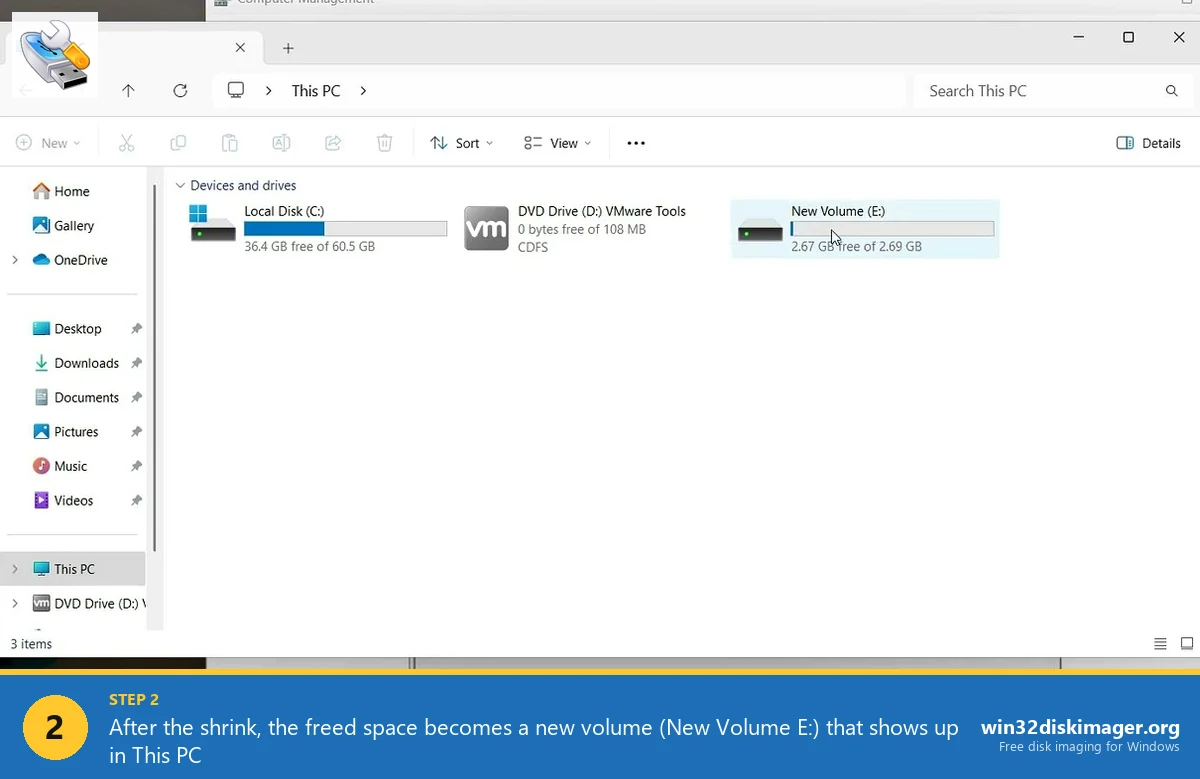
Right-click the Unallocated space → New Simple Volume… → accept the defaults → assign a drive letter → format as NTFS (or exFAT, or leave as RAW for Linux). A few seconds later the new volume shows up in File Explorer.
Why It Won’t Shrink More Than a Few Hundred MB
This is the problem everyone hits. You have 500GB free on a 1TB drive, but Shrink Volume says you can only reclaim 260 MB. It’s not a bug. It’s because Windows cannot move certain files, and the shrink stops at the position of the last one.
The usual culprits, in rough order of how often I see them:
- pagefile.sys – the virtual memory file
- hiberfil.sys – the hibernation file
- System Restore points
- Windows Search index (Windows.edb)
- Volume Shadow Copies
- Immovable metadata from a full NTFS MFT
Fix sequence that almost always works:
- Disable the pagefile. Win+R →
sysdm.cpl→ Advanced → Performance Settings → Advanced → Virtual memory Change → Uncheck “Automatically manage paging file size” → No paging file → Set → OK. Reboot. - Disable hibernation. Admin cmd:
powercfg /h off. Removes hiberfil.sys. - Turn off System Protection on that drive. Same sysdm.cpl → System Protection tab → pick drive → Configure → Disable. Delete existing restore points while you’re there.
- Shrink now. It’ll usually find a lot more available space.
- Re-enable pagefile, hibernation, System Protection afterward (optional but a good idea).
💡 Pro tip: before disabling anything, check the Event Viewer. Event Viewer → Windows Logs → Application, filter by source defrag, look for the “A volume shrink analysis was initiated” entry right after your failed shrink. Windows literally tells you which file blocked the shrink and where on disk it sits. Saved me hours the first time I noticed that.
When to Use a Third-Party Tool Instead
Disk Management can only shrink from the right-hand end of a partition. If the immovable file is in the middle, you’re stuck at “shrink up to that file.” Third-party tools like MiniTool Partition Wizard Free, AOMEI Partition Assistant, or GParted (from a Linux live USB) can shuffle data around to free more space.
I keep a GParted Live USB in my laptop bag, written with Win32 Disk Imager. Boot it, point at the drive, resize whatever you want, reboot into Windows. Two caveats: you must back up first because GParted is less gentle than Disk Management, and encrypted (BitLocker) volumes must be decrypted before any third-party tool can touch them.
Common Errors
“The parameter is incorrect.” Usually means the MFT is in a weird state. Run chkdsk /f /r, reboot, try again.
“There is not enough space available on the disk(s) to complete this operation.” Misleading. Means you don’t have enough free space contiguous at the end. Run defrag (HDD) or the pagefile/hibernation/system-protection sequence above.
Shrink succeeded but the unallocated space isn’t right next to the partition. That happens when you shrank a volume that’s already in the middle of the disk layout. You can’t extend a partition into non-contiguous free space with Disk Management. GParted handles this.
“Shrink Volume is greyed out.” Drive is BitLocker-encrypted (decrypt first), or it’s a dynamic disk (convert to basic), or the drive is read-only.
FAQ
Will shrinking delete my data? No. Data gets relocated, not erased. As long as the shrink completes cleanly, every file stays.
Does shrinking require a reboot? Not the shrink itself. Disabling pagefile and hibernation (if you need those for a bigger shrink) does require reboots.
Can I shrink the system partition (C:) safely? Yes, this is exactly what Windows is designed to support. BitLocker-encrypted C: is the exception, decrypt first.
Can I shrink a partition to smaller than the data on it? No. The minimum size is whatever the currently-used space is, plus some headroom for NTFS metadata.
Does this work the same on Windows 7? Yes, exactly. The Disk Management dialog has barely changed since Vista. Old Win 7 articles that tell you to go via Control Panel → Administrative Tools → Computer Management → Disk Management still work fine, just with more clicks than the Win+X shortcut above.
Wrap-Up
The Shrink Volume command is the most underused disk-partition tool built into Windows. Most people reach for paid third-party software without realising the built-in version is free, safe when you prep properly, and handles 95% of real-world use cases.
If you’re shrinking to make room for an OS install on USB or SD, the next step is usually writing that install image with Win32 Disk Imager. Between the two, you’ve got the full partition-and-image workflow covered with zero extra software.
Related Guides
Pair this guide with the rest of the Win32 Disk Imager knowledge base. These cover the adjacent workflows you’ll hit when working with disk images, bootable USBs, and Windows partition management.
- How to Use Win32 Disk Imager — Complete Beginner Guide — The full reference for the Win32 Disk Imager tool itself — install, UI walkthrough, and common workflows.
- Hide a Partition in Windows 11 with Diskpart — Remove a drive letter via diskpart to keep a partition out of File Explorer. Casual hiding, not encryption.
- Create a Windows 11 Recovery Drive (USB) — Modern Win 10/11 replacement for the old System Repair Disc. Reinstalls Windows from a single USB when the boot drive dies.
- Write an IMG File to USB with Win32 Disk Imager — Step-by-step for writing a .img or .iso to USB on Windows 10/11 with real benchmarks and error fixes.