In 2026, the only people still installing Windows XP are doing it for one of four reasons. A vintage hardware build (think ThinkPad T42, old IBM tower). An industrial controller running legacy software that will never be ported. A retro gaming rig for games that hate anything newer (Thief 2, Deus Ex, pre-2007 SecuROM titles). Or a museum / archival project.
I’ve done three of those four in the last year. My old Dell Optiplex GX270 boots XP off a USB stick faster than most modern boxes boot Windows 11. The process is weirder than installing a modern OS because XP’s installer genuinely was never designed to run from USB, but it works reliably once you know the trick.
TL;DR: You can’t just write an XP ISO straight to USB the way you’d do with Windows 11. Use WinToFlash or Rufus in “DD Image” + “XP support” mode, because XP’s setup runs in two phases and needs the USB to act like a boot sector AND a file source. Below is the step-by-step plus what to check on the target PC’s BIOS.
Before You Start: Is the Target PC Actually Capable?
XP’s USB boot support is the big blocker. PCs built before ~2005 often have BIOSes that only boot from CD/DVD, floppy, or IDE. USB boot wasn’t universal in that era.
- Enter the BIOS on boot (Del, F1, F2, F10 depending on vendor).
- Look under Boot Order or Advanced BIOS Features for a “USB” option. Could be labeled USB-HDD, USB-ZIP, USB-FDD, Removable Devices, or just USB.
- If the option isn’t there, you’re stuck. Either burn a CD instead, or use a DVD-ROM PCI card.
- If it IS there, set it as the first boot device.
Also: XP only officially supports MBR partition tables, not GPT. Your target disk needs to be set up as MBR. Modern UEFI-only motherboards with no CSM fallback will refuse to boot XP at all, so check for a “Legacy Boot” or “CSM” toggle.
What You Need
- A genuine Windows XP ISO (SP3 strongly preferred, ideally with integrated mass-storage drivers if the target is an SATA machine, see the “F6 drivers” note below)
- A USB flash drive, 2GB minimum, 4GB+ is comfortable. Avoid USB 3.0 sticks on very old hardware, some XP-era BIOSes only enumerate USB 2.0 ports
- A working Windows 10/11 machine to prepare the USB
- One of: Rufus, WinToFlash, or Win32 Disk Imager (for a pre-made XP USB image)
Method 1: Rufus (Fastest, Still Works in 2026)
Rufus has supported XP ISOs for years. This is what I use most often.
- Download Rufus from rufus.ie. Portable build, no install.
- Plug in the USB. Everything on it will be wiped.
- Open Rufus. Pick the USB under Device.
- Under Boot selection, click SELECT and pick your XP ISO.
- Rufus auto-detects XP and switches to MBR partition scheme + BIOS (or UEFI-CSM). Good.
- File system: FAT32 or NTFS both work. NTFS is safer for >4GB ISOs, which XP never is, so FAT32 is fine.
- Click START. Wait 3-10 minutes depending on USB speed.
When Rufus finishes, the USB is bootable. Pop it into the retro PC, boot from USB, and XP Setup should start copying files. Then comes the part everyone forgets: after the first reboot, pull the USB out for a second, let the system boot from the hard drive to continue setup, then plug it back in. Setup on some older BIOSes will otherwise loop back to the USB boot menu endlessly.
Method 2: WinToFlash (If Rufus Fails)
WinToFlash is the original XP-to-USB tool. Stubborn, old-looking UI, but handles edge cases Rufus sometimes chokes on.
- Download WinToFlash Lite from novicorp.com. Portable version exists.
- Run WinToFlash.exe (no install needed).
- Pick Windows Setup Transfer Wizard from the home screen.
- Source: point at your extracted XP ISO folder (extract the ISO with 7-Zip first if you haven’t) or the mounted ISO.
- Destination: pick the USB.
- Accept the Microsoft EULA (XP’s install license, not WinToFlash’s).
- Click Next and let it copy. Takes 5-15 minutes on a USB 2.0 port.
WinToFlash sets up a two-stage boot config: first boot from USB loads the text-mode setup, second boot from USB (after Setup copies files to the hard drive) continues the graphical stage. You’ll see an on-screen menu on the second boot asking which to pick, choose “GUI mode”.
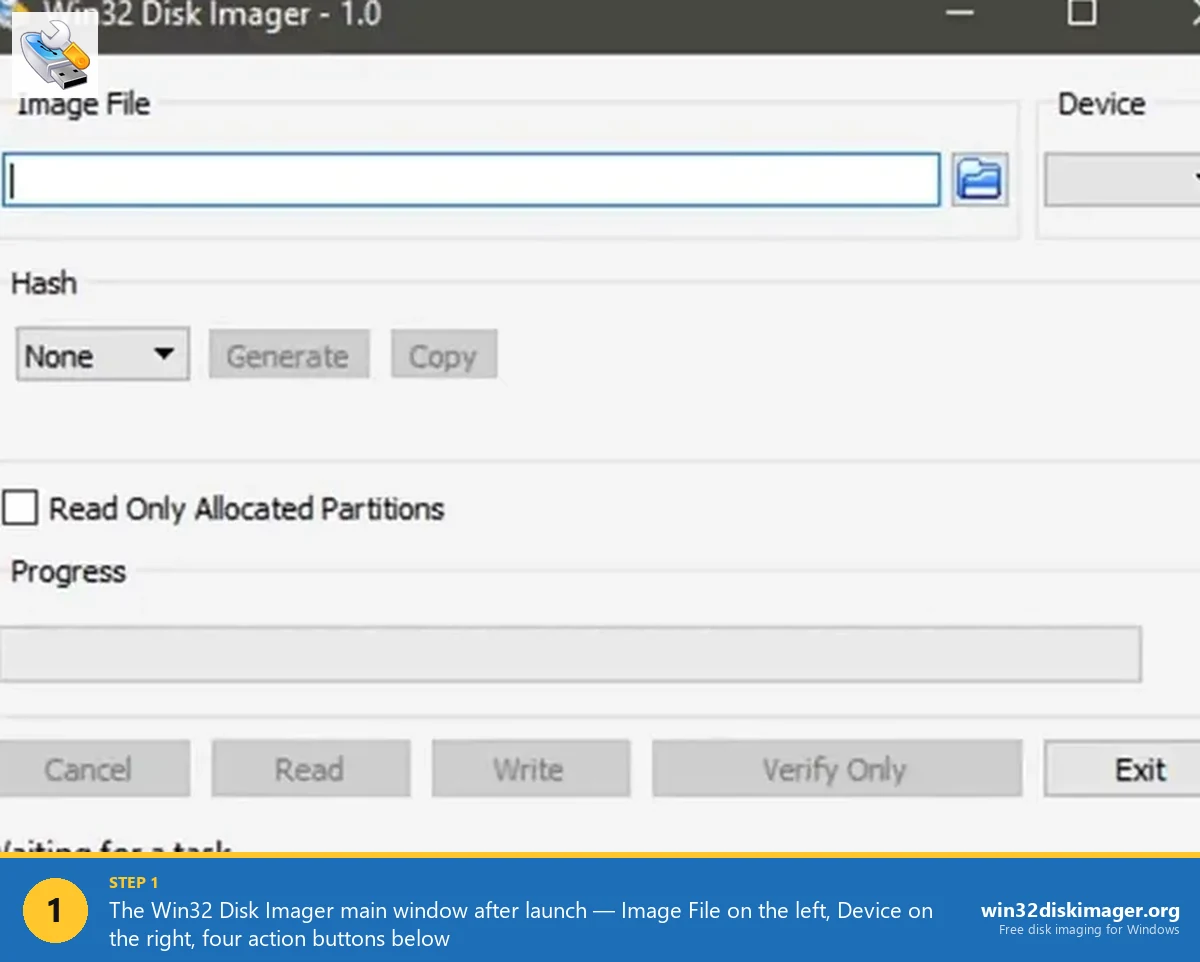
Method 3: Win32 Disk Imager with a Pre-Made XP USB Image
If you already have a bootable XP USB you made on another machine, or you downloaded a pre-made .img file of an XP install USB from a vintage-computing community, Win32 Disk Imager will write it to a fresh USB bit-for-bit and preserve the boot sector.
Workflow:
- Download Win32 Disk Imager from this site.
- Plug in the target USB.
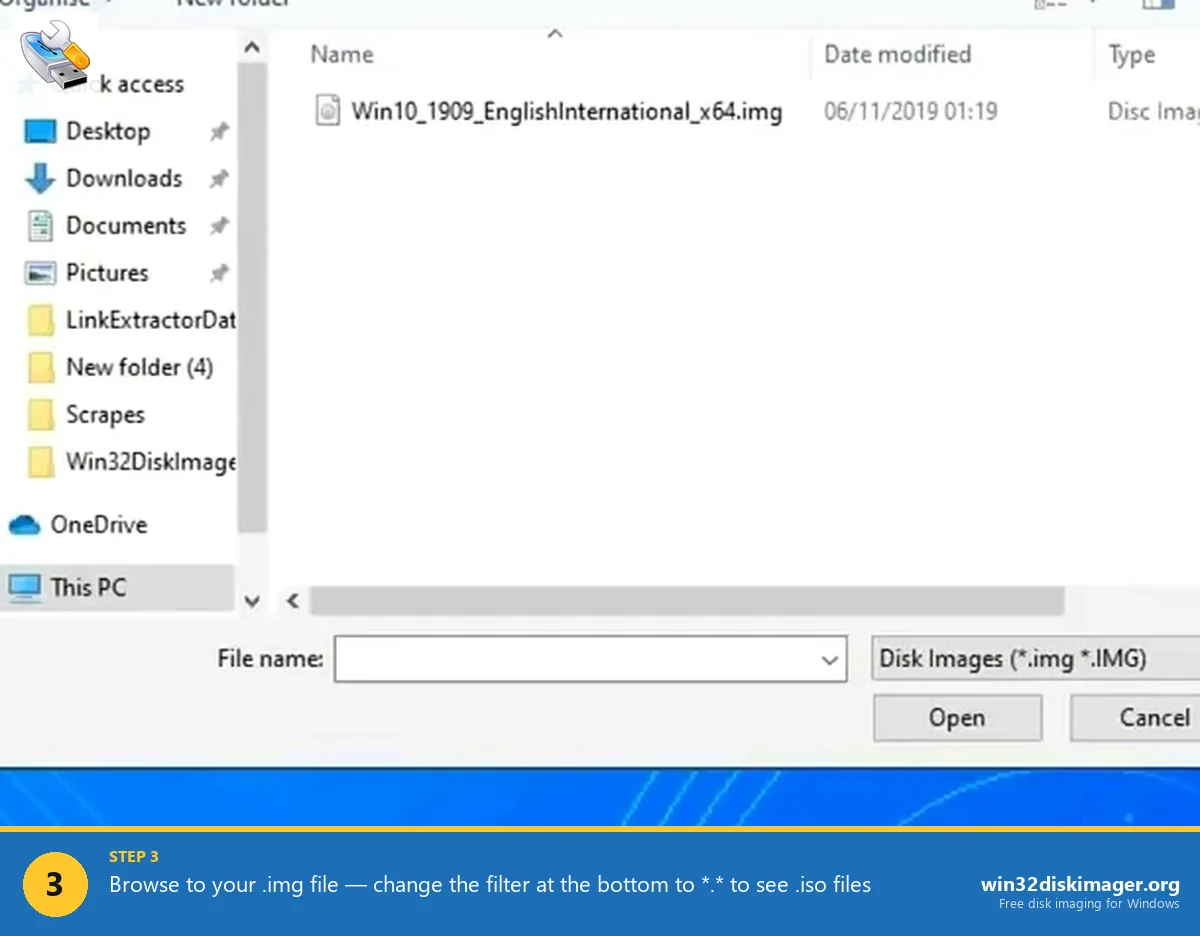
- Open Disk Imager. Image File → browse to your pre-made XP USB image (
.img). - Device → pick the target USB (check the drive letter twice, wrong target = wiped drive).
- Click Write.
Ten minutes later you’ve got an identical bootable copy. This is the fastest way if you’re building multiple XP USBs for a lab or a set of identical retro machines. Full walkthrough over at how to write an IMG file to USB with Win32 Disk Imager.
The F6 Drivers Trap (SATA Machines)
XP’s install disc predates SATA. If the target PC has SATA instead of IDE, Setup will tell you “Setup did not find any hard disk drives installed in your computer” and refuse to continue. This is universal pain for XP-on-modern-hardware installs.
Three fixes, pick one:
- BIOS → set SATA mode to IDE / Legacy / Compatibility. Cleanest option if the BIOS supports it. Most pre-2012 boards do.
- Slipstream SATA drivers into the ISO first using nLite. A one-time pain that produces a universal ISO you can reuse.
- Press F6 during the blue text-mode setup screen when it says “Press F6 if you need to install a third-party SCSI or RAID driver.” The wizard lets you load a driver from a floppy. Some USB boot tools can fake a floppy partition for this.
Option 1 is what I do 90% of the time. Easier.
Licensing in 2026
Microsoft no longer activates XP online, full stop. The activation servers are gone. Two options if you need to activate:
- Phone activation still works on some regional lines. You dial the number, key in the installation ID, and get back a confirmation ID. Success rate is spotty in 2026.
- Unactivated 30-day grace period. XP runs fully functional for 30 days without activation. For archival or testing use, that’s often all you need.
If you have a legit COA sticker with a product key, use it. Enter the key during install and hold a grudge against Microsoft for turning off the activation servers.
Common Gotchas
Stuck at “Setup is starting Windows” on the black screen. USB 3.0 port issue on old BIOSes. Move the USB to a USB 2.0 port. Most pre-2012 motherboards mark them clearly.
“A disk read error occurred. Press Ctrl+Alt+Del to restart.” The USB’s boot sector didn’t install correctly. Re-run Rufus. Try FAT32 if you used NTFS.
Setup loops back to USB boot after first reboot. Either disable “boot from USB” in BIOS after the first stage completes, or unplug the USB for a few seconds at the right moment. I prefer the BIOS method, less timing-sensitive.
XP installs but won’t see network. The install ISO doesn’t include drivers for most modern (post-2010) network chipsets. Grab drivers on a working PC, put them on a separate USB, install manually.
Can I Just Run XP in a VM Instead?
For 80% of “I need XP to run one app” cases, yes. VMware Workstation Player (free) and VirtualBox both run XP happily. You get a snapshot-able, portable XP environment without any USB shenanigans.
Native XP on real hardware is for: driver-dependent projects, parallel-port tools, ISA expansion cards, vintage game DRM that detects VMs, or nostalgia. If one of those is your scene, the USB install is the path.
FAQ
Does this work for Windows 2000 or earlier? Windows 2000 yes, same tools. Windows 98 and ME need different tools (HPUSBFW, or a bootable DOS USB) because 9x’s install structure is very different.
Is there a 32-bit vs 64-bit issue? Pick the XP ISO architecture that matches the CPU. 32-bit runs on pretty much any old hardware. 64-bit XP was rare and had poor driver support, most people should use 32-bit.
Why not just use Ventoy? You can. Ventoy works with XP ISOs but sometimes needs a secondary plugin for the two-stage setup quirk. Not worse than Rufus if you’re already a Ventoy user, but Rufus is simpler for a one-off.
Is it safe to use XP online? No. XP has had no security updates since 2014. Keep it air-gapped or behind an aggressive firewall. For internet-facing retro use, set up a Linux router in front of it.
Wrap-Up
Installing XP from USB in 2026 is a niche skill, but the tools still work. Rufus for 99% of cases, WinToFlash as a backup, and Win32 Disk Imager if you’re cloning a pre-made XP USB image to multiple machines. The biggest gotchas are BIOS USB-boot support and SATA mode, both of which are easier to fix in BIOS than to work around in setup.
If you’re here because the old guides that mention WinToFlash-only no longer fit your workflow, hopefully this covers the 2026 reality. And if you’re writing any other .img file to USB (Linux distro, Raspberry Pi OS, pfSense, custom retro builds), the Win32 Disk Imager walkthrough is the tool-agnostic sibling to this one.
Related Guides
Pair this guide with the rest of the Win32 Disk Imager knowledge base. These cover the adjacent workflows you’ll hit when working with disk images, bootable USBs, and Windows partition management.
- How to Use Win32 Disk Imager — Complete Beginner Guide — The full reference for the Win32 Disk Imager tool itself — install, UI walkthrough, and common workflows.
- Write an IMG File to USB with Win32 Disk Imager — Step-by-step for writing a .img or .iso to USB on Windows 10/11 with real benchmarks and error fixes.
- Create a Windows 11 Recovery Drive (USB) — Modern Win 10/11 replacement for the old System Repair Disc. Reinstalls Windows from a single USB when the boot drive dies.