The last time I counted, I had four bootable USB sticks in my desk drawer: current Windows 11, Windows 11 with TPM bypass, Ubuntu 24.04, and a multi-boot Ventoy stick. They rotate through every PC I touch, and maybe 80% of Windows install jobs start with plugging one in and hitting F12 at boot. The USB install is still the baseline method, and on 2026 hardware it takes about 3 minutes to build and 20 to actually install.
Microsoft’s own Media Creation Tool is the “safe path” if you have a supported PC. For literally everything else, older CPUs without TPM 2.0, custom editions, a cleaner OOBE, pushing 24H2 onto a pre-24H2 system, you want Rufus. I’ll cover both. Rufus is the one I recommend for 95% of cases because it’s faster, skips the TPM check if you ask it to, and doesn’t need to re-download the ISO every time.
TL;DR: Download Rufus from rufus.ie. Plug in an 8+ GB USB stick. Run Rufus → pick Device → click SELECT → pick your Windows 11 ISO (or click DOWNLOAD arrow to grab one inside Rufus) → choose GPT + UEFI → START. Takes 3-5 minutes on a USB 3.0 stick.
Media Creation Tool vs Rufus: Which Is Better?
Quick breakdown of what each does:
Media Creation Tool (the official Microsoft utility). Pros: official, one-click, always the latest official build. Cons: re-downloads the ISO every time, slower (adds 10-15 minutes over Rufus), enforces TPM/Secure Boot checks, no customization.
Rufus (third-party, but open-source). Pros: can reuse a downloaded ISO, faster (writes at USB 3 speeds), can bypass TPM 2.0 / Secure Boot / RAM requirement, can build multi-boot drives, has a built-in ISO downloader for Win 11. Cons: you’re trusting a non-Microsoft tool (though it’s been maintained since 2011 by Pete Batard, highly trusted in the community).
For anyone with a pre-TPM system (CPUs older than Intel 8th-gen or Ryzen 2000), Rufus is the only option that’ll let you install at all. For a modern PC on current hardware, either tool works, but I still pick Rufus because it’s just faster and gives you more control.
What You Need
- A USB flash drive with at least 8 GB (16 GB safer). Contents will be wiped. USB 3.0 is faster but USB 2.0 works.
- A working PC with internet access to download the ISO and Rufus.
- About 15-20 minutes total for creation, then another 30-45 minutes to actually install on the target PC.
Good USB stick choices: SanDisk Ultra Fit (USB 3.0), Samsung FIT Plus, Kingston DataTraveler. Cheap no-name USB 2.0 sticks work but take 15+ minutes to write the image. Not worth the frustration.
Method 1: Rufus (Recommended)
Grab Rufus from rufus.ie. Portable version, no installer, about 1.5 MB. Always download from the official site, there are scam clones with similar names.
Run rufus-4.x.exe. You’ll get the Rufus window.
Step by step:
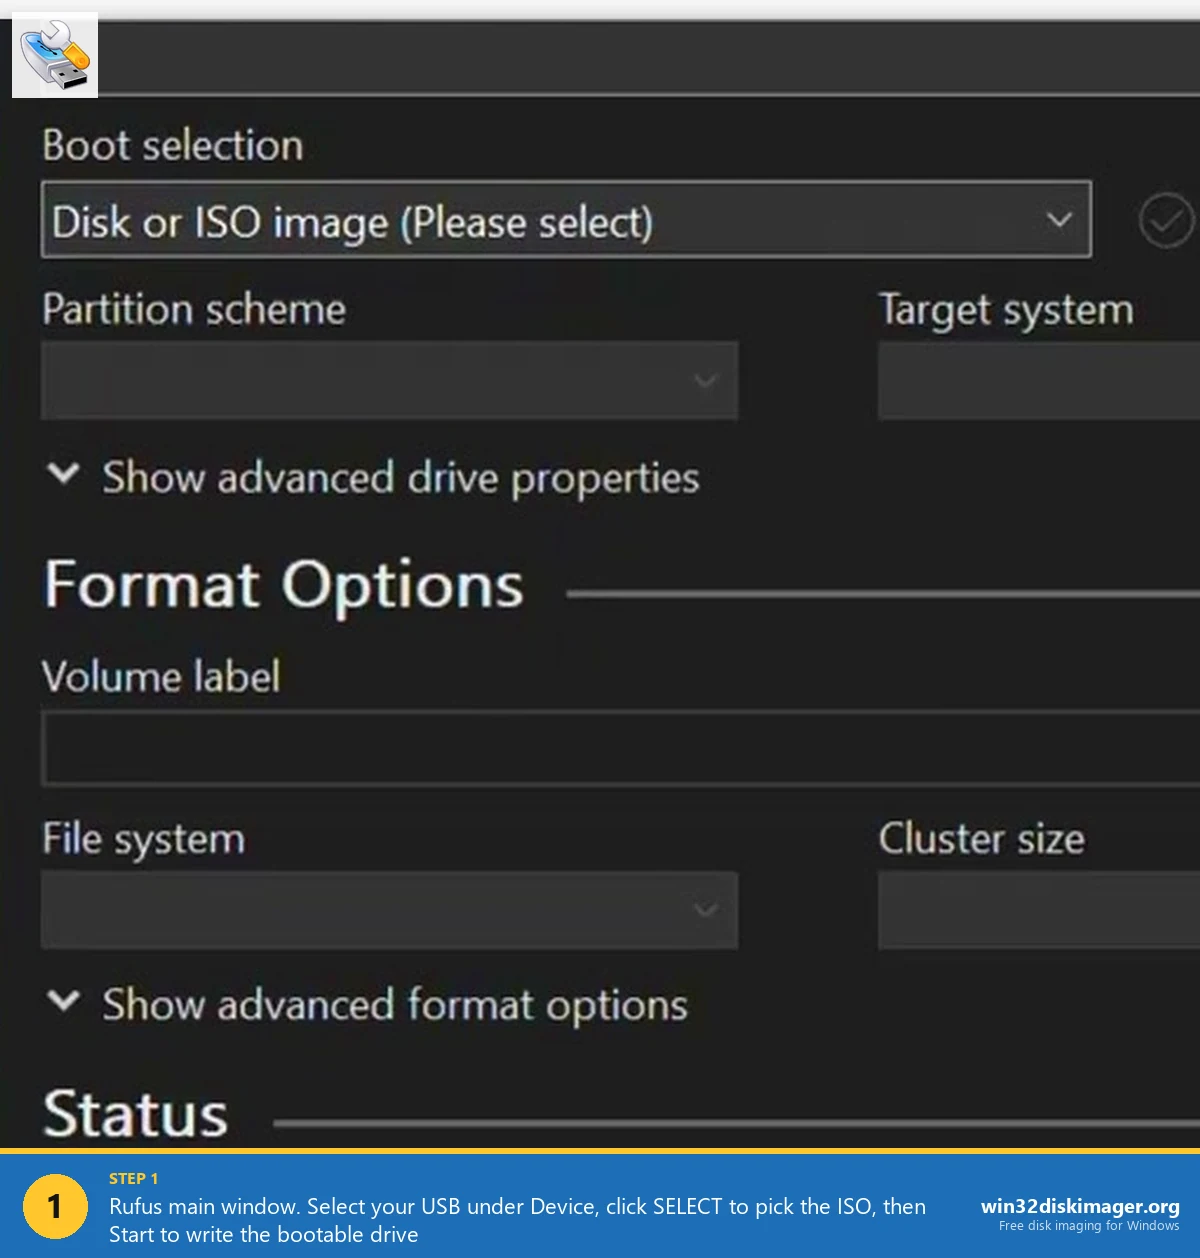
1. Plug in the USB. Rufus auto-detects it under the Device dropdown. Verify the right one is selected (triple-check, wrong USB = wiped family photos).
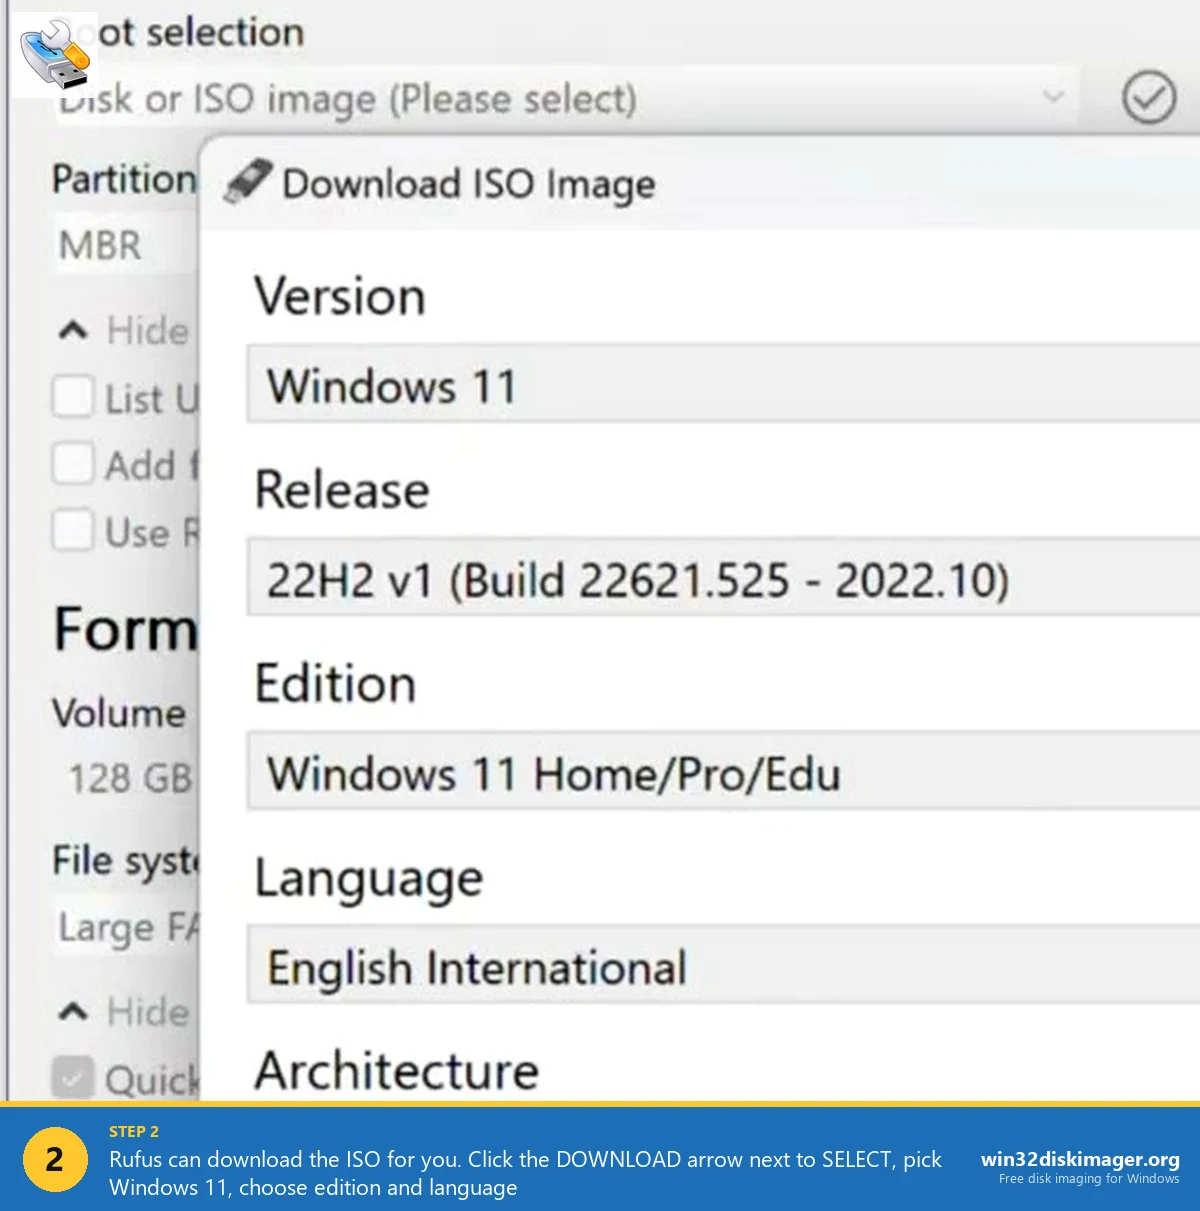
2. Boot selection: click SELECT, browse to your downloaded Win11 ISO. Or if you don’t have one yet, click the little arrow next to SELECT → DOWNLOAD → pick Windows 11, your preferred edition (Home/Pro/Edu is the common one), language, and architecture (x64 for all modern PCs). Rufus downloads the official Microsoft ISO directly.
3. Image option: leave as “Standard Windows installation.”
4. Partition scheme: GPT for modern PCs (UEFI). MBR only if you’re installing on a legacy BIOS system, typically pre-2013 hardware.
5. Target system: UEFI (non CSM). That’s the default on GPT, leave it.
6. Volume label: whatever, defaults to “CCCOMA_X64FRE_EN-US_DV9” or similar. Rename to “WIN11” if you want it pretty.
7. File system: NTFS. Default and correct.
8. Click START. Rufus pops up a “Windows User Experience” dialog. This is where the magic happens:
- Remove requirement for 4GB+ RAM, Secure Boot, and TPM 2.0. Check this if your PC doesn’t meet Win 11 requirements.
- Remove requirement for online Microsoft account. Hugely useful. Skips the forced MSA during OOBE so you can create a local account directly.
- Disable data collection (skip privacy questions).
- Set regional and time options to Bypass (uses defaults).
I check all four every time. Click OK.
Rufus warns that all data on the USB will be destroyed. Click OK. Writing begins. 3-5 minutes on USB 3.0, longer on USB 2.0. When it says READY, you’re done. Eject, plug into the target PC, boot.
Method 2: Media Creation Tool
Microsoft’s official path. Go to microsoft.com/software-download/windows11. Under “Create Windows 11 Installation Media,” click Download Now. You get MediaCreationTool_Win11_xxxxx.exe.
Run it:
- Accept license terms.
- Pick language and edition (usually pre-filled based on the PC you’re running it from).
- Choose USB flash drive.
- Select the plugged-in USB from the list.
- Wait 20-30 minutes while it downloads ISO + writes to USB.
That’s it. Eject, boot from it on the target PC. You’ll get the standard Win 11 installer with full TPM/Secure Boot enforcement.
⚠️ Heads up: Media Creation Tool and Rufus both create UEFI bootable USBs by default. If your target PC is legacy BIOS only, MCT doesn’t give you an option, it’ll fail to boot. That’s another reason to pick Rufus when you’re dealing with older hardware.
Booting from the USB
Plug the finished USB into the target PC. Power on. Immediately start mashing the boot-menu key before the Windows logo appears. Common keys by brand:
- ASUS: F8 or Esc
- Dell: F12
- HP: F9 (or Esc then F9)
- Lenovo: F12 or Fn+F12 on ThinkPads, Novo button on IdeaPads
- Acer / Gigabyte: F12
- MSI: F11
- Apple (Boot Camp): hold Option at startup
If none of those work, check the splash screen at boot, it almost always says “Press X for boot menu” somewhere. Once in the menu, pick your USB from the list (might be labeled “UEFI: Kingston…” or similar).
Windows Setup starts. From here it’s the standard install wizard.
Clean Install vs Upgrade Install
At the partition selection screen in Windows Setup, you pick where to install. Two real paths:
- Clean install: select the existing Windows partition → Delete → New → Next. Windows creates its partitions fresh. Old data gone. Cleanest possible result.
- In-place over an existing install: select the existing Windows partition → Next. Windows installs alongside, creates Windows.old with your previous system.
For repair/refresh scenarios where you want to keep files, the setup.exe method from the running OS (covered in our ISO install guide) is actually easier than booting from USB.
Backup Before You Start
I keep saying this and I’ll keep saying it: image your C: drive before reinstalling. A bootable USB with a fresh Win 11 ISO is great until something goes wrong and you realize you just wiped the partition that had your tax files.
Fastest backup: connect an external drive, use Win32 Disk Imager to Read the internal disk to an IMG file on the external. 5 minutes of effort, saves you from 100% of the “oh no” moments.
FAQ
Can I make a Windows 11 USB on Linux?
Yes. Use woeusb-ng or ventoy. Ventoy is my pick, copy the ISO file directly to a Ventoy-formatted USB and boot it, no re-writing needed. Works on Linux, macOS, Windows.
Does Rufus’ TPM bypass void my Windows license?
No. The license activation is based on the Microsoft account or product key, not the hardware compatibility check. Your copy of Windows 11 will activate normally. The only caveat: Microsoft reserves the right to withhold updates on “unsupported” systems, though in practice, feature updates have kept flowing to TPM-bypassed Win 11 installs through 24H2.
Why does Rufus say my ISO is “not a valid Windows image”?
Corrupted download. Re-download the ISO from Microsoft. Also verify the SHA-256 hash matches the one Microsoft publishes. A partial download will happily extract but fail Rufus’ integrity check.
Can I dual-boot Windows 11 with Linux using this USB?
Yes. Install Windows 11 first from the USB onto its own partition, then boot your Linux live USB and install Linux afterward (most distros auto-detect Windows and add it to GRUB). Reversing the order is possible but you have to manually repair the bootloader after Windows overwrites it.
How long does writing the USB take?
Rufus on USB 3.0: 3-5 minutes. Rufus on USB 2.0: 15-20 minutes. Media Creation Tool adds 10-15 minutes for the ISO download. If it’s taking 30+ minutes with Rufus on USB 3.0, your stick is probably slow or dying, try a different one.
Wrapping Up
Rufus + a decent USB 3.0 stick + Microsoft’s official ISO is the three-ingredient recipe for every Windows 11 install I do. Media Creation Tool is fine if you want the training-wheels path, but once you’ve used Rufus with the Windows User Experience bypass flags, you don’t go back. And once you’ve got Windows installed on the target machine, the very next thing I always do is image that fresh install with Win32 Disk Imager as a baseline snapshot. Two-hour job becomes a 10-minute restore next time.
Related Guides
Pair this guide with the rest of the Win32 Disk Imager knowledge base. These cover the adjacent workflows you’ll hit when working with disk images, bootable USBs, and Windows partition management.
- Install Windows 11 from an ISO without a USB (setup.exe Method) — Reinstall Windows 11 without a bootable USB by mounting the ISO and running setup.exe from the running OS.
- Create a Windows 11 Recovery Drive (USB) — Modern Win 10/11 replacement for the old System Repair Disc. Reinstalls Windows from a single USB when the boot drive dies.
- Write an IMG File to USB with Win32 Disk Imager — Step-by-step for writing a .img or .iso to USB on Windows 10/11 with real benchmarks and error fixes.
- How to Use Win32 Disk Imager — Complete Beginner Guide — The full reference for the Win32 Disk Imager tool itself — install, UI walkthrough, and common workflows.
See also: If you’d rather use Win32 Disk Imager instead of Rufus or MCT for the same task: Create a Bootable USB for Windows 10/11 with Win32 Disk Imager.