I bought a 2 TB NVMe last Black Friday for my ThinkPad. Cloned the old 512 GB drive over with Macrium, booted up, opened File Explorer, and sat there staring at a single C: drive with 1.5 TB of unallocated space doing nothing. Windows never auto-extends into unused space after a clone, you have to partition it yourself, and that dialog is still the same clunky MMC snap-in it’s been since Windows XP.
Partitioning a drive in Windows 11 takes about 90 seconds once you know where to click. I’ve done this on maybe 40 machines over the years, and the one thing that trips people up is the shrink step, specifically, why Windows won’t let you shrink a 2 TB volume down to 500 GB even when it says there’s 1.5 TB free. I’ll cover that too, plus the diskpart route for when Disk Management is being stubborn.
TL;DR: Win+X → Disk Management → right-click the C: volume → Shrink Volume → enter MB → right-click the new unallocated block → New Simple Volume → NTFS, default cluster size, done. Five minutes if everything cooperates.
Why Partition a Drive in the First Place?
Three reasons I still do this in 2026:
- Separating OS from data. If Windows corrupts itself, a clean reinstall on C: leaves everything on D: untouched. Saved me twice from a failed feature update.
- Dual-boot setups. Want Linux on the same drive? You need unallocated space first, and Windows Disk Management is the cleanest way to carve it out.
- Dedicated backup targets. I keep a D: drive specifically for disk images, Acronis files, and Win32 Disk Imager IMG backups. Keeps them out of the OneDrive sync net.
Modern take: if you’ve got a single-drive laptop, partitioning is kind of overrated. A separate physical SSD via USB 3.2 is cheap and safer. But for a 2 TB internal drive where you want a game library, a scratch drive for video editing, or a dedicated VM partition, carving it up with Disk Management is free and instant.
How to Open Disk Management in Windows 11
Three ways, pick whichever:
Fastest: Press Win+X. This opens the Power User menu (the right-click-on-Start-button menu). Click Disk Management. Boom, you’re in.
Via Run: Win+R, type diskmgmt.msc, Enter.
Via Computer Management: Search “Computer Management” in Start, open it, expand Storage in the left pane, click Disk Management. This shows Disk Management embedded in the MMC with Event Viewer, Services, and all the other admin tools in the sidebar.
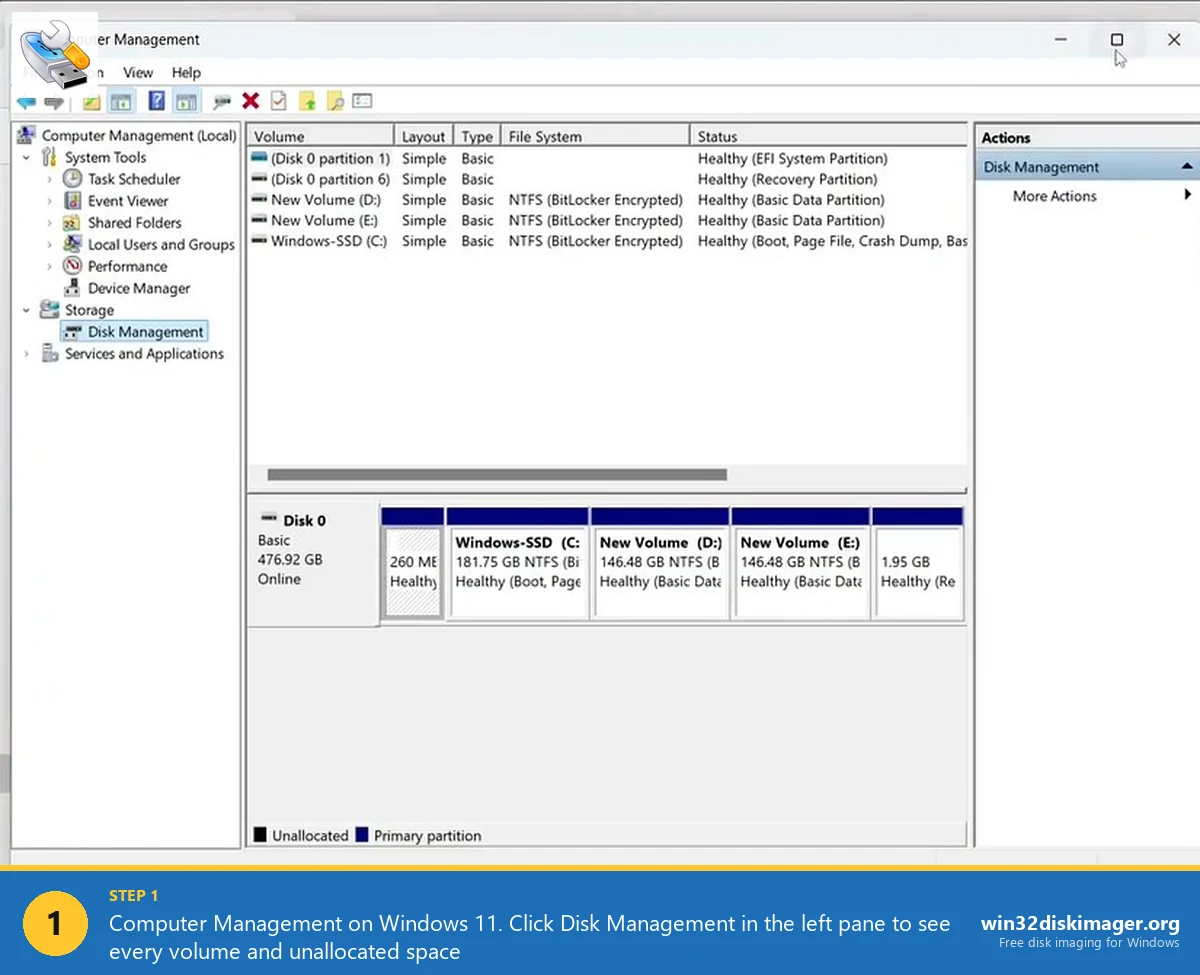
Either way, you land on the same view: a top pane listing every volume (C:, D:, recovery partitions, EFI, the works), and a bottom pane showing a graphical block for each physical disk with its partitions laid out proportionally.

Step-by-Step: Create a New Partition from Free Space
Assuming you already have unallocated space (the black-bar block in the graphical view), this is the easy path. If you don’t, skip to the next section on shrinking.
1. Right-click the unallocated space in the bottom pane. Pick New Simple Volume. A wizard pops up. Click Next.
2. Specify volume size. It defaults to the full unallocated amount. If you want a smaller partition (carving the unallocated space into two, say), type the MB value. Example: for a 500 GB partition, type 512000. Yes, it’s MB, not GB. Windows still uses decimal MB here.
3. Assign a drive letter. Windows picks the next free letter (usually D: or E:). Change it if you want. Pro tip: skip over letters reserved by network drives. If you map a network share as Z: and let Windows auto-assign a new partition to Z: because Z: wasn’t mounted at the time, you’ll get drive-letter collisions later.
4. Format. Pick NTFS (default), default allocation unit size, give it a volume label like Games or Data. Tick Perform a quick format, leave Enable file and folder compression off. Quick format is fine on a new partition. A full format is a waste of time unless you’re recycling a drive and want to detect bad sectors.
5. Finish. The partition appears in File Explorer within about 2 seconds. Done.
Shrinking an Existing Partition to Make Room
This is where people run into the annoying “available shrink space” problem. Here’s what’s happening:
Right-click the volume (usually C:) → Shrink Volume. Windows runs a quick scan and shows you how much you can shrink by. Often this number is way lower than the actual free space. You’ve got 400 GB free on a 2 TB drive but Windows says you can only shrink by 100 GB?
The cause is immovable files. Windows can’t move the paging file, hibernation file, or system volume information across the boundary you’re trying to shrink past. Once those files are physically located somewhere in the middle of the drive, the shrinker gives up at that exact offset.
The fix, in order of least invasive to most:
- Disable hibernation temporarily. Open an admin Command Prompt, run
powercfg -h off. This removeshiberfil.sys(often 8-16 GB depending on RAM). - Disable System Restore for the drive. System Protection → configure → Disable → Delete. Clears the restore-point data that pins files mid-drive.
- Disable the paging file. System Properties → Advanced → Performance Settings → Advanced → Change → uncheck auto-manage, pick No paging file. Reboot.
- Defrag + optimize. Run
defrag C: /Xas admin. This consolidates free space toward the end of the volume. - After all that, re-run Shrink Volume. You’ll get a much larger number.
- Re-enable hibernation (
powercfg -h on), paging file, and system protection after you’re done.
Sidebar, we covered the full shrink workflow on the dedicated shrink post with more detail on the immovable-files issue. Worth a read if Disk Management is giving you grief.
Using Diskpart from the Command Line
Sometimes Disk Management just won’t cooperate. Dialog hangs, context menu missing options, the volume is marked as RAW. For those cases, diskpart from an admin Command Prompt is the nuclear option.
Open an admin cmd, run diskpart, and you get an interactive prompt. Here’s the create-new-partition flow from scratch on a disk that already has unallocated space:
list disk
select disk 0
list partition
create partition primary size=512000
format fs=ntfs quick label="Data"
assign letter=D
exit
Sizes are in MB. size=512000 gives you a 500 GB partition. Omit size= to use the entire unallocated region.
⚠️ Heads up: select disk 0 picks the first disk. Always list disk first and verify the size. Selecting the wrong disk in diskpart and typing clean will wipe the partition table. Ask me how I know.
MBR vs GPT, and Why You Probably Want GPT
Every disk in Windows 11 uses one of two partition table formats: MBR or GPT.
- MBR (Master Boot Record) is the 1983 format. Max 4 primary partitions, 2 TB size cap. Any drive over 2 TB initialized as MBR loses the extra capacity. Still used on old BIOS-mode systems.
- GPT (GUID Partition Table) is the modern standard. 128 partitions, petabyte-scale, required for UEFI boot. This is what you want for any drive you’re partitioning in 2026.
Windows 11 literally requires GPT for the boot drive (it’s a UEFI-only OS). Secondary drives can be either, but there’s no reason to pick MBR for a new partition unless you’re explicitly setting up a vintage dual-boot with Win7 BIOS.
Check which one your drive uses: in Disk Management, right-click the disk label (the left block that says “Disk 0”) → Properties → Volumes tab → Partition style. If it says MBR and you’ve got a drive over 2 TB, convert it with mbr2gpt /convert /disk:0 from an admin cmd (Windows has to be offline or this runs in WinRE).
Common Errors and What They Mean
“Not enough space to complete this operation.” Usually means you’re trying to shrink past an immovable file boundary. Follow the fix list in the shrinking section.
“The operation failed to complete because Disk Management console is not up-to-date.” Right-click the top of the Disk Management window → Refresh. Or just close and reopen it. Known bug, appears after the drive structure changes externally (for example, after connecting a USB drive mid-session).
“Access is denied.” You’re running Disk Management as a standard user on a managed machine, or UAC blocked it. Run diskmgmt.msc as administrator (right-click → Run as administrator from Start).
New partition won’t show a drive letter. Right-click the new volume → Change Drive Letter and Paths → Add. Common after a diskpart session where you forgot the assign letter step.
FAQ
Can I partition a drive without losing data?
Yes, if you’re shrinking an existing volume to carve out new unallocated space, Windows preserves the data on the original volume. Creating a new volume from unallocated space doesn’t touch other partitions. But backup first, always. Anything involving partition tables carries a tiny risk of metadata corruption.
Why is my 2 TB drive showing only 1.8 TB?
Manufacturer vs OS unit math. Drive makers use decimal gigabytes (1 TB = 1,000,000,000,000 bytes). Windows reports in binary (1 TiB = 1,099,511,627,776 bytes). A “2 TB” drive has about 1.818 TiB of usable space. Nothing is missing, it’s a labeling convention difference that’s existed for 30 years.
How many partitions should I create?
For most people, 2 is enough. C: for Windows and installed apps, D: for data. More than 3 gets annoying to manage and you’ll waste space on each one. The exception is a specific workflow, one partition per VM, one per client project, one per game launcher.
Can I merge partitions later?
Windows Disk Management doesn’t do in-place merge. You’d delete one partition (losing its data) and then extend the adjacent partition into the freed space. For non-destructive merge, use AOMEI Partition Assistant or MiniTool Partition Wizard.
Does partitioning wear down an SSD?
Negligibly. Creating and formatting a partition writes a few megabytes of metadata. A quick format on a modern SSD takes maybe 30 seconds of writes that the drive’s wear-leveling distributes invisibly. Don’t worry about it.
Wrapping Up
Partitioning in Windows 11 is a 5-minute job that feels harder than it is because the UI is 20 years old. Disk Management for the standard workflow, diskpart when it misbehaves, and back up before any destructive operation. If you’re partitioning to set up a dedicated backup drive, that’s the perfect excuse to finally learn Win32 Disk Imager and start imaging your boot drive to an IMG file once a month.
Related Guides
Pair this guide with the rest of the Win32 Disk Imager knowledge base. These cover the adjacent workflows you’ll hit when working with disk images, bootable USBs, and Windows partition management.
- Shrink a Windows 11 Volume in Disk Management — Reclaim unallocated space from a partition for a dual-boot, game drive, or backup slot — plus the fix for tiny available-shrink-space.
- Hide a Partition in Windows 11 with Diskpart — Remove a drive letter via diskpart to keep a partition out of File Explorer. Casual hiding, not encryption.
- How to Use Win32 Disk Imager — Complete Beginner Guide — The full reference for the Win32 Disk Imager tool itself — install, UI walkthrough, and common workflows.
- Write an IMG File to USB with Win32 Disk Imager — Step-by-step for writing a .img or .iso to USB on Windows 10/11 with real benchmarks and error fixes.