Back when I was in college I kept a D: drive full of tax receipts, scanned ID docs, and other boring grown-up stuff on my gaming desktop. Roommates used that PC for Netflix and the occasional essay. I didn’t want any of them bumbling into the folder, but I also wasn’t about to install VeraCrypt on a machine three other people touched.
The trick I landed on is stupidly simple: remove the drive letter with diskpart. The partition stays intact, the data stays where it is, it just vanishes from File Explorer and the This PC sidebar until you put the letter back. Not real encryption. Not even real hiding. But against a casual “let me borrow your computer” situation, it’s a solid 90% answer, and it’s been working the same way since Windows 7.
TL;DR: admin cmd → diskpart → list volume → select volume N → remove letter D. To bring it back: same steps, but assign letter=D.
What This Method Actually Does (and Doesn’t)
Let’s be honest upfront. Removing a drive letter doesn’t encrypt the data. It doesn’t make the partition invisible to anyone who knows where to look. Anyone who opens Disk Management or runs diskpart themselves will see the volume immediately and can reassign a letter in about ten seconds.
- Data recovery tools will find it.
- A Linux live USB will mount it.
- Any admin on the machine can undo it.
What it is good for: stopping File Explorer and the Save As dialog from showing that drive. Keeping a kid, a house guest, or a non-technical coworker from clicking into something they shouldn’t. Parking a backup partition so Windows doesn’t try to show desktop notifications about its free space. That kind of thing.
For genuinely sensitive data, use real encryption. BitLocker (Pro/Enterprise/Education) or VeraCrypt (any edition) are the right tools.
Step 1: Open an Admin Command Prompt
Diskpart will not run without elevation. Press Start, type cmd, and on the right pane click Run as administrator. UAC prompt → Yes.
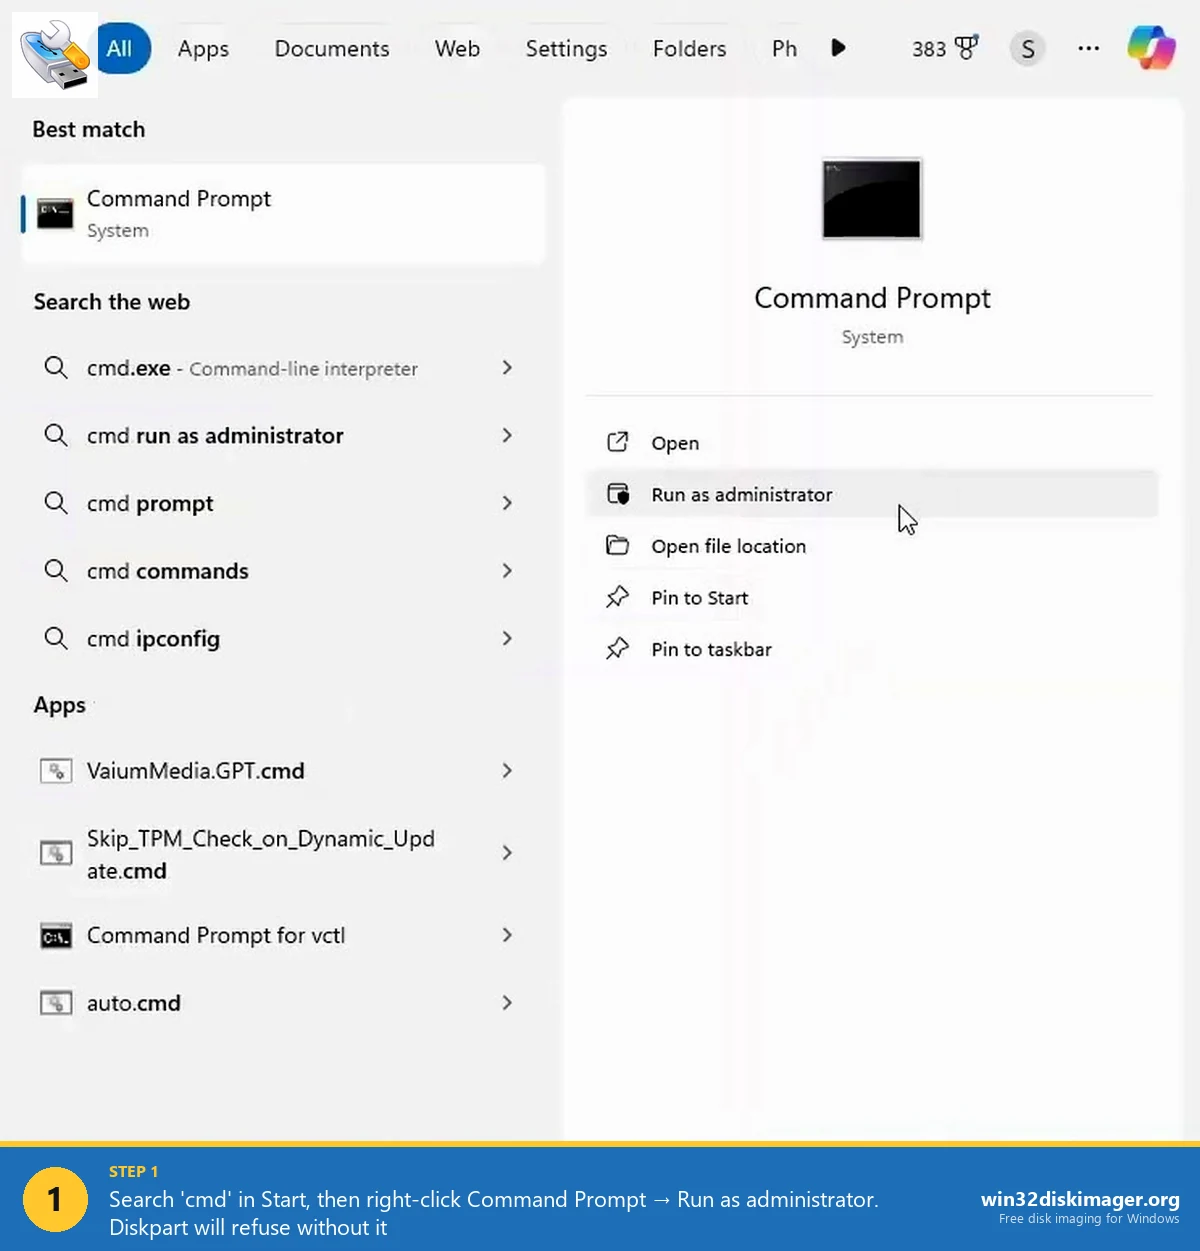
You can use Windows Terminal, PowerShell, or the classic cmd.exe, all three let you run diskpart the same way. I prefer plain cmd because I’ve burned myself too many times typing PowerShell-style quoting into diskpart and wondering why it hated me.
Step 2: Enter Diskpart and List Volumes
At the cmd prompt, type:
diskpart
list volume
You’ll get a table that looks something like:
  Volume ###  Ltr  Label        Fs     Type        Size     Status     Info
  ----------  ---  -----------  -----  ----------  -------  ---------  --------
  Volume 0     C   Windows      NTFS   Partition    465 GB  Healthy    Boot
  Volume 1     D   Data         NTFS   Partition    487 GB  Healthy
  Volume 2         Recovery     NTFS   Partition    541 MB  Healthy    Hidden
  Volume 3     E   Media        NTFS   Partition    488 GB  Healthy
Note the Volume ### number of the partition you want to hide. In this example I’m hiding D:, which is Volume 1. Not the drive letter, the Volume number. This is the part people mess up.
💡 Pro tip: if the table is cramped, resize your terminal window first. Diskpart respects the buffer width and truncates long labels otherwise.
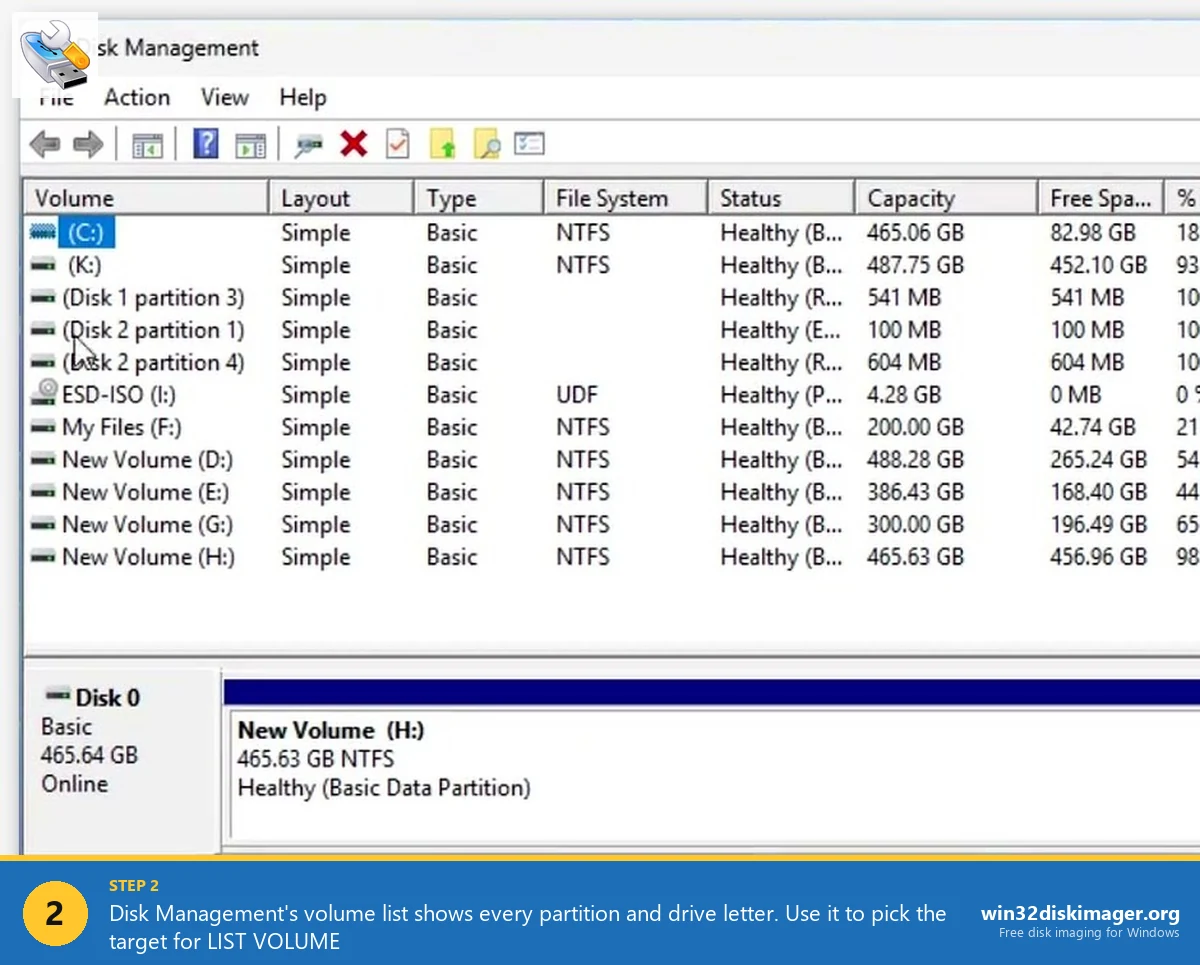
If you want a nicer UI view of the same info, hit Win+X → Disk Management. It shows every volume with its letter, size, and filesystem type. Useful for cross-checking before you pull the trigger in diskpart.
Step 3: Select the Volume
select volume 1Diskpart responds with Volume 1 is the selected volume. Every subsequent command now targets that volume until you select a different one or exit.
⚠️ Heads up: do not mix up select volume with select disk or select partition. They target different objects. Wrong object + subsequent clean command is how SD cards get wiped by accident.
Step 4: Remove the Drive Letter
remove letter=DDiskpart says DiskPart successfully removed the drive letter or mount point. Open File Explorer. D: is gone. The partition is still there (verify by running list volume again, it’ll still appear, just without a Ltr column value). Everything on it is intact. You just can’t reach it through Explorer until you assign a letter back.
Type exit to leave diskpart.
No reboot needed. Change is immediate.
Step 5: Bringing the Drive Back
Exactly the same sequence, but reverse the last command:
diskpart
list volume
select volume 1
assign letter=D
exit
If D is already taken by another drive (say, you plugged in a USB that got assigned D while your hidden partition was letterless), pick a different unused letter. The drive will reappear in File Explorer instantly.
The One-Liner Version (for Scripting)
If you do this often and want to automate, drop these in a .bat file:
@echo off
(echo select volume 1 ^& echo remove letter=D) | diskpart
Run it as admin and it pipes the two commands into diskpart. Flip the bat and the letter letter for the unhide version.
You can also schedule this with Task Scheduler to auto-hide the partition at login and unhide on demand, but honestly, at that point you’ve reinvented BitLocker badly. Just use encryption.
The GUI Alternative (Disk Management)
If the command line makes you nervous:
- Press Win+X → Disk Management.
- Right-click the partition you want to hide.
- Pick Change Drive Letter and Paths…
- Select the letter, click Remove.
- Confirm the “are you sure” dialog.
Exact same effect as remove letter=D. I still prefer diskpart because it scripts cleanly and I can list volume twice to sanity-check before running anything destructive.
Common Gotchas
“Virtual Disk Service error: The object is not found.” You selected the wrong volume, or the volume number changed after you added/removed another drive. Re-run list volume.
“DiskPart has encountered an error: Access is denied.” You forgot to run cmd as administrator. Start over.
“Remove letter=C” doesn’t work. You cannot remove the letter of the system drive, the boot drive, or any drive with an active pagefile. Windows refuses. Correct behavior.
Drive keeps getting a letter back after reboot. Some apps (mostly backup and sync utilities) will assign letters to unlabeled partitions on boot. Kill the offending service, or use Group Policy to disable auto-mount of new volumes.
OneDrive / Google Drive / Dropbox can still see files on the hidden drive. Not a bug. Those apps have background indexers that don’t care about drive letters. If the sync client was already pointed at the path, it’ll keep syncing. Set sync folders to paths on drives you’re not hiding.
When to Reach for Real Encryption Instead
If any of these apply, skip the diskpart trick and use BitLocker or VeraCrypt:
- The machine gets shared with non-admin accounts. They can’t undo diskpart changes but they can still get to the data via Disk Management on an admin session.
- The disk gets physically removed or stolen. Hiding a letter does nothing against a drive pulled and plugged into another PC.
- You need HIPAA / GDPR / compliance-grade data protection. This method is not defensible in any audit.
- The data is genuinely sensitive (ID documents, passwords, client records, financial info).
For anything short of that, hiding a letter is a low-effort, no-install, perfectly reasonable way to keep a partition out of sight.
FAQ
Does this work on external USB drives? Yes, exactly the same way. Unplug and replug and Windows will usually reassign a letter unless you also set Group Policy to prevent it.
Does removing the letter delete anything? No. Data is untouched. This is purely a drive-letter mapping change.
What happens to apps that have the drive in their config? They’ll start throwing “drive not ready” errors. Games with saves on the hidden drive, backup tools, photo importers. Things to unhide before you open them.
Does Win32 Disk Imager care about letterless partitions? When you’re writing an IMG file with Win32 Disk Imager, it needs a Device letter to target. Hidden partitions (no letter) won’t appear in the Device dropdown. If you need to write an image to a partition you previously hid, reassign a letter first, do the write, then hide again.
Wrap-Up
Hiding a partition via remove letter is a five-command trick that’s been in every Windows version since 7. It’s the right tool for casual separation (backups, media archives, keeping non-admin users out of your stuff) and the wrong tool for real security. Pair it with Fast User Switching, limited user accounts, and actual encryption on the drives that matter, and you’ve got a clean multi-tier setup that doesn’t require any third-party software.
Related Guides
Pair this guide with the rest of the Win32 Disk Imager knowledge base. These cover the adjacent workflows you’ll hit when working with disk images, bootable USBs, and Windows partition management.
- How to Use Win32 Disk Imager — Complete Beginner Guide — The full reference for the Win32 Disk Imager tool itself — install, UI walkthrough, and common workflows.
- Shrink a Windows 11 Volume in Disk Management — Reclaim unallocated space from a partition for a dual-boot, game drive, or backup slot — plus the fix for tiny available-shrink-space.
- Create a Windows 11 Recovery Drive (USB) — Modern Win 10/11 replacement for the old System Repair Disc. Reinstalls Windows from a single USB when the boot drive dies.
- Write an IMG File to USB with Win32 Disk Imager — Step-by-step for writing a .img or .iso to USB on Windows 10/11 with real benchmarks and error fixes.