I built a RetroPie cabinet for my brother’s 35th birthday in 2023. Pi 4, arcade joystick + buttons, 24-inch monitor in a custom MDF cabinet. The whole project came together in three weekends, but the actual RetroPie install took about an hour, mostly waiting for the SD card to flash and then for the first-boot setup to complete. The flashing part is what this article covers, the rest (controllers, ROMs, theme tweaks) is RetroPie’s own documentation territory.
RetroPie is one of the most popular Pi distributions ever built. It’s a custom Pi OS that boots straight into EmulationStation, with pre-configured emulators for Atari, NES, SNES, Genesis, GameBoy, PlayStation, N64, Dreamcast, and dozens more. Adding ROMs and configuring controllers is the post-install work. Getting RetroPie onto an SD card is what we’ll cover, with both the official Raspberry Pi Imager method and the Win32 Disk Imager approach (which is what you’ll need if you want to flash a custom RetroPie image you built yourself).
TL;DR: Download RetroPie .img.gz from retropie.org.uk. Decompress with 7-Zip. Win32 Disk Imager → Image File → pick the .img → Device → SD card → Write. 5-15 min depending on USB/SD speed. Insert SD into Pi, power on. EmulationStation appears. Configure controllers, add ROMs, play.
Choosing Your Pi Hardware
RetroPie supports a range of Pi models. Performance varies dramatically:
- Pi 5: The new flagship. Handles up to PSP and Dreamcast comfortably. Some N64 emulation works at full speed for the first time on Pi.
- Pi 4 (4GB or 8GB): Sweet spot for RetroPie in 2026. Perfect for everything through PS1, most N64, and Dreamcast at lowered settings. My recommendation for new builds.
- Pi 400: Pi 4 in a keyboard. Works fine for RetroPie but the keyboard form factor isn’t ideal for emulation.
- Pi 3B+: Last-gen but still fully supported. Handles NES/SNES/Genesis/GBA easily, struggles with PS1 and N64 on demanding titles.
- Pi Zero 2 W: For tiny handheld builds. Limited to 8/16-bit consoles realistically.
- Pi 1 / Pi Zero (original): Officially supported but very limited. Only Atari, NES, GB.
Recommendation in 2026: Pi 4 4GB ($45) is the value pick. Pi 5 4GB ($60) for futureproofing. Skip older models for new builds.
SD Card Selection
RetroPie itself is small (~5 GB). ROMs are what fills the card. Recommendations:
- 32 GB: Fits RetroPie + a couple thousand 8/16-bit ROMs. Tight if you want PS1 or N64.
- 64 GB: Sweet spot. RetroPie + extensive collection through PS1.
- 128 GB: For full collections including Dreamcast / PSP / multi-disc PS1 games.
- 256 GB+: Overkill unless you want every PSP and Dreamcast game ever.
Brand: SanDisk Ultra A1 or Samsung EVO Plus. Class 10 minimum, A1 preferred (better random read for emulation responsiveness). Avoid bargain no-name cards, they fail under continuous read load.
Downloading RetroPie
Go to retropie.org.uk/download/. Pick the right image for your Pi:
- Raspberry Pi 4 / 400: Pick the dedicated Pi 4/400 image.
- Raspberry Pi 5: Use Pi Imager’s RetroPie option (better Pi 5 support than the official RetroPie download as of mid-2026).
- Raspberry Pi 0 / 1 / 2 / 3: Pick the dedicated Pi 0/1/2/3 image.
- x86 (PC): Pick the x86 image. Yes, RetroPie runs on regular PCs too.
The downloaded file is .img.gz, around 1.5-2.5 GB compressed (4-5 GB after decompression).
Verify SHA256 hash (RetroPie publishes them on the download page). See our hash verification guide.
Decompressing the .img.gz
Win32 Disk Imager doesn’t accept .gz directly. Decompress first:
- Right-click the .img.gz → 7-Zip → Extract Here. Takes ~30 seconds.
- You’ll have a plain .img file alongside.
- Delete the .gz if you want to save space.
Alternative: use balenaEtcher or Pi Imager which accept .img.gz natively (they decompress on the fly during write).
Step-by-Step: Flash with Win32 Disk Imager
Standard Win32 Disk Imager flashing workflow:
1. Plug in SD card. Via USB reader or laptop slot. Existing data wiped.
2. Launch Win32 Disk Imager as admin. Right-click → Run as administrator. UAC yes.
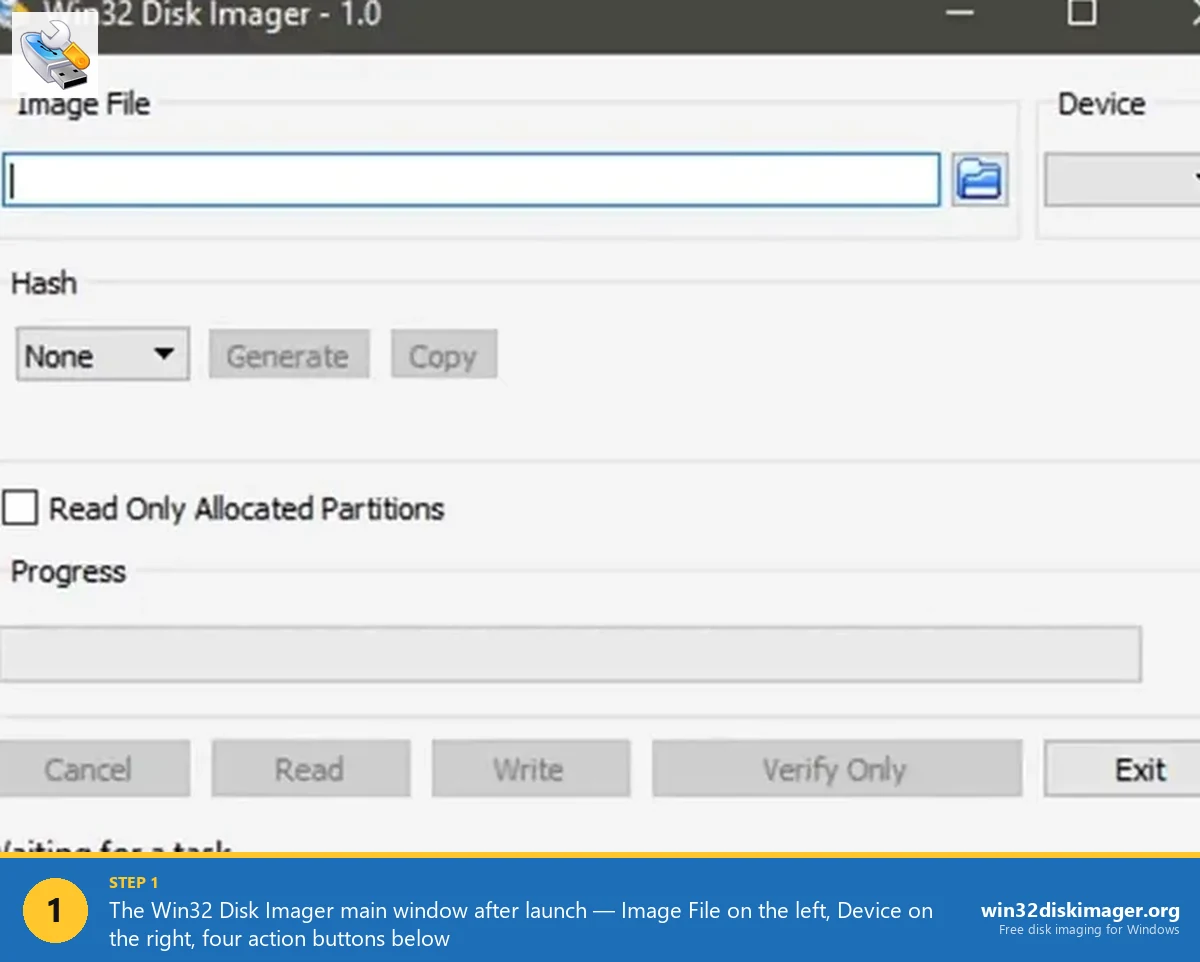
3. Click folder icon next to Image File. Navigate to your decompressed RetroPie .img.
4. Pick SD card in Device dropdown. Triple-check the right drive letter.
5. Click Write. Confirmation, Yes. Progress starts.
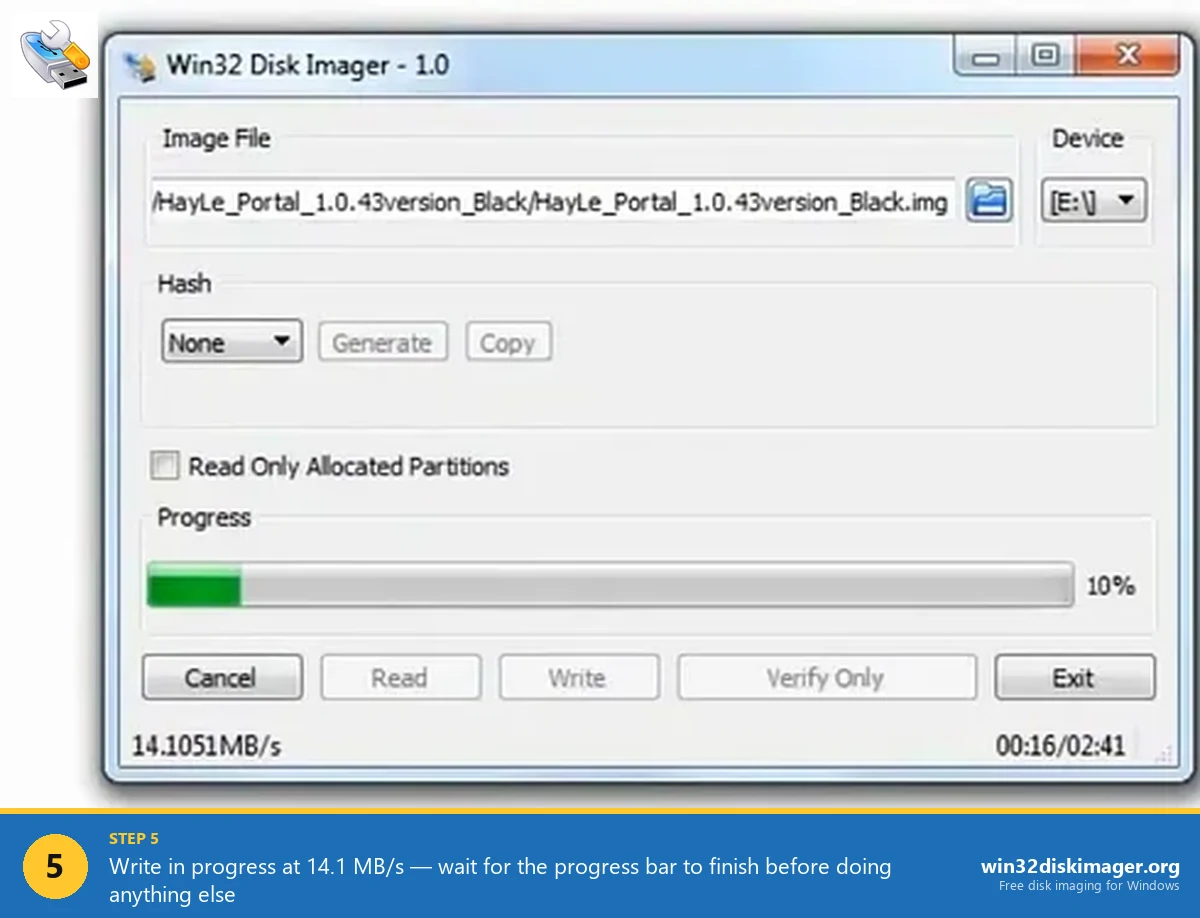
Typical: 4 GB image on USB 3.0 reader = 3-5 minutes. USB 2.0 reader: 5-8 minutes.
6. Verify (recommended). Click Verify Only after write. Confirms byte-perfect copy. Important for RetroPie since corrupted ROM saves are bad.
7. Eject SD card. Safely from Windows. Insert into Pi.
First Boot
Insert the SD into your Pi, plug in power. RetroPie’s first boot:
- ~30 seconds: RetroPie’s logo and console boot text.
- ~60 seconds: Filesystem auto-expansion to fill the SD card. Takes 30-60 sec depending on card size.
- ~90 seconds: Auto-reboot.
- ~30 seconds (after reboot): EmulationStation loads, the GUI front-end.
- ~10 seconds: Controller-detection screen appears.
Total: 2-3 minutes from power-on to controller setup.
If you don’t have a controller plugged in, EmulationStation prompts you to plug one in. Use any USB controller (Xbox, PS4, generic 8BitDo, arcade stick).
Configuring Your Controller
Hold any button on the controller to bring up the configure menu. EmulationStation walks you through every button:
- D-pad up, down, left, right
- Start, Select
- A, B, X, Y (or equivalent)
- L1, R1, L2, R2 (shoulder buttons)
- Left and right analog sticks (if present)
- Hotkey (often Select, used for in-game menu access)
Hold any button to skip if your controller doesn’t have it.
After configure, EmulationStation main menu appears with no game systems visible (since no ROMs are installed yet).
Adding ROMs
RetroPie expects ROMs in /home/pi/RetroPie/roms/[system]/. Three ways to copy ROMs:
Method 1: USB transfer. Easiest for non-tech-comfortable users.
- On a Windows PC, format a USB stick as FAT32 or exFAT.
- Create a folder named exactly
retropieon the USB. - Plug the USB into the Pi (any USB port). RetroPie auto-detects, creates folder structure, ejects USB after 30 seconds.
- Plug USB back into Windows. Inside
retropie/roms/you’ll find folders for every supported system (nes, snes, genesis, etc.). - Copy ROMs into the appropriate folder.
- Plug USB back into Pi. RetroPie auto-imports the ROMs.
Method 2: Network transfer (Samba). If both PC and Pi are on the same network, Pi shares /home/pi/RetroPie/roms/ via SMB. Browse to \\retropie\roms\ from Windows and copy ROMs directly.
Method 3: SCP / SFTP. For tech-comfortable users. SSH access enabled, SCP from PC to Pi.
⚠️ Heads up: Use ROMs you legally own or that are public domain (homebrew, freeware demos). I’m not telling you what to do, but the legality of ROM downloads is what it is.
Reboot to See Your ROMs
After adding ROMs, restart EmulationStation:
- Press the Start button (your assigned Start key).
- Pick “Quit” → “Restart EmulationStation”.
EmulationStation re-scans ROM folders. Game systems with at least one ROM now appear in the carousel. Pick a system, browse games, pick one to launch.
First time launching each system, RetroPie may need to download additional emulator components. Allow 1-2 minutes for these one-time setups.
Pi Imager: An Easier Alternative
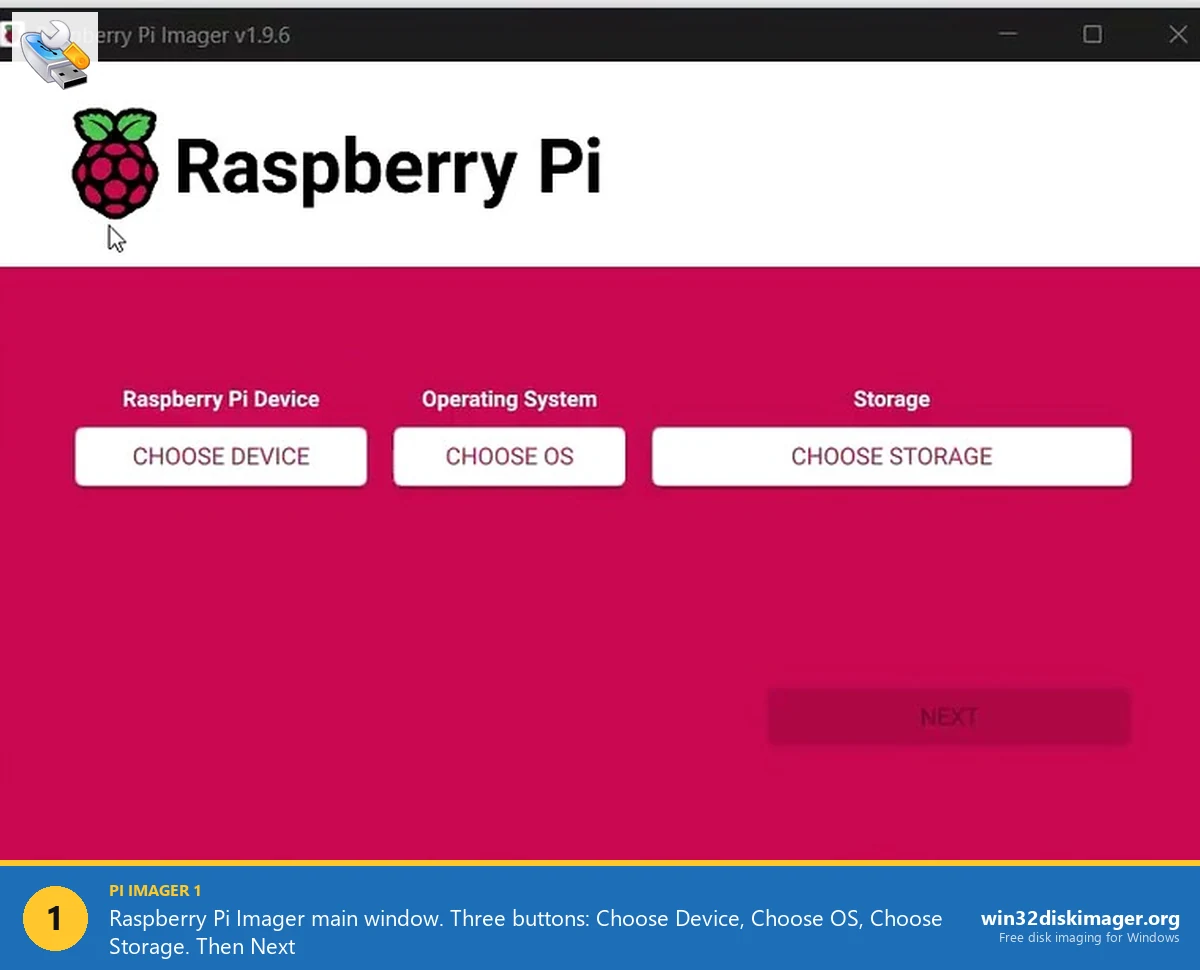
If you don’t want to manually decompress and use Win32 Disk Imager, Raspberry Pi Imager has RetroPie built into its OS list:
- Launch Pi Imager.
- Choose Device → Pi 4 (or your model).
- Choose OS → Emulation and game OS → RetroPie.
- Choose Storage → SD card.
- Click Next → optional pre-config (hostname, WiFi, SSH) → Save.
- Write. Pi Imager downloads, decompresses, and flashes in one step.
Easier for first-time setups. Win32 Disk Imager wins if you have a custom modified RetroPie image or want offline setup. See our Pi Imager comparison.
Optimizing RetroPie Performance
Tips for smoother gameplay, especially on Pi 3 or older:
- Overclock the Pi. RetroPie supports safe overclocks via raspi-config. Pi 3 to 1.4 GHz, Pi 4 to 2.0 GHz. Improves N64 / PS1 / Dreamcast performance noticeably. Adequate cooling required (heatsink or fan).
- Use the right emulator per system. RetroPie installs a default emulator for each system, but you can switch. Per-game emulator override: select the ROM in EmulationStation → Start → Edit Game → Emulator.
- For N64: mupen64plus-rice with custom configs is faster than the default mupen64plus-glide on Pi 4.
- Disable shaders. Pretty CRT-style scanline shaders look great but cost FPS on weaker Pis. Turn off in RetroArch settings if you’re getting slowdowns.
- Use Pi 4’s USB 3.0 for ROM storage on USB SSD. Faster than SD card for game loading. Move ROMs to USB after install.
Performance Reference: What Each Pi Can Run
Realistic emulation expectations as of 2026:
| Pi Model | Best Runs | Iffy | Don’t Bother |
|---|---|---|---|
| Pi 5 (4/8 GB) | Through Dreamcast / PSP | Most N64, Saturn | Wii, GameCube |
| Pi 4 (4/8 GB) | Through PS1 / N64 | Dreamcast, demanding PS1 | PSP, Wii |
| Pi 3B+ | Through GBA / PS1 (lite) | Most N64, Saturn | Dreamcast, PSP |
| Pi Zero 2 W | NES, SNES, Genesis, GB/GBA | PS1 (some) | N64, Dreamcast |
| Pi 1 / Zero original | NES, Genesis, GB | SNES, GBA (some) | Anything 3D |
“Iffy” means some games run, others stutter. Compatibility varies per game. The RetroPie wiki has detailed per-game compatibility lists for each Pi model.
Common Setup Issues
Pi doesn’t boot, just shows rainbow splash and stops. Old Pi OS with Pi 5 hardware. Re-download the latest RetroPie image specifically for your Pi model.
HDMI output blank. Try the other HDMI port on Pi 4/5 (HDMI 0 is the one closest to USB-C, often works better than HDMI 1). Or edit /boot/config.txt on the SD card from Windows to force HDMI mode.
EmulationStation crashes on startup. SD card corruption. Re-flash with verification.
Controller not detected. Plug in BEFORE booting Pi. RetroPie scans at boot. Hot-plug after boot sometimes works, sometimes doesn’t.
Audio doesn’t work. RetroPie needs to know whether to use HDMI or 3.5mm jack. Configure: in EmulationStation main menu → Sound Settings → Audio Output → pick HDMI or Headphones.
Filesystem won’t expand on first boot. Run manually: SSH in (or open Terminal on Pi) → sudo raspi-config → Advanced Options → Expand Filesystem.
Backing Up Your Configured RetroPie
After you’ve set up controllers, added ROMs, and customized themes, back up the SD card. Otherwise a card failure means redoing everything.
Use Win32 Disk Imager Read with “Read Only Allocated Partitions” ticked to make an IMG of the configured card. See our SD backup guide.
Optional: PiShrink the IMG to make it smaller for archival. See our PiShrink guide.
Store on NAS / cloud / external drive. If your SD ever dies, restore the IMG to a fresh card and you’re back to your full setup in 20 minutes.
Building a RetroPie Cabinet (Brief Overview)
If you’re considering a full arcade cabinet build:
- Cabinet: MDF DIY ($50-150), pre-built kit (Bartop $200-300), or full upright ($500-1000).
- Display: LCD monitor (cheap, used 22-24 inch from Goodwill works), or vintage CRT for nostalgia (heavy, hard to find).
- Controls: Sanwa or Seimitsu joysticks + buttons (~$50). Connect via Xin-Mo or i-PAC USB encoder ($30).
- Audio: Pi 3.5mm out → small powered speakers ($20).
- Power: Single power strip with switch.
- RetroPie config: RetroPie’s “Themes” supports cabinet-specific themes that look great on real cabinets.
Total cost for a decent DIY: $200-400. r/cade and r/arcade subreddits have build threads with ideas.
BIOS Files: The Legal Gray Area
Some emulated systems require BIOS files to work: PS1 (scph1001.bin), Dreamcast (dc_boot.bin), Sega CD, etc. These are copyrighted and not distributed with RetroPie.
Legal options: dump from your own original console using freely-available tools (e.g., dumping PS1 BIOS via a memory-card adapter). Owning a real PS1 means you “own” the BIOS legally.
Where to put BIOS files: /home/pi/RetroPie/BIOS/. Each emulator’s documentation lists which exact filename it expects. Place the file, restart EmulationStation, system shows up.
Without proper BIOS files, some games won’t load and emulators may show error messages or refuse to start. PS1 in particular is BIOS-dependent.
Themes and Customization
EmulationStation’s default theme is functional but plain. The community has created hundreds of themes:
- Carbon (RetroPie default).
- Pixel: pixel-art aesthetic, lots of detail per system.
- Switch: looks like Nintendo Switch UI.
- ComicBook: comic-style covers.
- NES Mini: looks like the official NES Classic Edition.
- Arcade Cab: simulated marquee + bezel for cabinet builds.
Install via EmulationStation main menu → UI Settings → Theme → Get Themes. Browse, download, apply. Theme switch takes seconds.
For game scraping (cover art, metadata): EmulationStation main menu → Scraper. Pulls from screenscraper.fr or thegamesdb.net. Time-consuming initial scrape (~30 min for 1000 games) but transformative for browsing experience.
FAQ
Is RetroPie free?
Yes. RetroPie itself is free open-source. The emulators it uses are all free open-source. ROMs are not provided; you supply your own.
Does RetroPie work on Pi 5?
Yes, with the latest 2026 build. Pi 5 support was added in 2024 and matured throughout 2025. Use Pi Imager for Pi 5 RetroPie installs since the official RetroPie download page may lag behind.
What’s the difference between RetroPie, Recalbox, and Batocera?
All three are Pi-based retro game OSes. RetroPie is most established (since 2012), most customizable. Recalbox is more polished UI, less customizable. Batocera focuses on multi-platform (Pi + PC + handhelds). Pick based on preference; all three flash with Win32 Disk Imager identically.
How many ROMs can fit on a 32 GB SD?
Roughly: NES (~1000), SNES (~700), Genesis (~600), GameBoy (~500), GBA (~300), PS1 (~30 due to large file size). Mixed collection: easily 2000-3000 ROMs through PS1.
Can I play multiplayer with multiple controllers?
Yes. RetroPie auto-detects and configures additional USB controllers. Supports up to 4 players for most consoles, 2-8 for some specific games (e.g., NES Bomberman supports 4-8 players via multitap emulation).
What about save states?
RetroPie supports save states for almost every system via RetroArch. In-game: Hotkey + Right Bumper saves, Hotkey + Left Bumper loads. Save anywhere, load anywhere. Way better than the 1990s memory-card workflow.
Does RetroPie support online multiplayer?
Yes, via RetroArch’s netplay feature. Both players need the same ROM and a moderately fast connection. Works for most 2D fighters and platformers; lag-sensitive games like fighting games are iffy.
Can I add cheat codes?
Yes. RetroArch has built-in cheat database for many games. In-game menu (Hotkey + X) → Cheats. Browse, enable codes, hilarity ensues.
Is there a kid-friendly mode?
EmulationStation has a “Kid Mode” that hides the configuration menus and only shows games. Enable in EmulationStation main menu → UI Settings → UI Mode → Kid.
Can I run RetroPie alongside other Pi OS uses (like Plex or Home Assistant)?
Technically yes (RetroPie runs on Raspberry Pi OS Lite as base), but you’d want a dedicated SD card per role. Mixing RetroPie + other workloads on one card creates conflict and config complexity.
What if my Pi 4 is overheating during emulation?
Pi 4 + heavy emulation (N64, PS1) generates enough heat to throttle. Add a heatsink ($5) or active cooler with fan ($15) to your case. Pi 5 has more aggressive throttling protection but also runs hotter; cooling is more important on Pi 5.
Can I use a Bluetooth controller?
Yes. Pi 3 and later have built-in Bluetooth. Pair via raspi-config or RetroPie’s Bluetooth menu. PS4, Xbox, 8BitDo, and similar all work. Some controllers need driver tweaks; check RetroPie wiki for your specific model.
Wrapping Up
RetroPie installs in 20 minutes and gives you a full retro gaming console for under $100 in hardware. Win32 Disk Imager flashes the .img reliably; Pi Imager makes it slightly easier with its built-in OS picker. Once configured with controllers and ROMs, back up the SD card with our SD backup guide so you don’t lose your setup if the card dies. For more Pi-OS-specific guides, see Install Pi OS and Restore Pi SD.
Related Guides
Pair this guide with the rest of the Win32 Disk Imager knowledge base. These cover the adjacent workflows you’ll hit when working with disk images, bootable USBs, and Windows partition management.
- How to Install Raspberry Pi OS Using Win32 Disk Imager (2026 Guide) — Complete Pi OS installation on Windows with Win32 Disk Imager — OS variant picking, headless config files, and the first-boot troubleshooting list.
- How to Use Win32 Disk Imager — Complete Beginner Guide — The full reference for the Win32 Disk Imager tool itself — install, UI walkthrough, and common workflows.
- How to Back Up an SD Card to an IMG File on Windows — Back up a Raspberry Pi SD card to an IMG file on Windows — full Read walkthrough, PiShrink compression, and a backup-schedule template.
- Win32 Disk Imager vs Raspberry Pi Imager (2026) — The Pi Imager pre-config vs Win32DI Read/backup debate, with benchmarks and the cluster-flashing workflow.