I had a 4 TB external drive that wouldn’t format from File Explorer last month. Right-click → Format, type a label, click Start, wait 20 seconds, “Windows was unable to complete the format.” No error code, no reason, just the cheerful Microsoft shrug. The drive worked fine otherwise, File Explorer could read it, it just refused to let me wipe it.
Dropped into diskpart from an admin Command Prompt, ran four commands, drive was formatted in under a minute. That’s the whole reason this article exists. The File Explorer format dialog is fine 95% of the time, but when it isn’t, diskpart and the format command are what you fall back to. I’ll walk through both, plus the full wipe-and-start-over workflow with clean, which is the only way to nuke a drive’s partition table cleanly.
TL;DR: Open an admin Command Prompt. Run diskpart → list volume → select volume N → format fs=ntfs quick label="Data". For a full wipe, replace the format step with clean then re-partition and format. Total time: 60-90 seconds for quick format, hours for a full format of a big drive.
When You Actually Need the Command Line
File Explorer’s format dialog (right-click a drive → Format) is the easy path. Use that first. The command line matters when:
- File Explorer fails. “Windows was unable to complete the format” usually means the drive has weird partition metadata, a write-protected flag, or a filesystem Windows doesn’t recognize.
diskpartbypasses most of that. - You need to wipe the partition table entirely. Format only touches the filesystem inside a partition.
cleanremoves the MBR/GPT header itself, giving you a truly blank drive. - You’re scripting. Automated machine rebuilds, OSDeploy imagery, MDT task sequences, these all drive
diskpartvia script files (diskpart /s script.txt). - You’re formatting the boot drive from WinRE. When you boot into Windows Recovery with Shift+Restart, you don’t have File Explorer, you have a command prompt.
diskpartis the only tool available. - You need exFAT or FAT32 on a drive over 32 GB. File Explorer won’t let you format a 64 GB USB stick as FAT32. Command line will.
Open Command Prompt as Administrator
You need the admin version. Regular cmd won’t let diskpart initialize.
Fastest: press Win+X, pick Terminal (Admin). That opens Windows Terminal on the PowerShell tab, but cmd and PowerShell both work for our purposes. Or press Win+R, type cmd, then press Ctrl+Shift+Enter to run it elevated.
UAC prompt will pop up. Click Yes. You’re in.
Method 1: The Built-in format Command
Simpler case first. If the drive already has a drive letter and a partition, you can format it with one line:
format D: /fs:ntfs /q /v:DataBreakdown:
D:is the target drive letter. Triple-check this before hitting Enter. TypingC:here is the kind of mistake that doesn’t forgive./fs:ntfsis the filesystem. NTFS for internal drives, exFAT for external/shared, FAT32 for USB sticks under 32 GB or retro compatibility./qmeans quick format. Skip it for a full format with bad-sector scan (takes hours on big drives)./v:Datasets the volume label to “Data”. Skip or change as needed.
Windows will prompt you: “Proceed with Format (Y/N)?” Type Y, Enter. A few seconds later: done.
⚠️ Heads up: The format command refuses to format the currently-running Windows drive. You’d have to boot into WinRE and do it from there, and at that point you’re reinstalling Windows anyway.
Method 2: Diskpart (The Heavy Artillery)
When format doesn’t work, or when you need to do partition-level surgery, switch to diskpart. From your admin Command Prompt:
diskpartThe prompt changes to DISKPART>. You’re now in the diskpart interactive shell. Every command runs in this shell until you type exit.
First, list what’s on the system so you don’t format the wrong thing:
list volume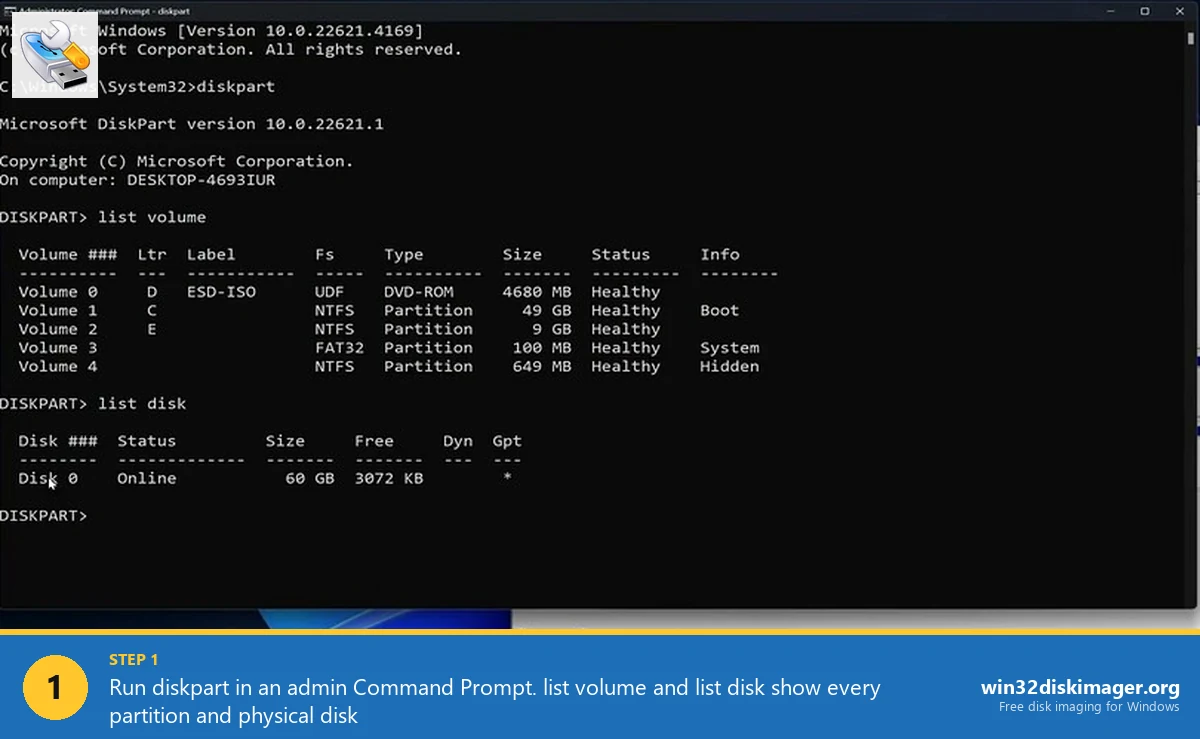
You get a table showing Volume number, drive letter, label, filesystem, size, and status. Find the one you want to wipe. Write down its volume number.
Then:
select volume 2
format fs=ntfs quick label="Backup"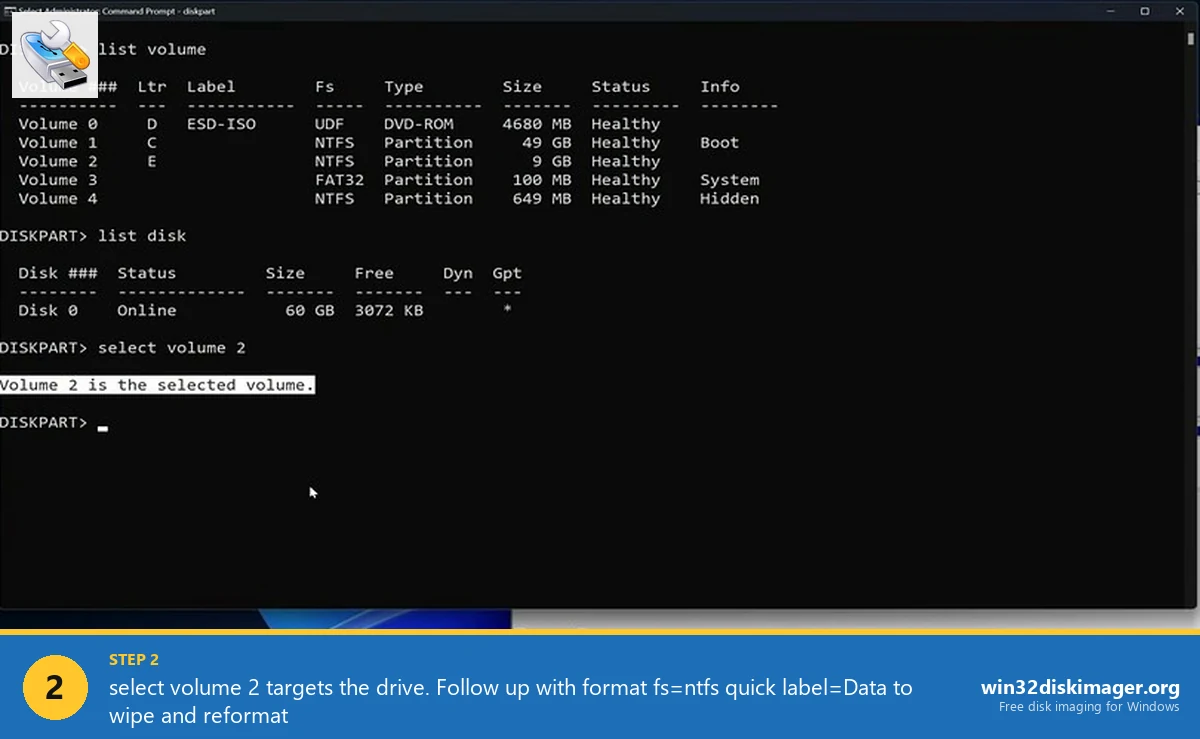
That’s it. Quick format completes in 10-30 seconds regardless of drive size (it only writes the filesystem header). Full format (drop the quick) writes zeroes to the entire drive and can take 2-4 hours on a 4 TB HDD.
For exFAT: format fs=exfat quick label="USB". For FAT32: format fs=fat32 quick label="USB". FAT32 tops out at 32 GB partition size in diskpart, same as File Explorer, but unlike File Explorer it’ll at least let you try.
The clean Command: Full Drive Wipe
This is the nuclear option. clean inside diskpart removes the partition table, the MBR/GPT headers, and effectively tells Windows “this drive has never been formatted.” Useful when:
- You’re converting between MBR and GPT and the drive is stuck.
- Windows installer keeps complaining about the disk.
- A USB stick got corrupted during imaging (very common with Win32 Disk Imager flash failures).
- You’re selling/giving away a drive and want a fresh slate.
From DISKPART prompt:
list disk
select disk 1
clean
create partition primary
format fs=ntfs quick label="Fresh"
assign letter=D
exit
list disk shows physical disks, not partitions. Disk 0 is typically your boot drive. DO NOT run clean on Disk 0 unless you’re specifically trying to wipe Windows itself.
💡 Pro tip: clean all writes zeros to every sector on the drive, which takes forever (hours on a big HDD) but is the closest thing to a secure wipe diskpart offers. For an SSD, that actually wears out flash, don’t do it, use the drive’s built-in Secure Erase from the manufacturer’s tool instead (Samsung Magician, WD Dashboard, Crucial Storage Executive).
Removing Write Protection Before Formatting
Every now and then, diskpart throws “The media is write protected” and refuses to format. Common on USB sticks with a hardware switch (check the stick, some have a tiny slider), but also happens via software flags.
From within diskpart, after selecting the disk:
attributes disk clear readonlyThat removes the read-only flag. Run attributes disk to verify. Then re-try format or clean.
If that doesn’t work, the drive might have a StorageDevicePolicies registry key forcing read-only. Delete HKLM\SYSTEM\CurrentControlSet\Control\StorageDevicePolicies\WriteProtect value, reboot, retry.
Cluster Size and Why the Default Is Fine
Advanced users sometimes ask about unit= in the format command to set cluster size. For 99% of cases, leave it alone. Windows picks a sensible default (4 KB for drives under 16 TB on NTFS).
When it matters: video editing scratch drives benefit from 64 KB clusters (fewer file-system operations for large sequential files). Databases and game installs want 4 KB for minimal slack space. If you’re asking, leave the default.
Common Errors
“DiskPart has encountered an error: Access is denied.” You’re not running as admin. Close, re-open Command Prompt with Run as administrator.
“The volume you have selected may not be extended.” You selected a volume that doesn’t support the operation (read-only, system, or wrong filesystem). Re-run list volume to confirm you targeted the right one.
“Virtual Disk Service error: The specified disk is not convertible.” You tried convert gpt or convert mbr on a non-empty disk. Run clean first, then convert, then create partitions.
“The format specified is not valid.” You typed the filesystem wrong. It’s fs=ntfs, not fs=NTFS or fs:ntfs. Diskpart is picky about syntax.
FAQ
Will format wipe data permanently?
Quick format doesn’t. It rewrites the filesystem header but leaves the old data sitting on the platters/flash cells. Recovery software (Recuva, R-Studio, PhotoRec) can often restore files from a quick-formatted drive. For secure erase, use a full format (format fs=ntfs without quick) or the drive manufacturer’s Secure Erase utility.
What’s the difference between format and clean?
format wipes the filesystem inside a partition but keeps the partition table. clean wipes the partition table itself, leaving the drive with no partitions at all. You’d typically run clean first, then create partition, then format.
Can I format an SSD this way?
Yes, and quick format is the right choice for SSDs. Full format writes zeros to every cell, which burns through SSD write endurance needlessly. If you want a secure wipe on an SSD, use the drive’s Secure Erase feature via the manufacturer’s tool, not diskpart’s clean all.
Why does diskpart list more volumes than File Explorer shows?
Because diskpart shows hidden partitions like EFI System Partition, Recovery, and OEM reserved volumes. File Explorer only shows volumes that have a drive letter assigned. The hidden ones are fine, leave them alone.
Can I format a drive larger than 32 GB as FAT32?
Diskpart usually refuses FAT32 over 32 GB too. If you need it (some TVs, older game consoles, some industrial equipment), use third-party tools like Rufus or FAT32format (fat32format.com). Microsoft locked down the size cap in their tools even though the FAT32 spec supports up to 2 TB.
Wrapping Up
Command-line formatting is one of those skills you don’t need until you really do, and then it’s the difference between fixing a stuck drive in two minutes and buying a new one. Keep diskpart, list volume, select volume, and format fs=ntfs quick in muscle memory and you’ll rescue a lot of drives from the trash pile. And once the drive is formatted and empty, it’s the perfect moment to image a clean Windows install onto it with Win32 Disk Imager before loading it with data.
Related Guides
Pair this guide with the rest of the Win32 Disk Imager knowledge base. These cover the adjacent workflows you’ll hit when working with disk images, bootable USBs, and Windows partition management.
- Partition a Hard Drive in Windows 11 (Disk Management + Diskpart) — Carve a 2 TB NVMe into C: for Windows and D: for data using Disk Management, diskpart, and the immovable-files shrink fix.
- Hide a Partition in Windows 11 with Diskpart — Remove a drive letter via diskpart to keep a partition out of File Explorer. Casual hiding, not encryption.
- How to Use Win32 Disk Imager — Complete Beginner Guide — The full reference for the Win32 Disk Imager tool itself — install, UI walkthrough, and common workflows.
- Write an IMG File to USB with Win32 Disk Imager — Step-by-step for writing a .img or .iso to USB on Windows 10/11 with real benchmarks and error fixes.