My sister’s Dell laptop wouldn’t POST last Christmas. Blinking orange LED, nothing on screen. Bad SSD, turned out. I swapped in a spare drive, plugged in a recovery USB I’d made for her a year earlier, and forty minutes later she was back on a working Windows 11 install with her files on the side. Zero phone calls to Best Buy, zero “can you send me the product key” panic.
A recovery drive is the modern replacement for the old Windows 7 System Repair Disc, the one that used to fit on a 700MB CD. In Windows 10 and 11 it’s a USB stick (16GB minimum if you want the reinstall option), and it’s the single most useful thing you can prepare for a machine you own. I make one for every Windows box the day I set it up, and I’ve never once regretted the 20 minutes.
TL;DR: Plug in a 16GB+ USB drive. Press Start, type recovery drive, open Create a recovery drive. Tick Back up system files to the recovery drive. Pick the drive. Next. Wait ~20 min. Done.
Why a Recovery Drive Beats a System Repair Disc
The old Win 7 System Repair Disc was a 165MB boot-only toolkit. No recovery image, no factory restore, just Startup Repair, System Restore, Command Prompt, and a memory tester. Useful, but limited, and useless if your Windows install is actually gone. You needed the original install DVD for that.
The Windows 10/11 recovery drive is different. With the Back up system files checkbox ticked, it’s essentially a portable Windows installer plus your OEM recovery image. If your boot drive dies, you can reinstall Windows onto a brand-new SSD from this one USB. No ISO download, no product key typing (modern keys are embedded in the UEFI), no driver hunting for most OEM hardware because the manufacturer’s drivers get baked in.
I’ve used one to resurrect a ThinkPad X1 Carbon, a Dell XPS, and my sister’s Inspiron. Worked every time. Failure mode is usually the USB stick itself going bad sitting in a drawer for two years, which is why I refresh them roughly annually.
What You Need Before Starting
- A USB drive, 16 GB minimum if you want the reinstall option. 32 GB is safer on machines with a lot of preinstalled OEM stuff. Cheap SanDisk or Samsung sticks work fine. Don’t use some random old 8GB promo USB, they’re the most likely to corrupt.
- An administrator account on the PC.
- About 20 to 45 minutes. It copies system files then a Windows image. Don’t interrupt it.
- The drive will be wiped completely. Everything on it gone. Back up first if there’s anything on there.
⚠️ Heads up: the tool only works with USB drives, not SD cards or external HDDs. Microsoft specifically excludes anything that isn’t recognized as a removable USB mass storage device.
Create a Recovery Drive in Windows 11 (and 10)
Plug in the USB drive first. Then press the Start button (or the Windows key) and just start typing recovery drive.
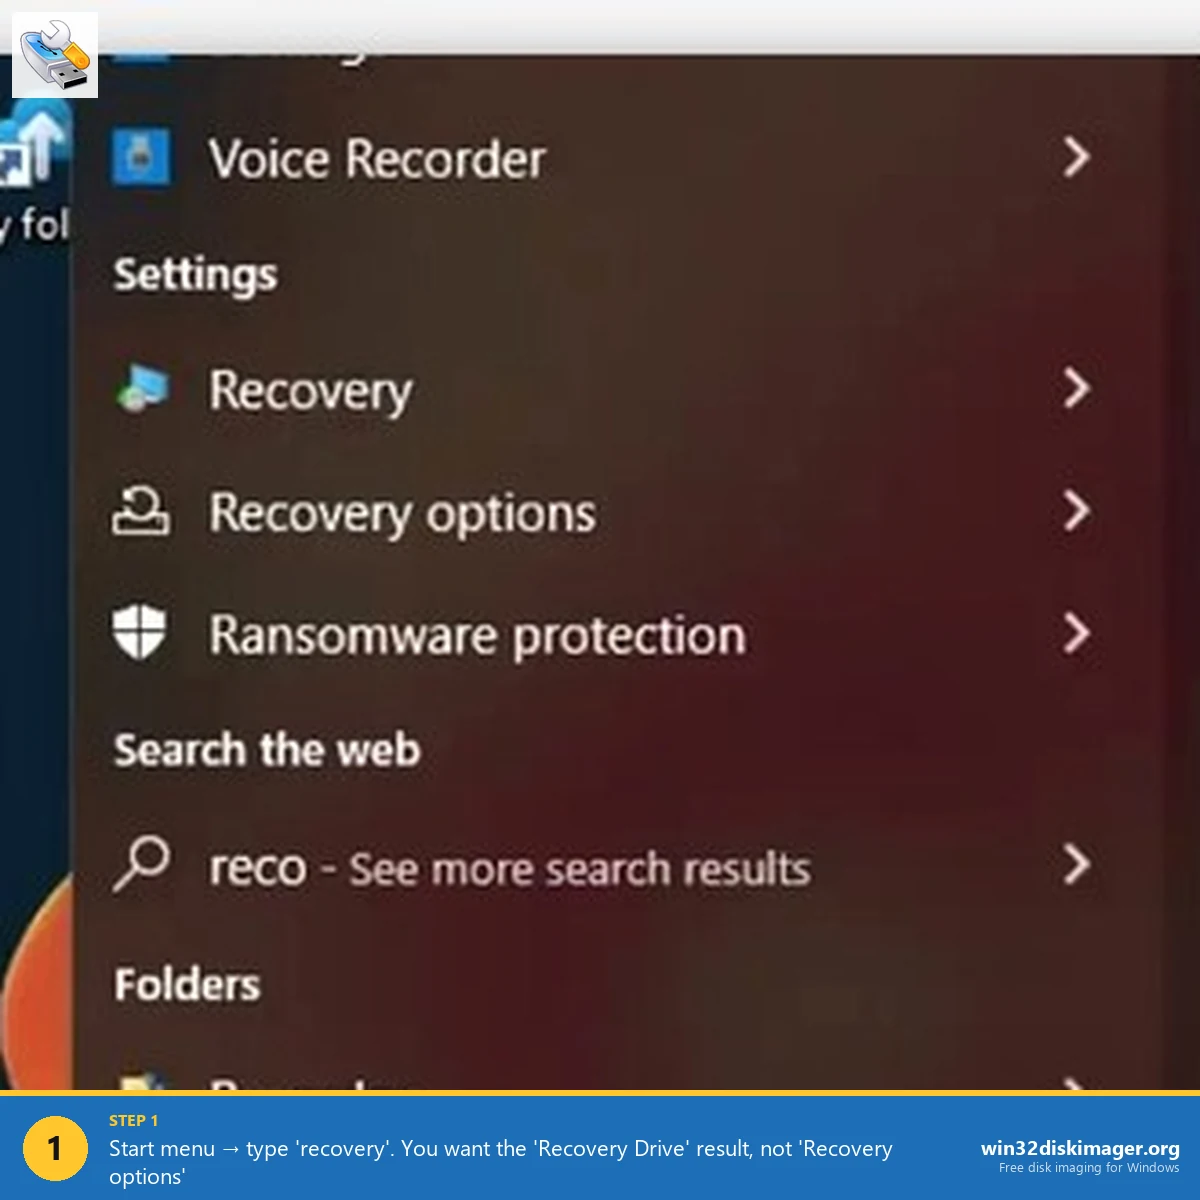
You’ll see Recovery Drive at the top of the results, right above Recovery options. They are not the same thing. Recovery options is the built-in Settings page for reset/restore. Recovery Drive is the tool that creates a bootable USB, which is what you want. Click it (or right-click → Run as administrator if you get a permissions error).
A dialog opens titled Create a recovery drive. The first screen has exactly one checkbox: Back up system files to the recovery drive. This is the important one.
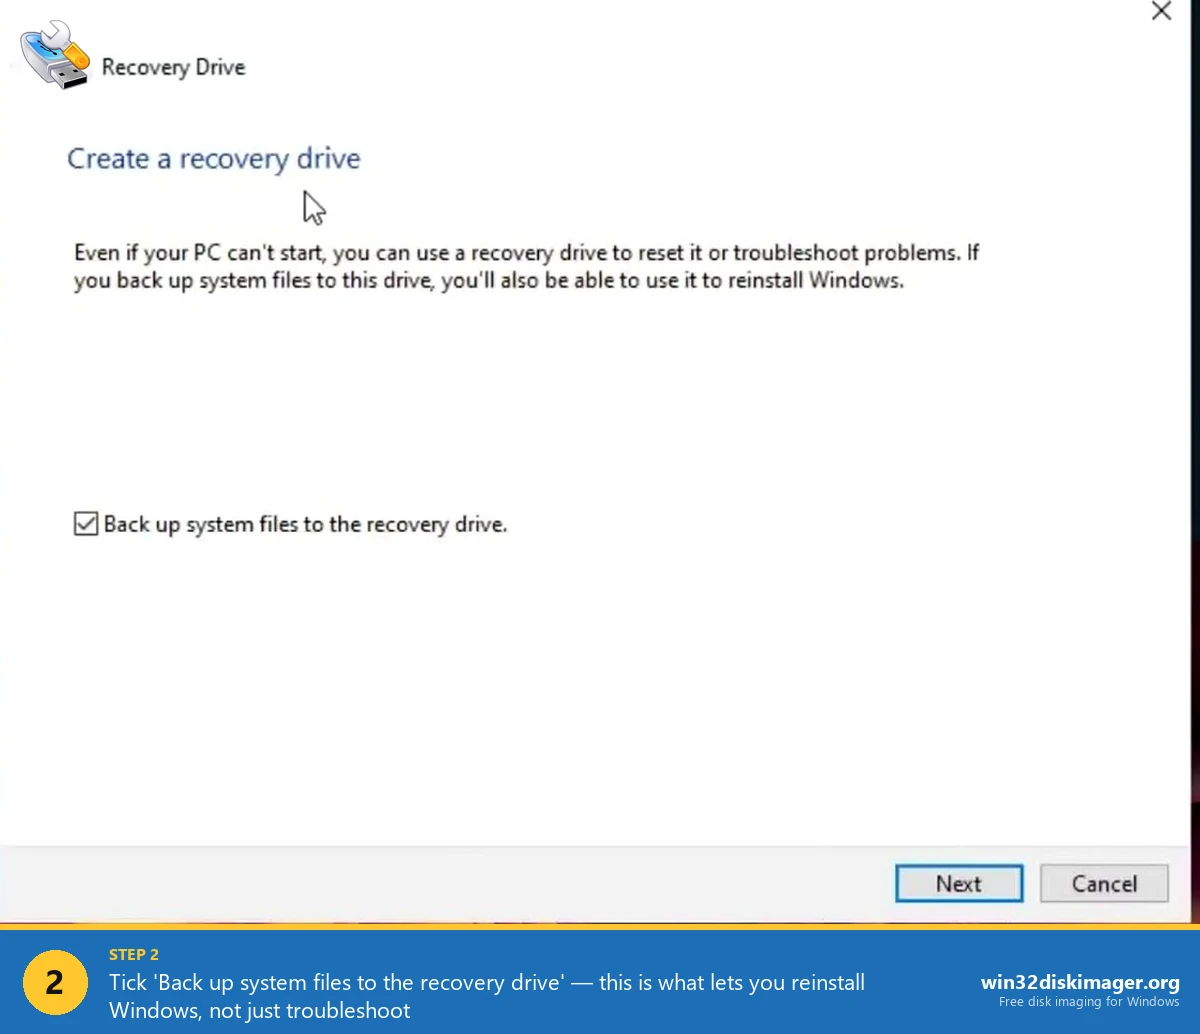
Always leave it checked. Without it, you get a 512MB troubleshooting USB with no actual Windows installer on it. With it checked, you get a full reinstall USB. The only reason to uncheck it is if you have a USB drive smaller than 16GB and are prepared to accept the limitation.
Click Next. The wizard scans for connected USB drives, shows you a list, asks you to pick one. Double-check the drive letter and label, because everything on that drive is about to die. Click Next again, then Create.
Go get coffee. On an SSD-equipped PC writing to a USB 3 stick, plan on ~20 min. On an older spinning-disk laptop writing to a USB 2 port, it can take over an hour.
What’s Actually on the Drive
If you plug the finished recovery drive into a working machine and browse it, you’ll see a FAT32 volume with:
bootmgrandbootmgr.efi— the UEFI and legacy bootloaders\EFI\— the EFI system partition contents\sources\—boot.wim(WinPE) andinstall.wimorinstall.esdif you ticked the checkbox\RecoveryImage\— the compressed OEM image on some branded PCs
This is structurally very close to what Win32 Disk Imager would produce if you wrote an official Windows 11 ISO to a USB, but with the OEM recovery image bolted on. The UEFI will happily boot from either.
Using It to Actually Recover
When the worst happens, plug the USB into the dead PC. Power on while tapping the one-time boot menu key. Every vendor is different:
- Dell: F12
- HP: F9 (or Esc then F9)
- Lenovo ThinkPad: F12 or the little Fn+F12, or the hardware button on some newer models
- Lenovo IdeaPad: the tiny NOVO pinhole button next to the power button
- ASUS: Esc or F8
- MSI: F11
- Surface: hold Volume Down while pressing Power
- Generic / custom build: F12, F11, F8, or Del to enter BIOS and change boot order
Pick the USB drive. The recovery environment boots into a blue Choose an option screen. From there:
- Troubleshoot → Advanced options → Startup Repair fixes most boot failures. First thing I try. Works maybe 60% of the time.
- Troubleshoot → Advanced options → Command Prompt lets you run
chkdsk,sfc /scannow /offbootdir=C:\ /offwindir=C:\Windows, orbootrec /fixmbr. Useful if you know what you’re doing. - Troubleshoot → Recover from a drive is the nuclear option. Wipes the target drive and reinstalls Windows from the image on the USB. Your files are gone unless you backed them up. But the PC comes back to life.
Common Gotchas
“We can’t create the recovery drive. A problem occurred when creating the recovery drive.” Classic. Usually one of three things: Secure Boot is interfering (disable temporarily), the WinRE environment on your install is missing or disabled (reagentc /info from an admin PowerShell will tell you), or the USB stick is failing. Try a different USB first, it’s usually that.
“USB drive isn’t showing up in the picker.” The tool only shows drives that look like USB mass storage. External SSDs in enclosures sometimes register as fixed disks and get skipped. Rare, but a real gotcha.
Recovery drive made on PC A doesn’t fully work on PC B. Correct. The OEM recovery image is tied to the machine it was made on. A Dell recovery USB will boot on an HP but the Recover from a drive option won’t reinstall Dell’s factory image. Startup Repair and Command Prompt still work cross-machine.
My recovery drive is now missing since a big update. After major feature updates (22H2 → 23H2, 23H2 → 24H2) the recovery drive becomes stale. The WinPE boots fine but the reinstall image is an old version. Rebuild it once a year and you’re golden.
Where This Fits Alongside Win32 Disk Imager
People sometimes ask if they should use Win32 Disk Imager to write a Windows ISO to USB instead. You can, but the result is not the same thing as a recovery drive. Disk Imager writes the ISO bit-for-bit, which gives you a clean Windows installer. No OEM drivers, no recovery image, no system files backup. Fine for a reinstall-from-scratch. Worse for quick troubleshooting.
My actual setup is one of each: a dedicated recovery drive for the specific machine (made via the tool above) and a separate generic Windows 11 installer USB written with Win32 Disk Imager from the official Microsoft ISO. Covers both cases.
FAQ
Can I use an SD card? No. The tool rejects anything that isn’t a proper USB mass storage device.
Does the recovery drive include my personal files? No. It only includes system files and the OEM image. Your documents are not backed up. Use File History or OneDrive for that.
Can I use one recovery drive for multiple PCs? For the Startup Repair / Command Prompt tools, yes. For the full reinstall image, only on the machine it was made on.
Does this still work on Windows 7? The old Win 7 System Repair Disc tool still works if you’re on Windows 7, but Win 7 is EOL. If you’re reading this in 2026 and still on 7, the real recommendation is upgrade. The classic Win 7 path was Win+R → control → Backup and Restore → Create a system repair disc, using a blank CD/DVD.
Wrap-Up
The modern Windows recovery drive is boring, quiet insurance. You make it once, drop it in a drawer, forget it exists, and then one day it saves your weekend. My rule: 16GB+ USB, Back up system files checked, redo it once a year, and label the stick clearly so you don’t accidentally write a Linux ISO over it later.
If you’re pairing it with a full bootable Windows installer, check out the companion guide on writing an ISO to USB with Win32 Disk Imager. Between the two, you’ve got every Windows recovery scenario covered.
Related Guides
Pair this guide with the rest of the Win32 Disk Imager knowledge base. These cover the adjacent workflows you’ll hit when working with disk images, bootable USBs, and Windows partition management.
- How to Use Win32 Disk Imager — Complete Beginner Guide — The full reference for the Win32 Disk Imager tool itself — install, UI walkthrough, and common workflows.
- Write an IMG File to USB with Win32 Disk Imager — Step-by-step for writing a .img or .iso to USB on Windows 10/11 with real benchmarks and error fixes.
- Shrink a Windows 11 Volume in Disk Management — Reclaim unallocated space from a partition for a dual-boot, game drive, or backup slot — plus the fix for tiny available-shrink-space.
- Hide a Partition in Windows 11 with Diskpart — Remove a drive letter via diskpart to keep a partition out of File Explorer. Casual hiding, not encryption.