My sister called me last month needing help. Her laptop’s USB ports were dead (all three, somehow, probably bad solder job on the port board), and she needed to reinstall Windows 11 because her OneDrive sync had corrupted and nothing else she tried fixed the boot loop. No bootable USB option. I talked her through installing Windows 11 directly from an ISO file mounted inside the running Windows, and 40 minutes later she was at a fresh desktop.
This is a trick a lot of people don’t know about: you can run setup.exe directly from a mounted ISO in a live Windows session. No USB needed, no DVD drive, nothing plugged in. Just the ISO file and the same machine you’re sitting at. It’s not a clean install in the traditional sense (you can’t format C: while Windows is running), but for upgrade, repair, and in-place reinstall scenarios, it’s the fastest path.
TL;DR: Download the Windows 11 ISO from microsoft.com/software-download/windows11 → double-click to mount it (Windows 11 handles ISO natively) → open the mounted drive in File Explorer → run setup.exe → follow the Keep everything / Remove everything prompts. Done in ~40 minutes.
When This Method Works (and When It Doesn’t)
Running setup.exe from within the running Windows gives you three install options:
- Keep personal files and apps. True in-place upgrade. Safest option. Almost everything survives. Good for fixing a borked system without losing work.
- Keep personal files only. Apps get wiped, Documents/Downloads/Desktop survive. Cleaner than option 1, useful when bloat or a broken app is the actual problem.
- Nothing. Functionally equivalent to a clean install. Everything in the user profile gets moved to
Windows.old. Apps wiped. Comes out feeling like a fresh PC, but your C: drive partition is still the same, you can’t repartition this way.
What this method can’t do:
- Format or repartition C:. That requires booting from external media (USB/DVD).
- Install Windows on a different partition than the current one.
- Fix scenarios where Windows can’t actually boot. If you’re stuck at BSOD or WinRE, you need a recovery USB.
- Bypass TPM/Secure Boot on unsupported hardware. The setup.exe path still enforces those checks.
Download the Windows 11 ISO from Microsoft
Go to microsoft.com/software-download/windows11. Scroll down to “Download Windows 11 Disk Image (ISO) for x64 devices.” Pick your language (match the one you have installed, otherwise the Keep files option won’t be available), click Confirm, then Download.
The current 24H2 ISO is about 5.5 GB. On a decent connection, 5-10 minutes. The link expires after 24 hours, so download and use it same-day if possible.
⚠️ Heads up: Don’t grab ISOs from third-party sites. There are perfectly legitimate reasons to rehost (massgrave.dev runs a transparent mirror), but amateur download sites often bundle modified ISOs with crypto miners. If the ISO isn’t from microsoft.com or from a file served with a published SHA-256 hash, skip it.
Mount the ISO
Windows 11 mounts ISOs natively. Right-click the downloaded Win11_24H2_EnglishInternational_x64.iso → Mount. Or just double-click it.
A new drive appears in This PC, usually D: or E: depending on existing drive letters. Icon looks like a DVD drive. This is the ISO’s contents exposed as if it were a mounted disc.

If the mount fails, the ISO file might be on a compressed/encrypted folder, or File Explorer might have a handler conflict (some apps like 7-Zip hijack the ISO extension). Easy fix: right-click → Properties → uncheck Read-only if set, Apply, try again. Or move the ISO to a non-compressed folder like Desktop.
Run setup.exe from Inside Windows
Open the mounted drive. You’ll see this file structure:
boot/(boot loaders, not relevant for in-place)efi/(UEFI boot files)sources/(where the Windows image lives)support/(checkers and helpers)autorun.infbootmgr/bootmgr.efi(BIOS/UEFI loaders)setup.exe← this is the one you want
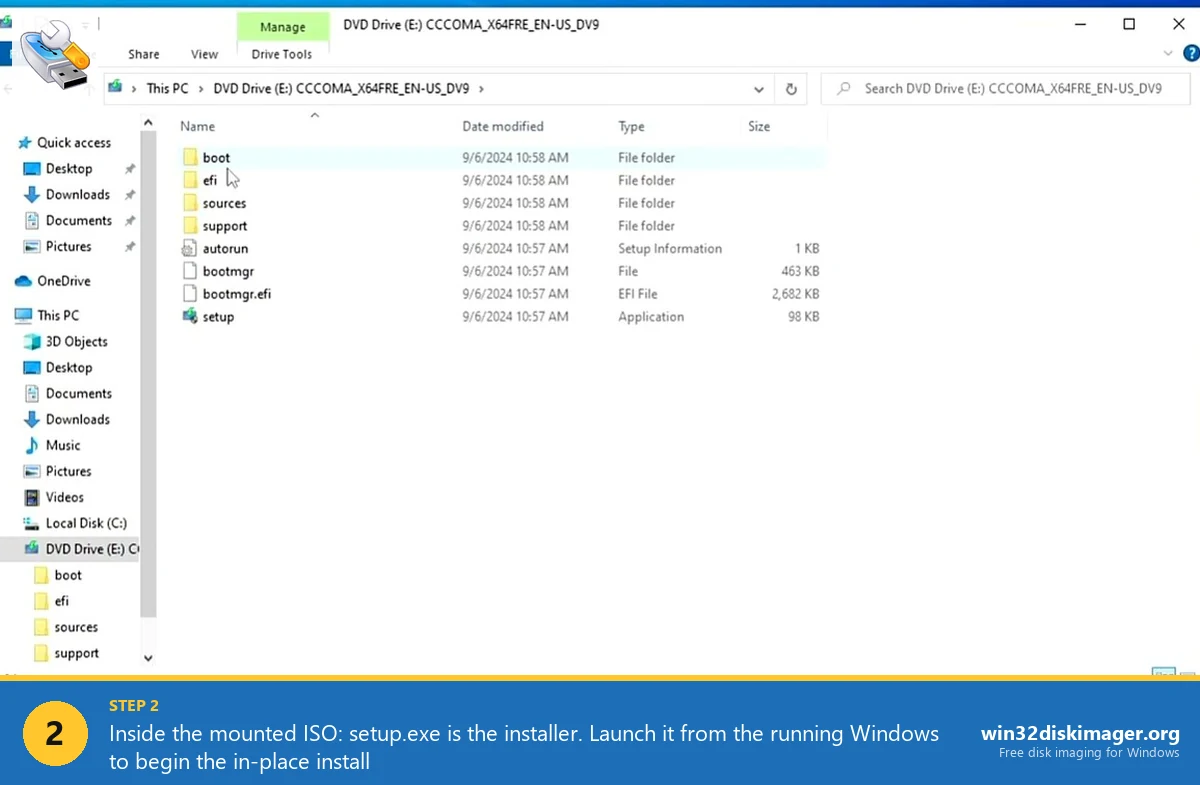
Double-click setup.exe. UAC prompt pops up. Yes. Windows 11 Setup splash appears. From here it’s the standard upgrade wizard.
First screen: “Install Windows 11 Setup.” Click Next.
Next: “Get important updates.” Either let it check online or skip for now. If your internet is slow, skip, you can update post-install. If you’re doing this because Windows Update is the thing that broke, definitely skip.
Then: EULA. Accept.
Next: the crucial screen. “Change what to keep.” Three options:
- Keep personal files and apps
- Keep personal files only
- Nothing
Pick based on what you’re trying to achieve. Click Next. The installer does a final compatibility check (this is where TPM/Secure Boot get validated), then “Ready to install.” Click Install.
The 40-Minute Wait
The machine reboots 2-3 times during the install. First reboot: the OS swap happens. Second: config and device drivers load. Third: OOBE (Out-Of-Box Experience) or directly back to your desktop.
Typical timing on a modern SSD:
- Copy files: 5-8 minutes
- Install features and drivers: 15-25 minutes
- Config: 5-10 minutes
Total 30-45 min on NVMe, longer on HDDs. Don’t interrupt this, force-restart during the feature install phase leaves you in a state where Windows won’t boot either version.
The Windows.old Folder
After a clean install (Nothing option), your previous Windows install lives at C:\Windows.old. It’s the old Windows folder, your old user profile, and old Program Files, kept for 10 days so you can roll back.
Takes up whatever your previous install used, typically 20-40 GB. If you need that space back before the 10-day auto-cleanup:
Settings → System → Storage → Temporary files → tick “Previous Windows installation(s)” → Remove files. Gone.
Before you nuke Windows.old, grab anything from it that didn’t migrate: browser profiles (buried in Windows.old\Users\Name\AppData\Local\Google\Chrome\User Data), game saves, Outlook .ost and .pst files.
Making an IMG Backup Before You Start
Non-negotiable rule: back up before reinstalling. I don’t care if it’s “just” a Keep files install. Unknown unknowns strike during Windows setup all the time.
Quickest path: image the current C: to an external drive with Win32 Disk Imager. Read the C: drive to an IMG file on a USB stick or network share. 30 GB of used C: space compresses down to about 20 GB in a fresh IMG. If the install goes sideways, you can write the IMG back and be exactly where you were an hour ago.
Alternative: Macrium Reflect Free (if you have it from before it went paid), Acronis Cyber Protect, or the built-in wbAdmin start backup command for a system image.
FAQ
Can I install Windows 11 from an ISO without a Microsoft account?
For the in-place setup.exe path, yes, if you’re keeping your existing account, which is already local or MSA-linked. For a Nothing / clean install path through this method, you’ll hit OOBE and the forced Microsoft account. Bypass by pressing Shift+F10 at the first OOBE screen → oobe\bypassnro in the command prompt → reboot → pick “I don’t have internet” during setup.
Does setup.exe require admin rights?
Yes. UAC will prompt. If you’re on a managed/enterprise machine without admin, you can’t do this, talk to IT.
Will this method bypass TPM 2.0 / Secure Boot requirements?
No. The in-place setup.exe path enforces the same hardware checks as the USB installer. If your CPU is older than 8th-gen Intel or Ryzen 2000, you’ll fail the compat check. Workarounds exist (registry bypass, Rufus’ modified installer), but the stock ISO + stock setup.exe won’t budge.
Can I install a different Windows edition this way?
Partially. setup.exe matches the edition of your current install (Home, Pro, Enterprise). To change edition, you’d need a product key for the target edition, not a different ISO, Windows 11 ISOs contain all editions.
What if my C: drive doesn’t have enough free space?
You need at least 15-20 GB free to run the upgrade. If you’re short, Windows will tell you upfront and refuse. Free up space by deleting temp files, uninstalling unused apps, or moving Downloads to another drive. Storage Sense (Settings → System → Storage) can clear 5-10 GB automatically.
Wrapping Up
Running setup.exe from a mounted ISO is the most underrated Windows install trick. No USB, no boot media, no BIOS fiddling. It fixes a lot of “Windows is broken but not totally dead” scenarios in under an hour. Keep an ISO downloaded on a secondary drive or Win32 Disk Imager backup and you’ve got a recovery path that doesn’t require raiding your drawer for a spare USB stick.
Related Guides
Pair this guide with the rest of the Win32 Disk Imager knowledge base. These cover the adjacent workflows you’ll hit when working with disk images, bootable USBs, and Windows partition management.
- Create a Windows 11 Recovery Drive (USB) — Modern Win 10/11 replacement for the old System Repair Disc. Reinstalls Windows from a single USB when the boot drive dies.
- Write an IMG File to USB with Win32 Disk Imager — Step-by-step for writing a .img or .iso to USB on Windows 10/11 with real benchmarks and error fixes.
- How to Use Win32 Disk Imager — Complete Beginner Guide — The full reference for the Win32 Disk Imager tool itself — install, UI walkthrough, and common workflows.
- Partition a Hard Drive in Windows 11 (Disk Management + Diskpart) — Carve a 2 TB NVMe into C: for Windows and D: for data using Disk Management, diskpart, and the immovable-files shrink fix.