So my little brother dropped a folder of 3,800 RAW photos from a wedding shoot onto my old laptop last month, and File Explorer basically died for about 40 seconds every time I opened it. Just sat there. White screen. Spinning. Nothing.
I’d hit this same wall years ago on Windows 7 and Vista, and the fix back then was burying the right checkbox under Organize > Folder and Search Options. On Windows 11 it’s still there, just moved around a bit and renamed to File Explorer Options. I’ve been toggling it on both my daily driver (11 Pro 23H2) and a cheap spare laptop (10 22H2) for maybe a decade now, so here’s the clean version for 2026, plus the three other ways to do it that nobody really talks about.
TL;DR: Open File Explorer → click the three-dot menu → Options → View tab → tick Always show icons, never thumbnails → Apply. That’s it for the UI route. Registry and Group Policy versions at the bottom if you need them pushed out to a whole fleet.
Why You’d Actually Want Thumbnails Off
Three reasons, in the order most people hit them.
Performance on spinning drives and slow SSDs. Windows has to read the first few MB of every image, video, and PDF to generate a preview, cache it to thumbcache_*.db, and then render. On a folder with a few thousand RAW files on a 5400 RPM HDD, you’re looking at 30+ seconds of seek time before anything appears. Icons render instantly. I noticed this most on an old mechanical-drive mini PC I use as a backup target. Switching to icons-only took folder open time from ~22s to under a second.
Privacy at work. If you open a folder of screenshots in front of your boss, it doesn’t matter if every file is named Screenshot_2026-03.png. They can still read what’s in them. Forcing icon view is a quick way to make a folder readable without being scannable. Not bulletproof, but it buys you a second to scroll.
Corrupted thumbnails. Every once in a while the thumbcache database gets wedged and you get gray squares, wrong thumbnails, or that infamous “This file does not have a program associated with it” ghost. Turning thumbnails off, clearing the cache, turning them back on usually fixes it. More on that in the troubleshooting section.
The Main Method: File Explorer Options (Windows 10 & 11)
Works identically on Win 10 and Win 11 despite the ribbon vs. command bar redesign. I’ll walk through the Win 11 path since that’s where the UI differs the most from the old Win 7 screenshots floating around.
Open any File Explorer window (Win+E if you’re a keyboard person). On Windows 11 you’ll see a row of icons at the top with a … three-dot “See more” menu on the right. Click it, then click Options. On Windows 10 it’s under the View ribbon tab → Options → Change folder and search options.
The dialog that pops up is titled File Explorer Options on Win 11, Folder Options on Win 10. Same thing under the hood. Click the View tab at the top.
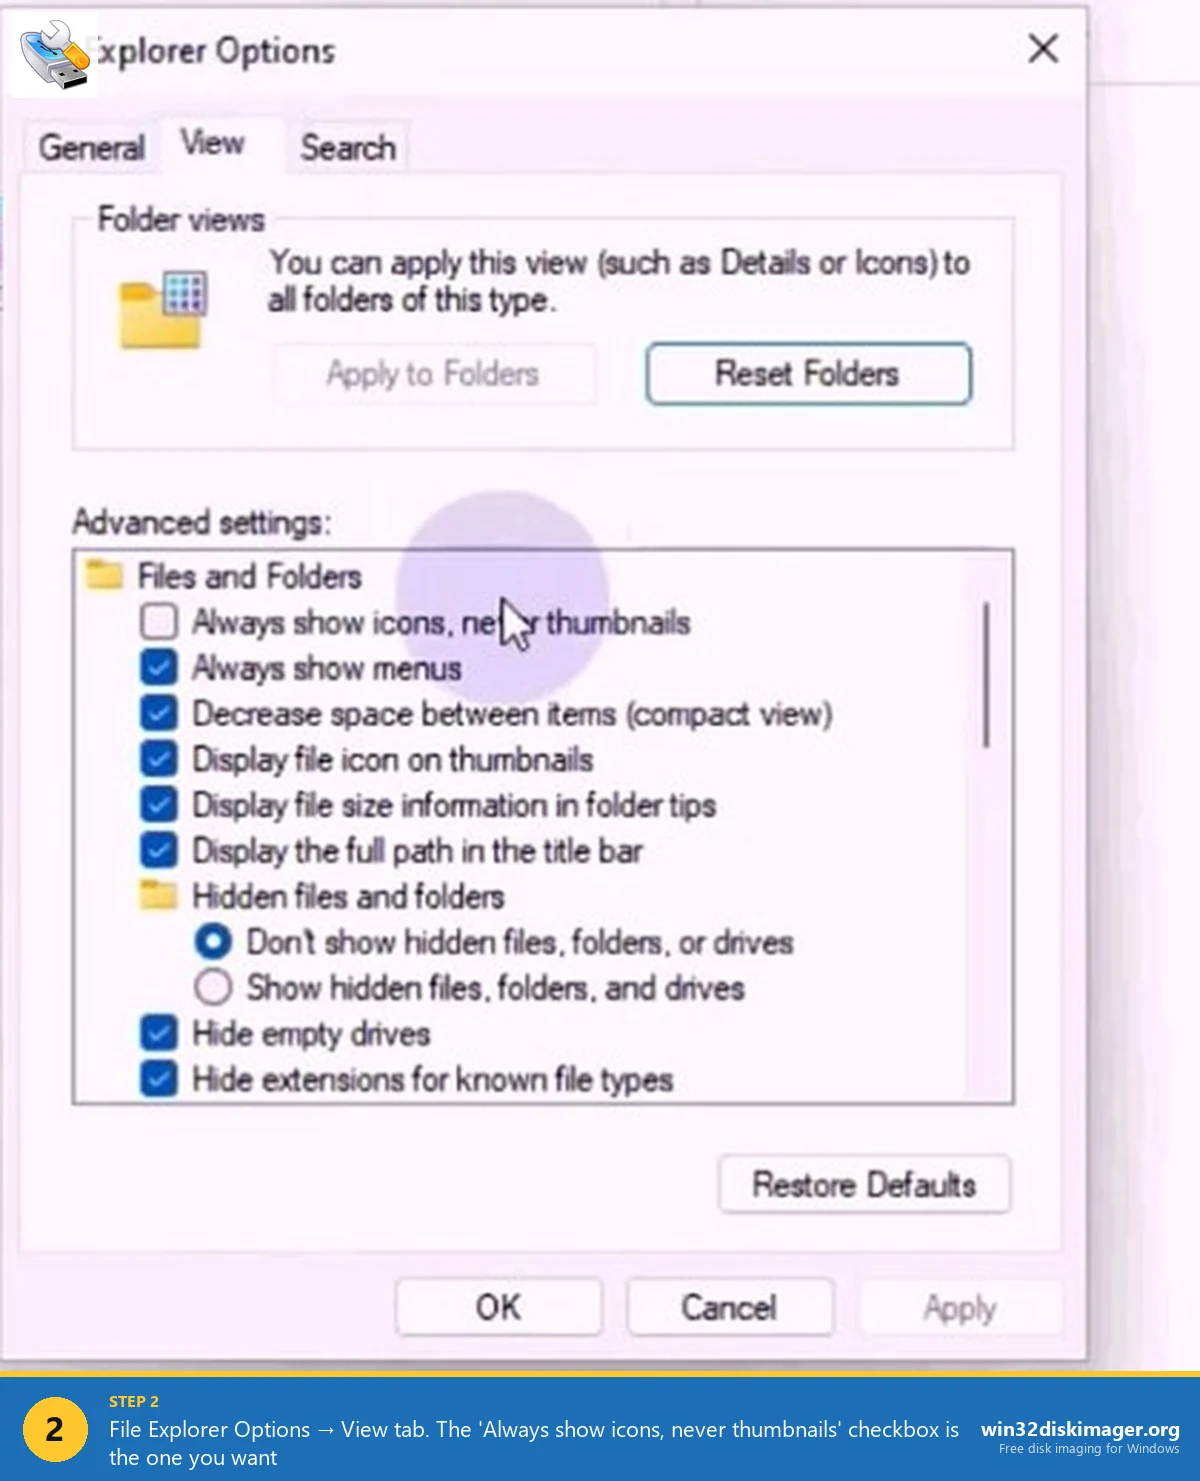
Under Advanced settings the very first checkbox is Always show icons, never thumbnails. It’s a double negative and it trips people up every time. Checked = thumbnails OFF. Unchecked = thumbnails ON.
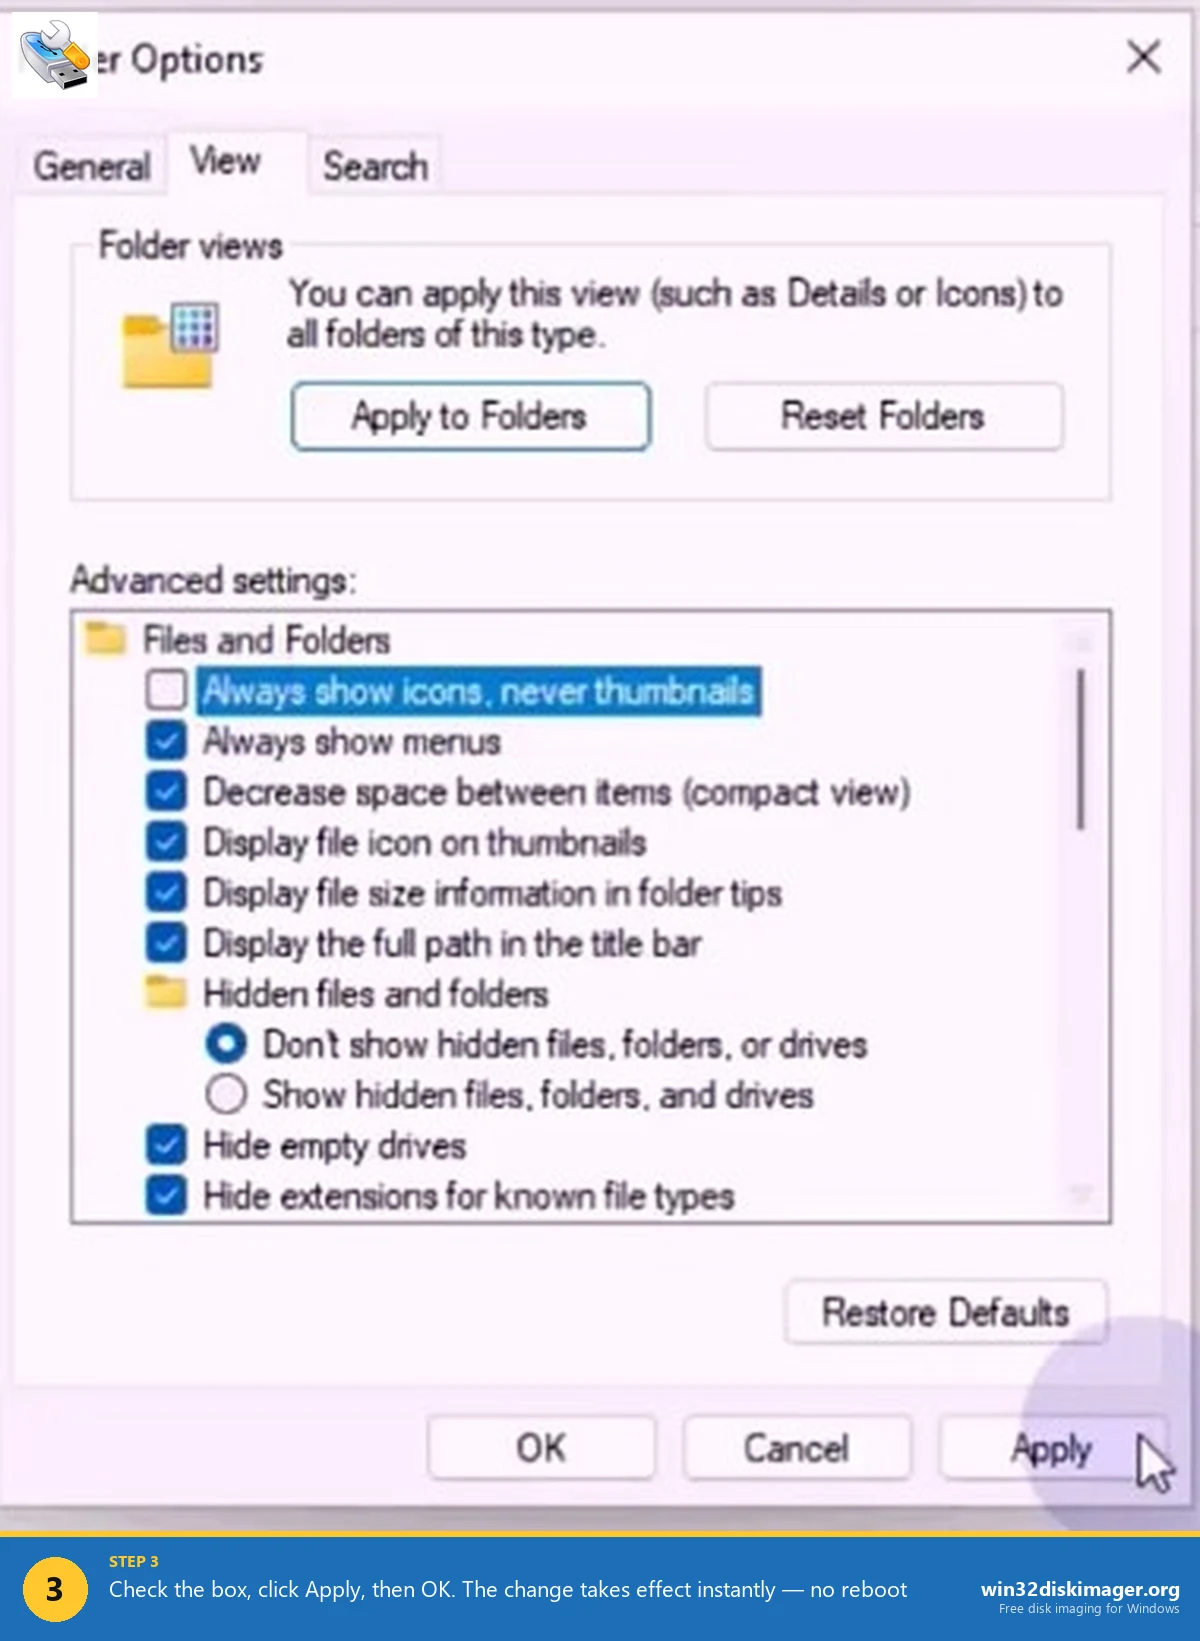
Tick it, click Apply, then OK. The change is instant. No sign-out, no reboot. Open the folder that was lagging and it’ll render icons in a blink.
💡 Pro tip: the same dialog has Display file icon on thumbnails a few rows down. If you leave thumbnails on but disable that, you get a preview without the little program-type badge overlay. Cleaner look for screenshot folders.
The Performance Options Shortcut (Both Settings in One Place)
There’s a second checkbox buried in the old Windows visual-effects panel that controls the exact same thing, and it’s the one I personally use because it also sits next to animations, smooth scrolling, and the other visual toggles.
Hit Win+R, type sysdm.cpl, Enter. Advanced tab → Performance → Settings. Under Visual Effects, find Show thumbnails instead of icons. Uncheck it. Apply. Done.
This toggle and the File Explorer Options toggle write to different registry keys but produce the same visual result. If you check one and it doesn’t seem to stick, check the other. They can occasionally disagree after a feature update.
Group Policy (for IT folks pushing this to users)
On Pro, Enterprise, or Education editions, run gpedit.msc. Navigate to:
User Configuration → Administrative Templates → Windows Components → File Explorer
The policy you want is Turn off the display of thumbnails and only display icons. Set to Enabled. There’s a sibling policy, Turn off the display of thumbnails and only display icons on network folders, which does what it says on the tin. I use that one on any machine connected to a slow NAS because Windows will otherwise download every preview over SMB and it’s unbearable.
Home edition users, you don’t have gpedit. Skip to the registry method below.
Registry Method (Works on Home Too)
Back up first. I’m serious. Any registry edit deserves a quick export before you touch it.
Open regedit, navigate to:
HKEY_CURRENT_USER\Software\Microsoft\Windows\CurrentVersion\Explorer\Advanced
Find (or create, as DWORD 32-bit) a value named IconsOnly. Set it to 1 to disable thumbnails, 0 to enable. Sign out and back in, or restart explorer.exe from Task Manager.
If you want to push it to all users on a box, do the same thing under HKEY_LOCAL_MACHINE\Software\Microsoft\Windows\CurrentVersion\Policies\Explorer with a DWORD named DisableThumbnails = 1.
Fixing Broken Thumbnails (The Real Reason Most People Land Here)
I’ll be honest, about half the people googling this aren’t trying to disable thumbnails for good, they’re trying to fix a folder where thumbnails are blank, wrong, or only showing for some files. That’s almost always the thumbnail cache corrupting itself.
Fix sequence that works for me every single time:
- Disable thumbnails using the File Explorer Options method above.
- Open Disk Cleanup (
cleanmgr.exe) → select your system drive → tick Thumbnails → OK. This wipes%LocalAppData%\Microsoft\Windows\Explorer\thumbcache_*.db. - Restart explorer.exe (Ctrl+Shift+Esc, find Windows Explorer, Restart).
- Re-enable thumbnails.
- Reopen the folder. Windows rebuilds the cache fresh.
Worked on my 2018 Surface Pro that had been showing the wrong cover art for half my MP4 library for months. One pass and it was sorted.
Common Gotchas
The setting won’t stick after Windows Update. Happened to me twice after feature updates (22H2 → 23H2 on my Pro machine). Re-applying always works. I suspect the update resets a few Explorer prefs. Not 100% sure but it’s consistent enough that I just expect it now.
Desktop icons still show thumbnails. The desktop is weirdly not covered by the global toggle in every Windows build. Right-click desktop → View → uncheck Show desktop icons and re-enable, or restart explorer.
Video thumbnails specifically missing. That’s usually a missing codec rather than the thumbnail setting. Install HEVC Video Extensions from the Store (or icaros for a brute-force fix) and it’ll come back.
FAQ
Will disabling thumbnails save disk space? A little. The thumbcache files on my main box are about 180 MB combined. Not life-changing, but if you’re on a cramped 128 GB SSD it adds up.
Does this affect the Photos app preview? No. The setting only controls File Explorer. Photos, Gallery, and third-party viewers generate their own previews.
Is there a way to disable thumbnails per-folder? Not through the UI. You can tag a folder as a specific template type (Right-click → Properties → Customize → Optimize this folder for: General items / Documents) which indirectly affects what Explorer tries to render, but there’s no one-click per-folder kill switch.
What about Windows 7 and Vista? If you’re still on those, click Organize → Folder and Search Options → View tab → same checkbox. Or Tools → Folder Options if the classic menu bar is visible. The setting name hasn’t changed in 15 years.
Wrap-Up
For a toggle that’s been around since Vista, thumbnail preview still causes more slow-folder complaints than almost any other Explorer setting. If you’re on mechanical storage, a slow SSD, or anything networked, turning it off is probably the single biggest Explorer perf win you can get without installing anything.
I keep it off by default on every machine I set up, then turn it back on folder-by-folder when I actually need to see image previews. Takes two seconds and saves a lot of staring at spinning cursors.
Related Guides
Pair this guide with the rest of the Win32 Disk Imager knowledge base. These cover the adjacent workflows you’ll hit when working with disk images, bootable USBs, and Windows partition management.
- Processor Scheduling: Programs vs Background Services — Flip the Win32PrioritySeparation setting for headless servers, Plex boxes, and CI runners.
- Shrink a Windows 11 Volume in Disk Management — Reclaim unallocated space from a partition for a dual-boot, game drive, or backup slot — plus the fix for tiny available-shrink-space.
- How to Use Win32 Disk Imager — Complete Beginner Guide — The full reference for the Win32 Disk Imager tool itself — install, UI walkthrough, and common workflows.